基于Hexo7.3.0+Next8.20.0+TiDB搭建博客平台
Hexo与NextT搭建创作平台
版本信息统计:
| 名称 | 版本 | 地址 |
|---|---|---|
| Hexo | 7.3.0 | https://github.com/hexojs/hexo |
| Next | 8.20.0 | https://github.com/next-theme/hexo-theme-next |
| Waline | https://github.com/walinejs/waline https://waline.js.org/ |
|
| waline/client | v3.3.0 | |
| waline/vercel | v1.32.1 | |
| MongoDB |
搭建流程
安装Node.js
Windows 下可以从 Node.js Download 处选择 Windows Installer 下载msi安装包
node-v20.16.0-x64.msi:
安装Git
Windows 下可以从 Git Download 处下载 Git for Windows 安装包
Git-2.46.0-64-bit.exe
安装过程,一路用默认即可:
1 | E:\GTMC\blog>git -v |
安装pandoc
这个不是插件,而是装在windows上的程序:
pandoc-3.3-windows-x86_64.msi
1 | E:\GTMC\blog>pandoc -v |
如果在命令行执行命令的时候,找不到命令或者版本不对,则需要系统系统环境变量。
安装Hexo
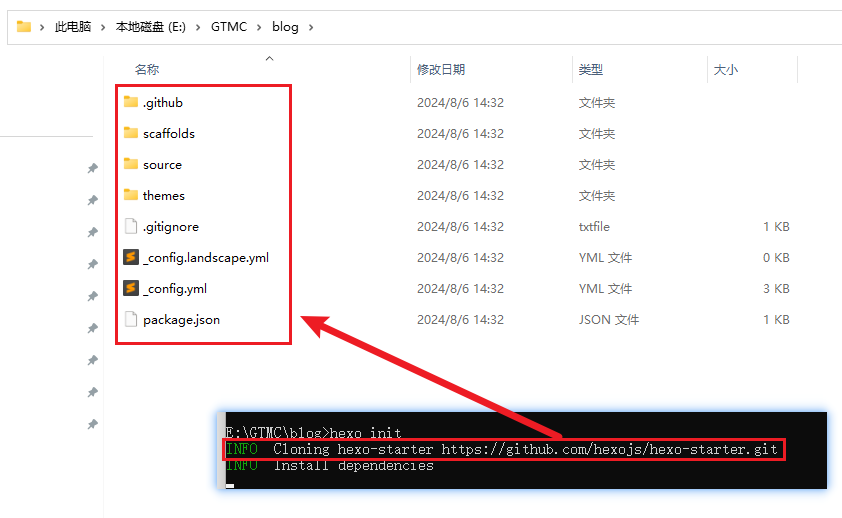
选择一个用来创建博客的目录,在该目录下使用 CMD 命令行窗口:
选择的目录:E:\GTMC\blog>
1 | # 切换到用来创建博客的目录 |
查看Hexo版本
可以通过命令 hexo -v 查看当前hexo的版本信息:
1 | E:\GTMC\blog>hexo -v |
建站
1 | # 切换到用来创建博客的目录 |
如果命令执行比较卡,建议把vpn设置为全局模式,并且在执行hexo init命令的cmd窗口,先执行这两条命令:
1 | set https_proxy=http://127.0.0.1:7890 |
怎么判定是否设置成功:
1 | curl -vvvk https://www.google.com |
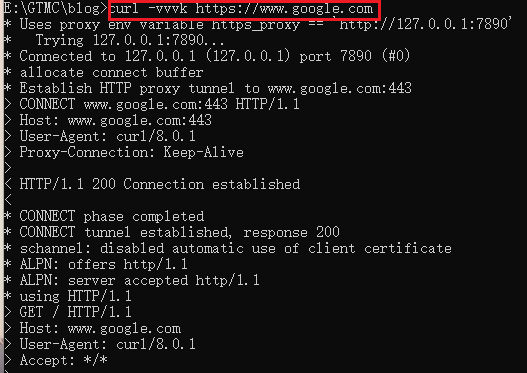
出现如图所示,google访问成功的信息,说明设置成功。
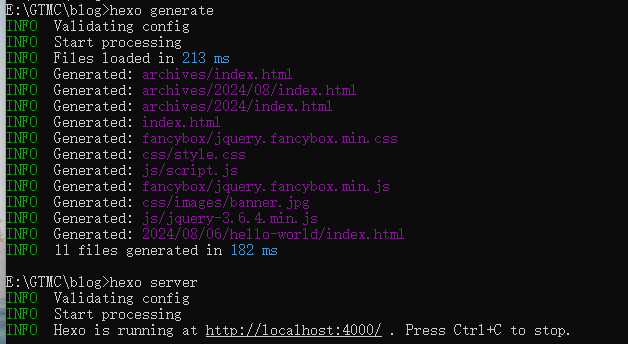
生成静态页面
1 | hexo generate |
启动服务
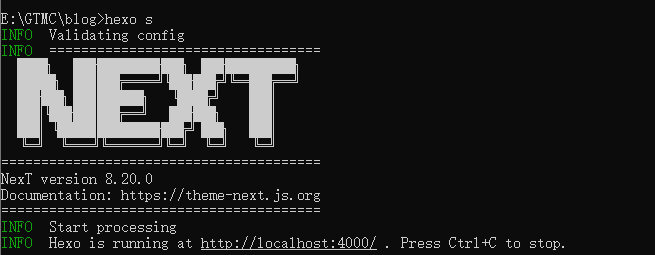
1 | hexo server |
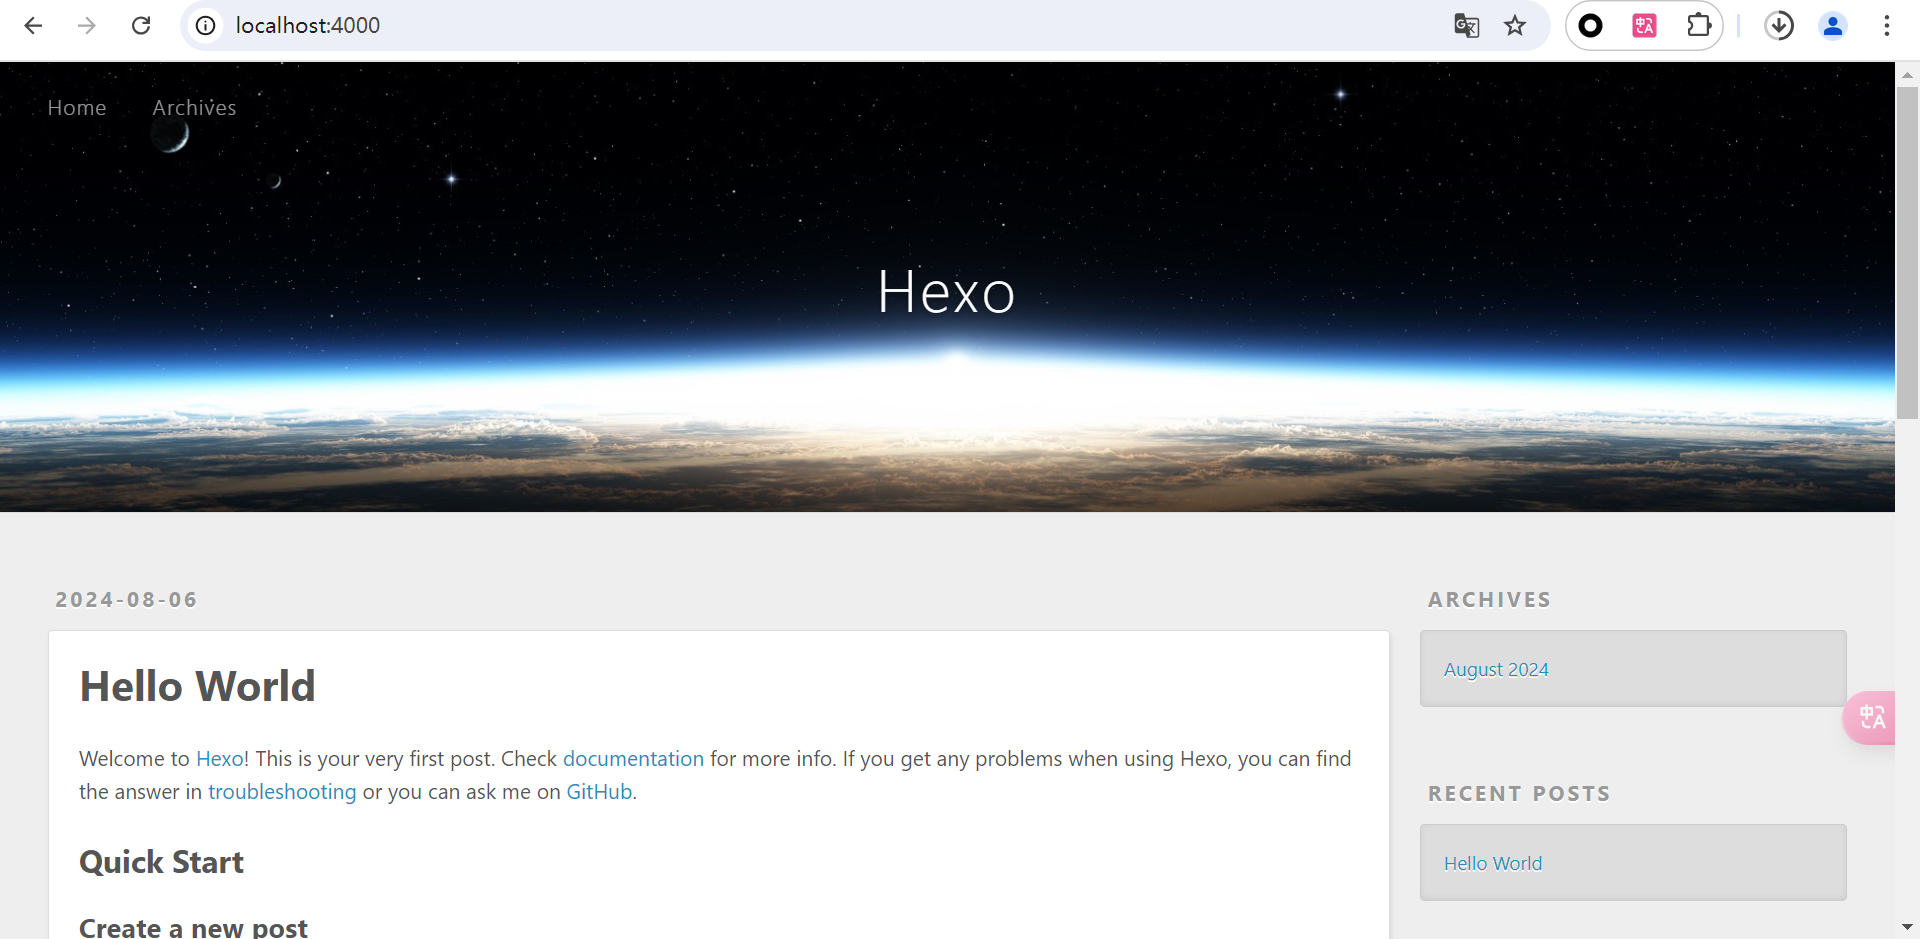
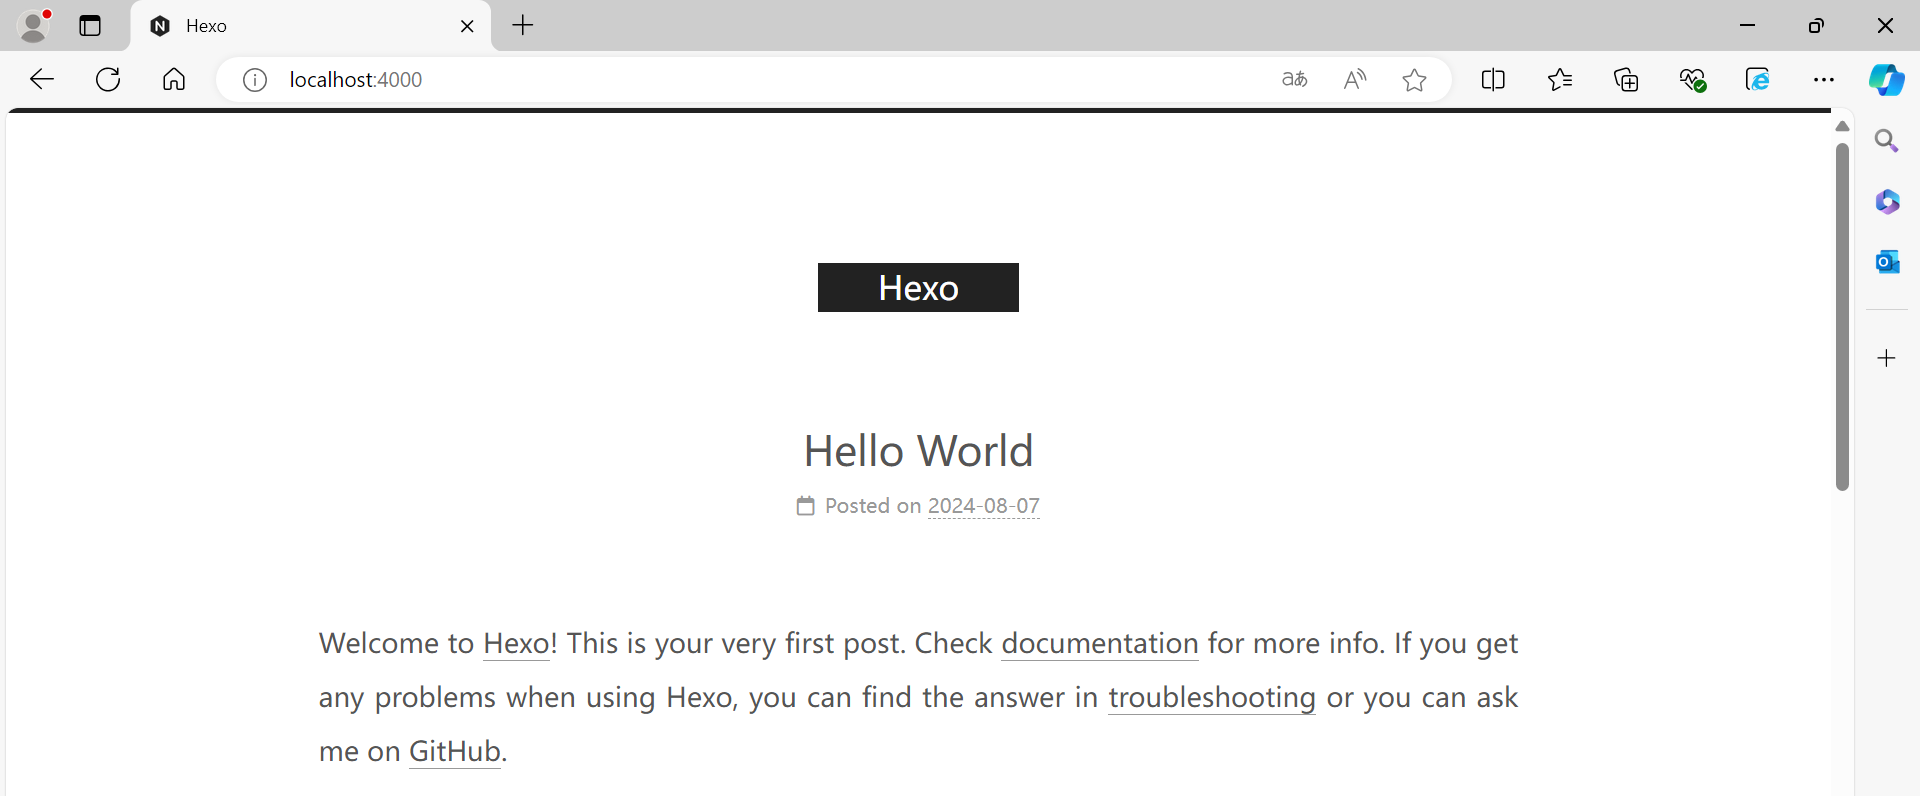
默认页面:
Hexo配置
更换主题
这里有三个NextT版本:
- https://github.com/iissnan/hexo-theme-next
- https://github.com/theme-next/hexo-theme-next
- https://github.com/next-theme/hexo-theme-next
新手真的有点犯迷糊。
第一个版本的star好高,具体不清楚。
第二、三个版本,这里有说明:
https://github.com/next-theme/hexo-theme-next/issues/36
https://github.com/next-theme/hexo-theme-next/issues/4#issuecomment-626205848
- 简单来说,问题就是 theme-next 团队的 owner 始终拒绝向其它任何团队成员提供足够的权限,且 owner 本人自 2019 年 10 月起已连续半年不在线,导致其它活跃的团队成员无法管理仓库,也无法邀请新的成员。
由于对 theme-next 团队的未来不抱有期望,我作为 theme-next 的主要贡献者,自 2020 年 4 月起停止为旧的仓库贡献代码,并创建了新的组织,以确保维护工作正常进行。- 只要能够收到足够多的 Bugfix / Feature Request,每月更新肯定不是问题。
- 目前已经发布的版本在这里: https://github.com/next-theme/hexo-theme-next/releases
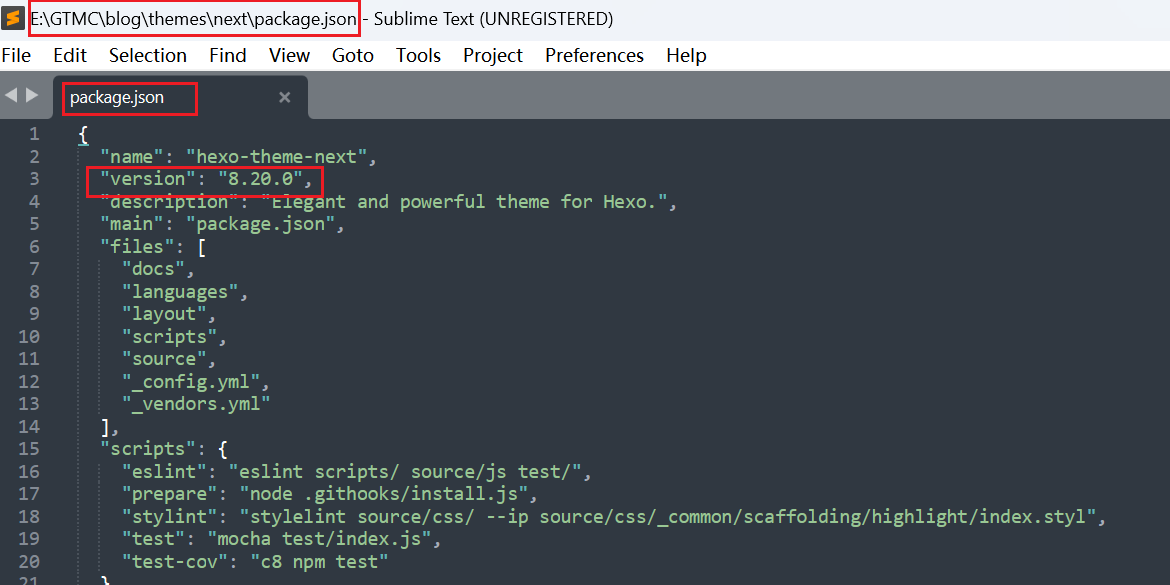
接下来的安装,都是基于第三个版本的Next进行的:
1 | git clone https://github.com/next-theme/hexo-theme-next themes/next |
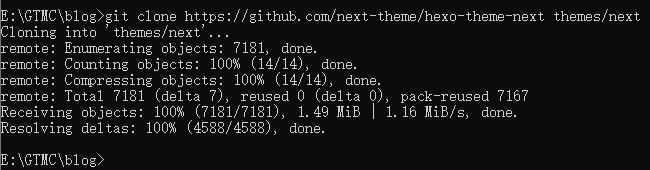
1 | E:\GTMC\blog>git clone https://github.com/next-theme/hexo-theme-next themes/next |
在站点站点根目录下打开 _config.yml,找到 theme 字段,将 theme: landscape 改为 theme: next ,然后再次执行 hexo g 来重新生成。
主题设置
关于主题的配置可直接参考NexT官网的配置流程 开始使用-NexT ,这里我会把自己在配置时的操作简单记录,仅供大家参考。
在 Hexo 中有两份主要的配置文件,其名称都是 _config.yml。 其中:
- 一份位于站点根目录下,主要包含 Hexo 本身的配置;
E:\GTMC\blog\_config.yml
- 另一份位于主题目录下,这份配置由主题作者提供,主要用于配置主题相关的选项
E:\GTMC\blog\_config.next.yml
为了描述方便,在以下说明中,将前者称为 站点配置文件, 后者称为 主题配置文件。
重点:
把E:\GTMC\blog\themes\next下的_config.yml拷贝到E:\GTMC\blog下,且重命名为_config.hext.yml。
接下来针对NextT这个主题的设置,都是围绕着_config.hext.yml这个配置文件展开。
选择Scheme
借助于 Scheme,NexT 提供了多种不同的外观。目前 NexT 支持三种 Scheme :
- Muse - 默认 Scheme,这是 NexT 最初的版本,黑白主调,大量留白
- Mist - Muse 的紧凑版本,整洁有序的单栏外观
- Pisces - 双栏 Scheme,小家碧玉似的清新
- scheme: Gemini
Scheme 的切换通过更改 主题配置文件 ,搜索 scheme 关键字。 你会看到有三行 scheme 的配置,将你需要启用的 scheme 前面注释 # 去掉即可。
当修改后,再次启动hexo时,页面出现这个提示:

原因:
原因是hexo在5.0之后把swig给删除了需要自己手动安装,我们的hexo版本为hexo: 7.3.0。
解决办法:
1 | npm i hexo-renderer-swig |
再次启动:
设置 语言
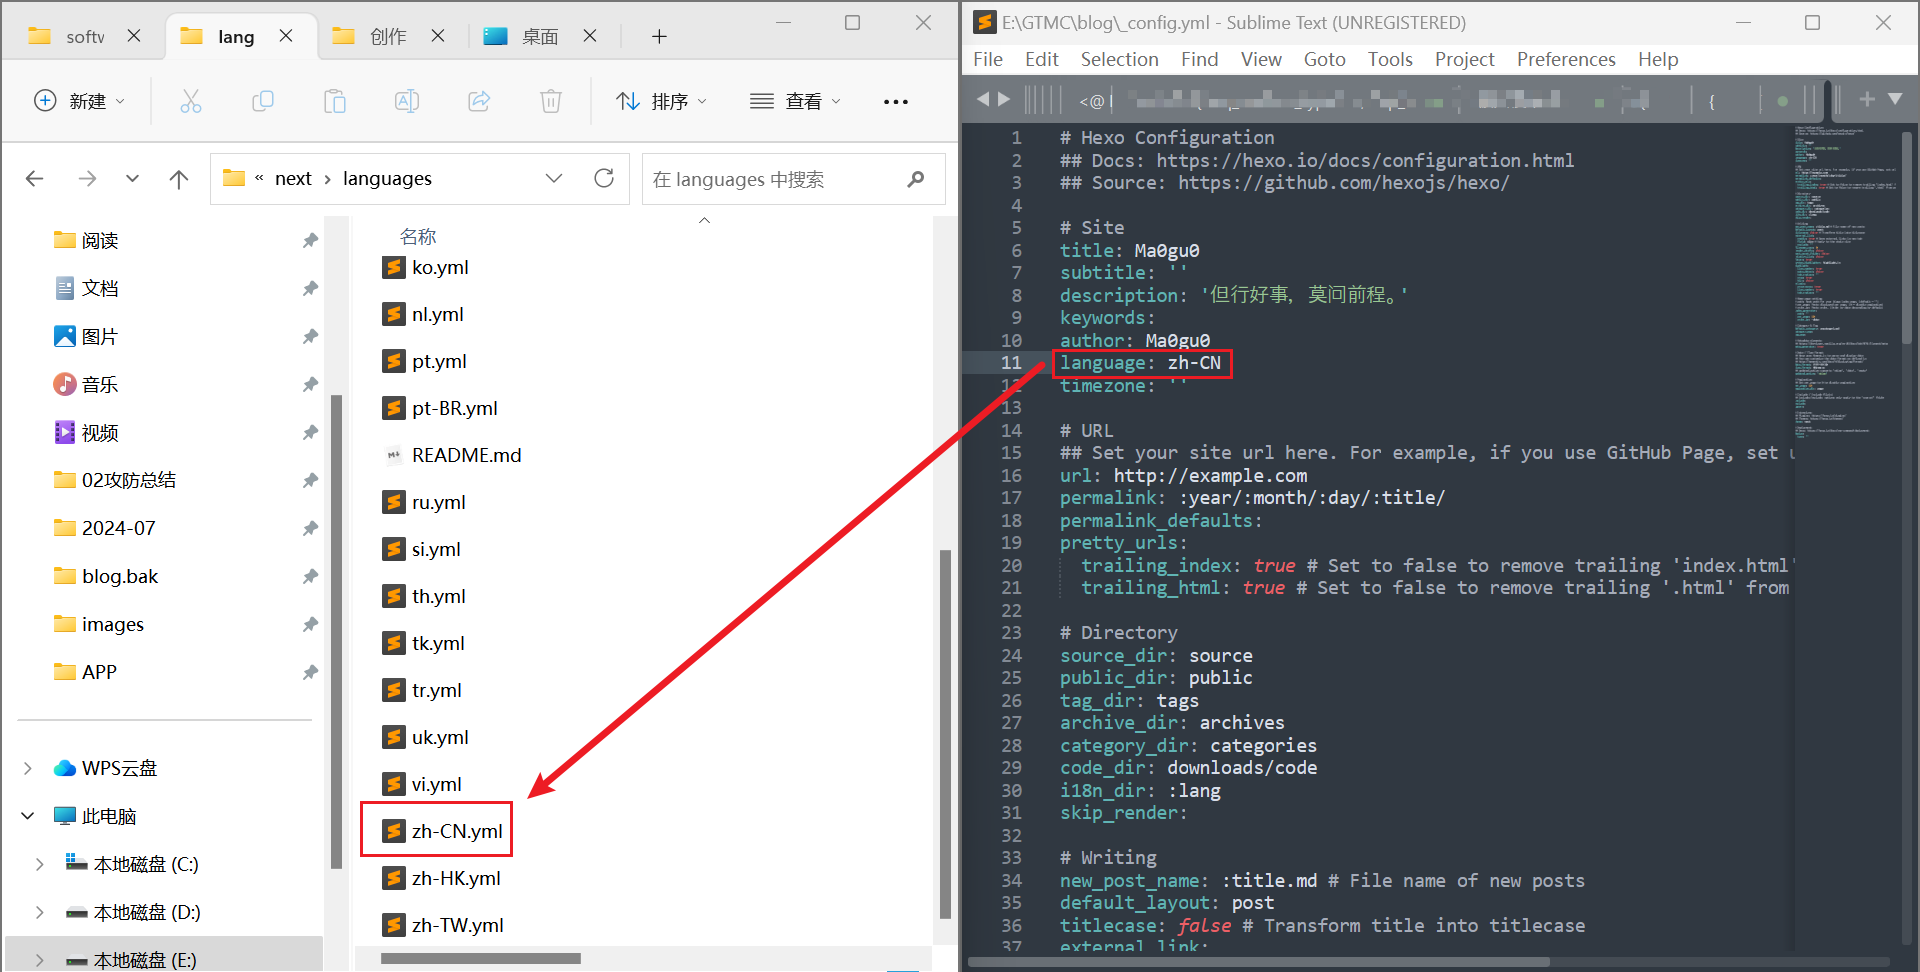
编辑 站点配置文件(E:\GTMC\blog\_config.yml), 将 language 设置成你所需要的语言。这里我选择了简体中文,配置如下:
1 | language: zh-CN |
设置 菜单
菜单即是你的导航菜单,我们可以设置菜单项的 显示名称和 链接 以及 菜单项对应的图标 。
我们可以在 主题配置文件 中来修改,对应的字段是 menu 。我的配置如下:
1 | menu: |
菜单项的显示文本放置在 NexT 主题目录下的 languages/{language}.yml ({language} 为你所使用的语言)。
菜单项的图标,对应的字段是 menu_icons。我们可以通过 enable 来控制是否显示图标。
我们也可以添加自己的链接,只要把上面的 名称-链接-图标 三者对应好即可。
请注意键值(如
home)的大小写要严格匹配
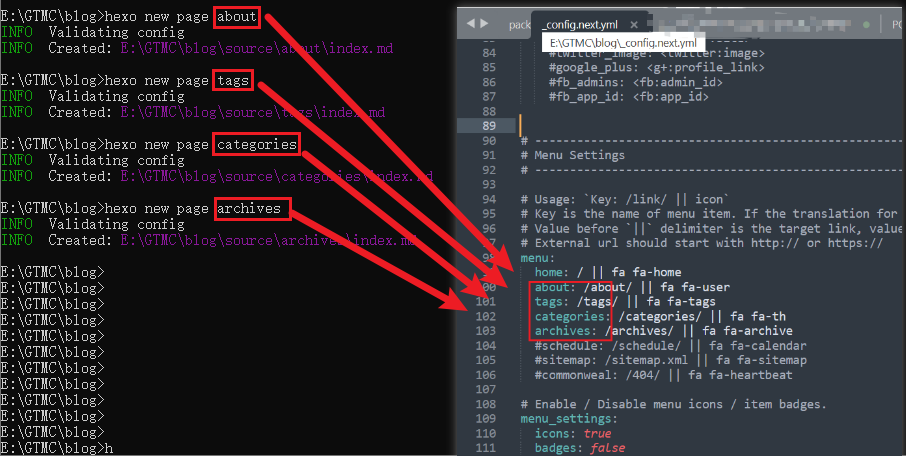
注意,如果在设置好菜单并且使用hexo new page xxx生成相关页面,并且对应的md文件都修改好了,重启启动后,访问页面出现类似这个报错:
需要检查一下主题配置文件中,menu部分是否存在空格:

以下是标准的:
1 | menu: |
设置 头像
编辑 主题配置文件, 编辑字段 avatar, 值设置成头像的链接地址。
我们可以将自己的头像图片文件上传到主题目录下的 source/uploads/ 目录下(新建uploads目录若不存在) 或 source/images/ 目录下。完整的目录就是 your-hexo-site\themes\next\source\images\ 下。
然后将 avatar 字段配置如下:
1 | # Sidebar Avatar |
或者也可以使用网络上的头像来进行设置:
1 | avatar: http://example.com/avatar.png |
设置 作者昵称及站点描述
编辑 站点配置文件, 设置 author 为你的昵称。
编辑 站点配置文件, 设置 description 字段为你的站点描述。
1 | # Site |
设置代码高亮主题
NexT支持的主题,可以通过这个链接获取:https://theme-next.js.org/highlight/。
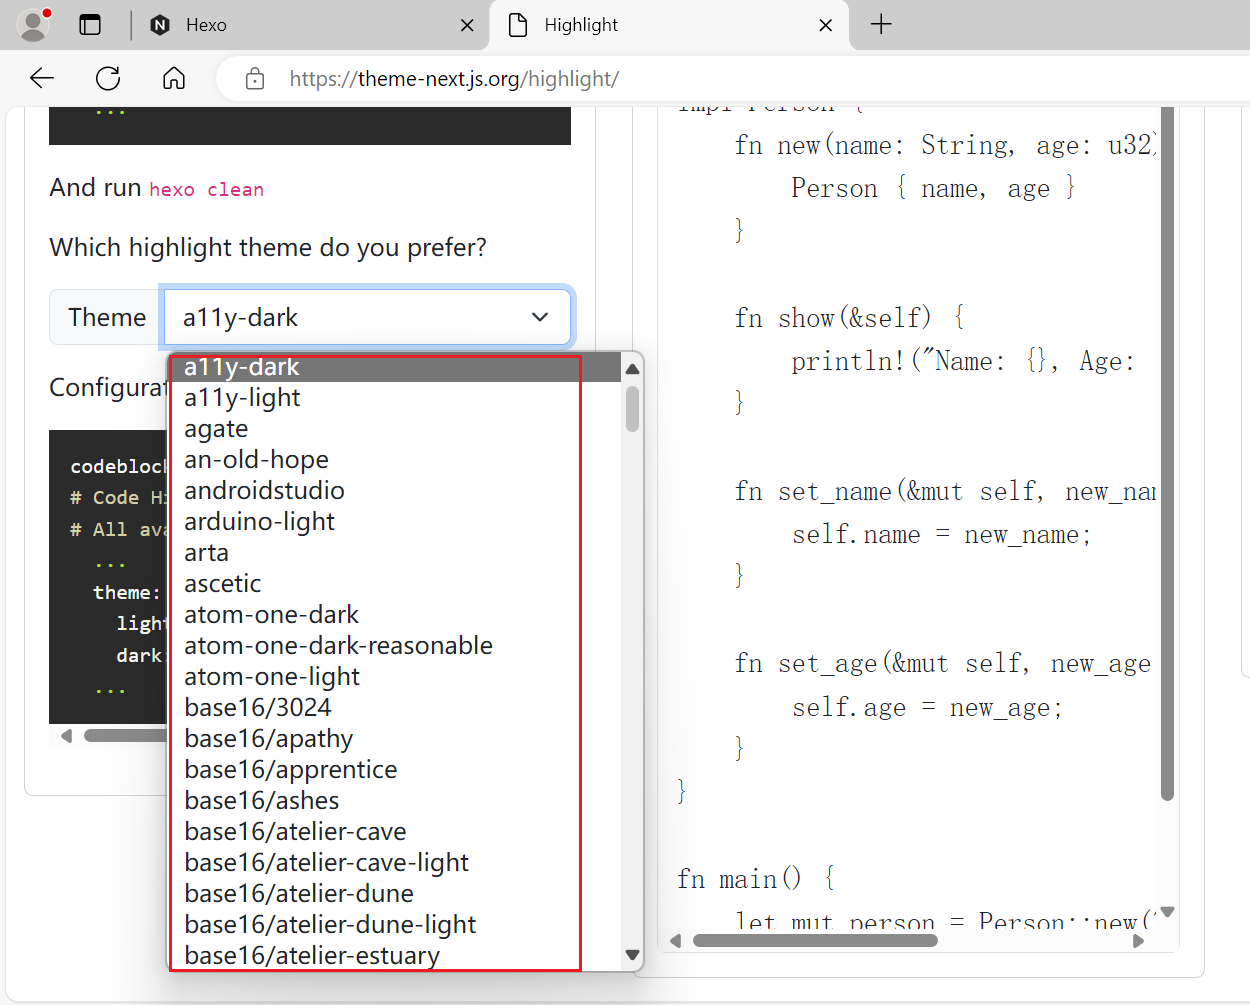
最后选择这个:
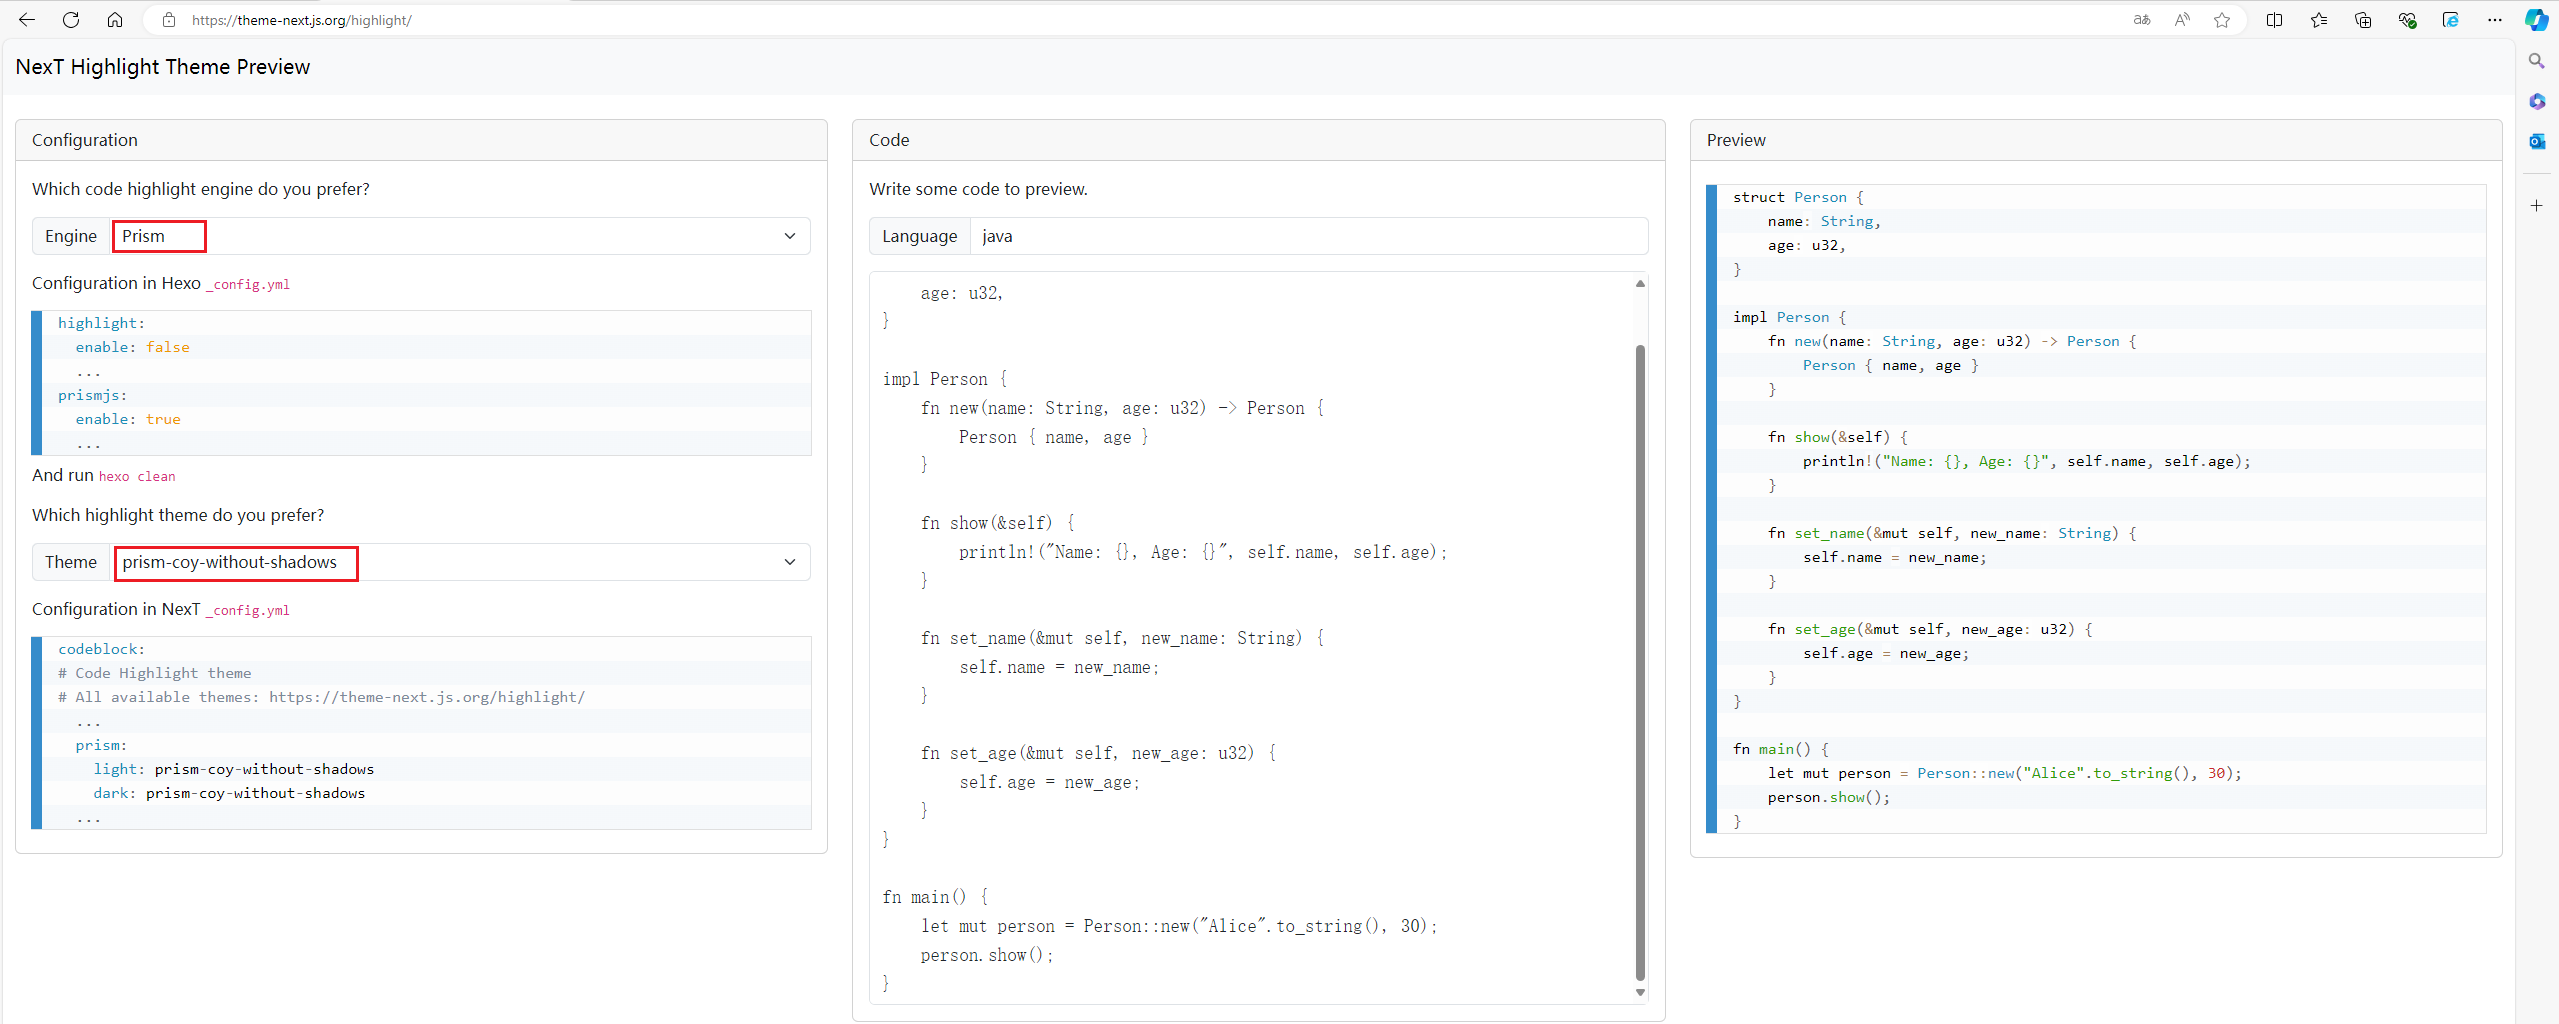
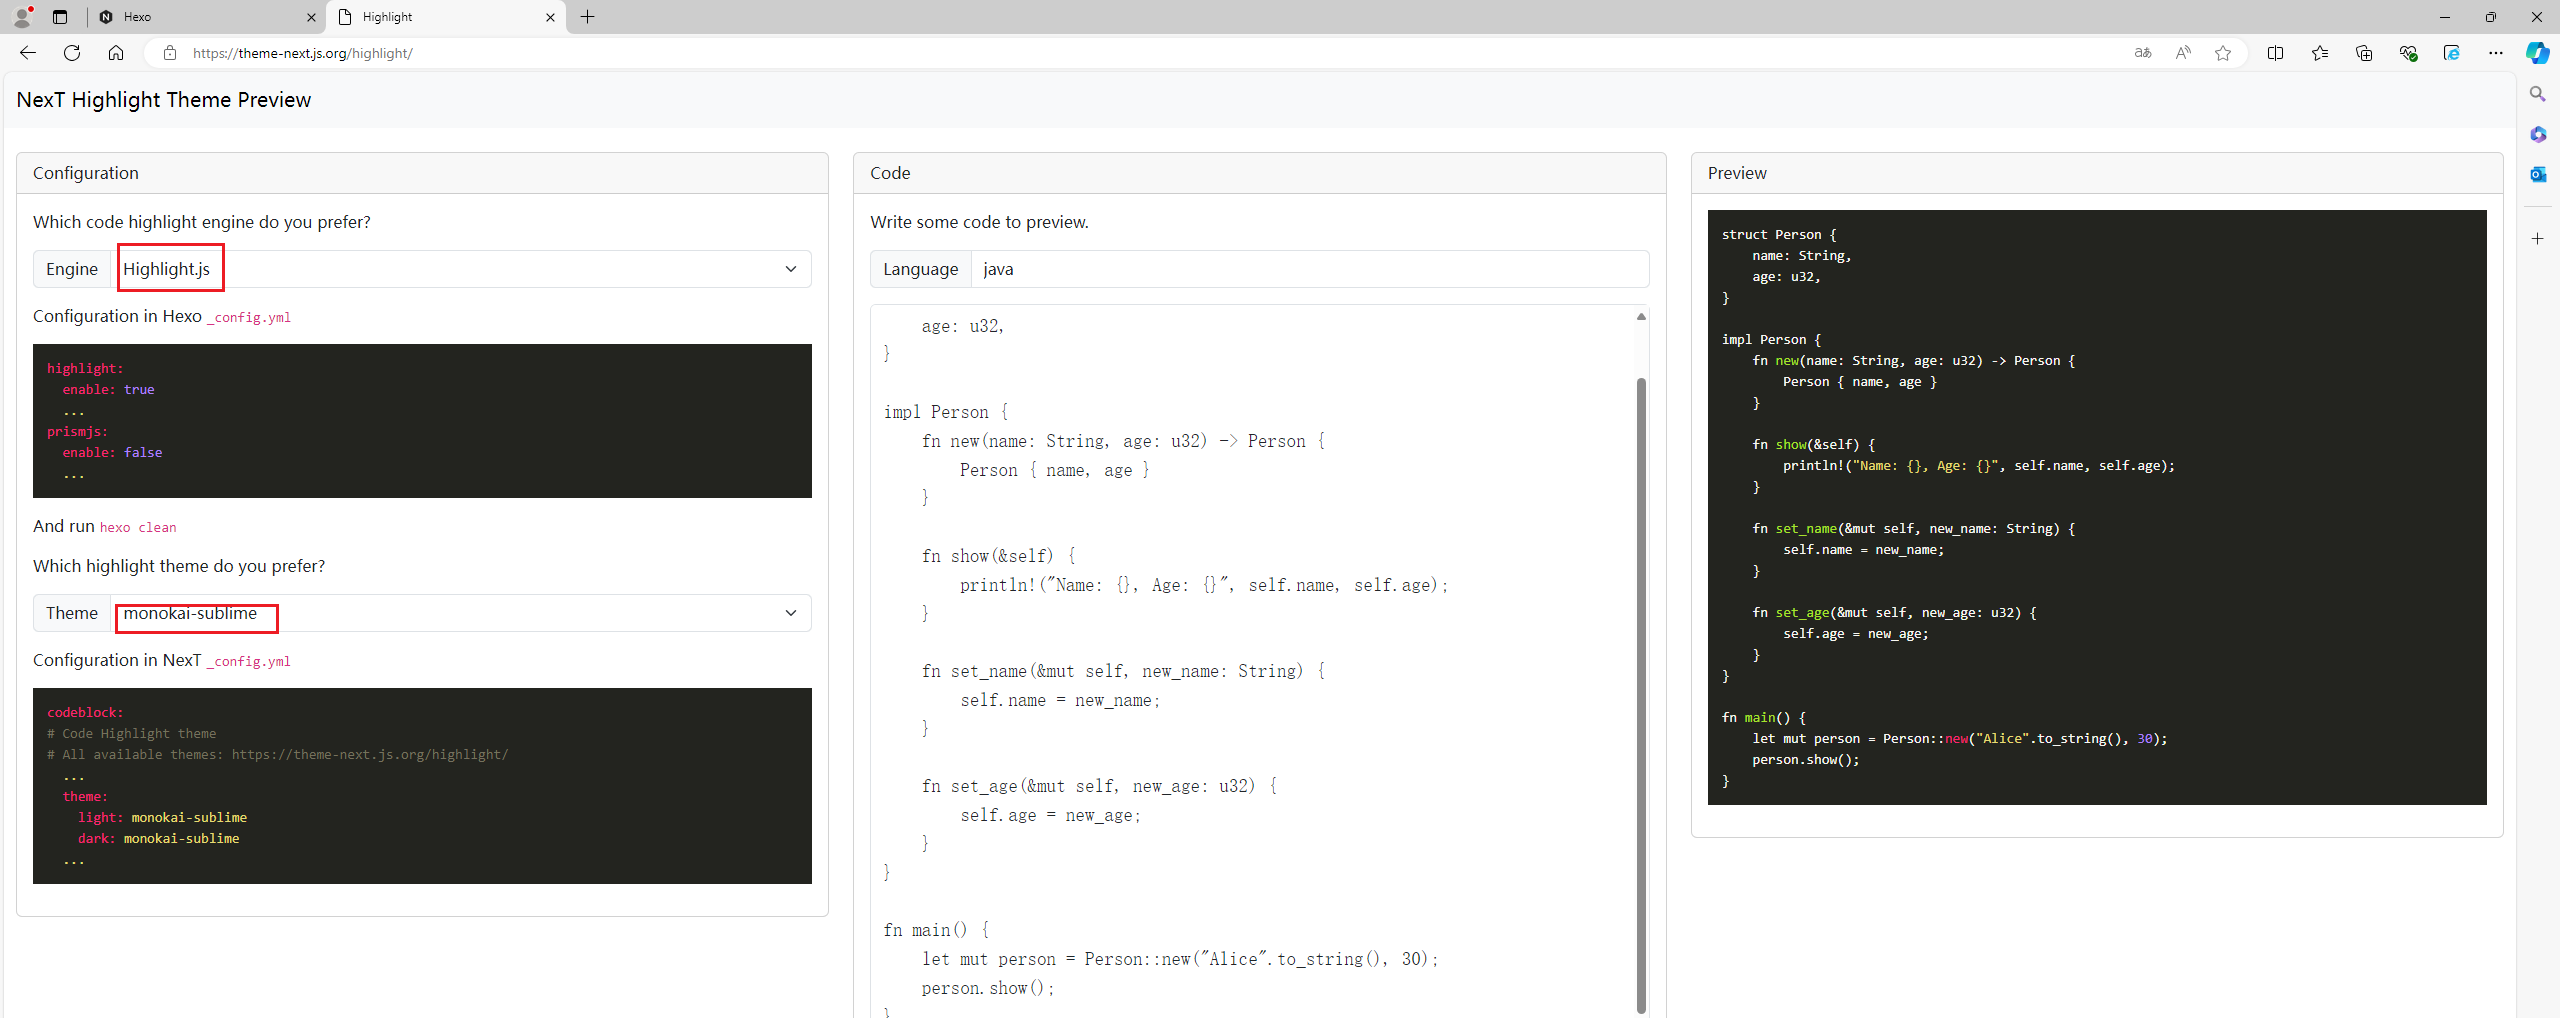
配置推荐:
1 | highlight: |
1 | codeblock: |
在 主题配置文件 中通过搜索关键字”Highlight theme”,定位出对应的配置:
1 | codeblock: |
在 主题配置文件 中修改后的效果:
1 | codeblock: |
在 站点配置文件 ,hexo这个新版本,暂时不确定怎么设置。
开启打赏功能
NexT可以支持微信打赏和支付宝打赏,在 主题配置文件 中添加如下字段即可:
1 | # Donate (Sponsor) settings |
注意:如果图片太大,会导致打赏显示失败。
修改E:\GTMC\blog\themes\next\languages下的zh-CN.yml文件:
1 | reward: |

主题栏目设置
在上面设置导航菜单时我们已经添加了导航菜单: categories 和 tags ,但在预览时会直接报错,因为我们还没有创建这两个分类页面。
添加「标签」页面
「标签」页面将展示站点的所有标签,若你的所有文章都未包含标签,此页面将是空的。
这里先详细介绍两个命令:
1 | > hexo n about |
hexo n 的完整格式为 hexo new ,所以上面的命令也可以写成:
1 | > hexo new about |
两者的区别是:
hexo new xxxx 表示创建一个新的文章页面。在Hexo中, 你写的博客文章会默认存储在 your-hexo-site/source/_posts 下。比如上面的命令 hexo new about 我们就在 your-hexo-site\source\_posts 目录下新建了一个 about.md 的文件。
hexo new page xxxx 表示创建一个新的分类主页面。比如上面的命令 hexo new page about 我们就在 your-hexo-site\source\ 目录下创建了一个名为 about 的目录,该目录下有一个名为 index.md 的文件。
在命令行窗口下,定位到 Hexo 站点目录下。使用 hexo new page 新建一个分类主页面,命名为 tags :
1 | > cd your-hexo-site |
然后打开 your-hexo-site\source\tags 目录下的 index.md 文件,将页面的类型设置为 tags ,主题将自动为这个页面显示标签云。
1 | --- |
注意:如果有启用
多说或者Disqus评论,页面也会带有评论。 若需要关闭的话,请添加字段comments并将值设置为false,如:
1 | --- |
那么我们在新创建的文章页面中要如何来显示标签呢?
我们可以在文章页面中通过添加 tags 标记来设置文章要显示的标签。
Hexo 中有 Front-matter 这个概念,是文件最上方以 --- 分隔的区域,用于指定个别文件的变量。
Front-matter 支持 “数组” 方式或 “yaml” 方式来设置,如下:
1 | title: hexo index |
1 | title: hexo index |
添加「分类」页面
「分类」页面将展示站点的所有分类,若你的所有文章都未包含分类,此页面将是空的。
和上面配置 tags 的方法一样,我们可以通过命令 hexo new page xxxx 来创建:
1 | > cd your-hexo-site |
这里需要注意的一点是,我们命令中的名称
tags和categories是在之前配置导航菜单时在menu字段下指定的名称,大小写不能错。
相应的页面类型设置如下:
1 | --- |
同样的,在文章页面中,我们可以通过 categories 字段来为文章指定所属的分类:
1 | --- |
关于 Hexo 下的文章页面
上面已经提到过,我们可以通过 hexo n xxxx 或 hexo new xxxx 来创建新的文章页面,默认会保存在 your-hexo-site\source\_posts 目录下。
一般的文章页面头部的 Front-matter 格式如下:
1 | --- |
需要注意的是
- 冒号后面与内容直接要有一个空格,否则无法编译生成
- 正文与
Front-matter之间要有一个空行 - 为文章添加描述文字除了指定
description之外,还可以在正文中通过添加<!--more-->标签分隔内容
常见问题
- 修改配置文件时注意YAML语法,参数冒号:后一定要留一空格
- 中文乱码请修改文件编码格式为UTF-8
- yml文件中所有有空格的字段都用双引号括起来
默认情况下,新建文章的文件名和标题名是相同的,需要注意的是如果文件名是中文,那么生成的链接后面会自动添加末尾斜杠 http://localhost:4000/2016/09/xxxxxxx/ 如果手动去掉该斜杠 / 会直接报错。所以推荐文件名最好用 英文 来写,文章内的标题可以改成中文。
另外,文章文件名中文末尾斜杠 的问题也可以通过配置 Nginx 来解决。(这里暂不讨论该方法)
Hexo 中常用命令
1 | hexo n == hexo new |
简写形式:
1 | hexo n == hexo new |
博客优化
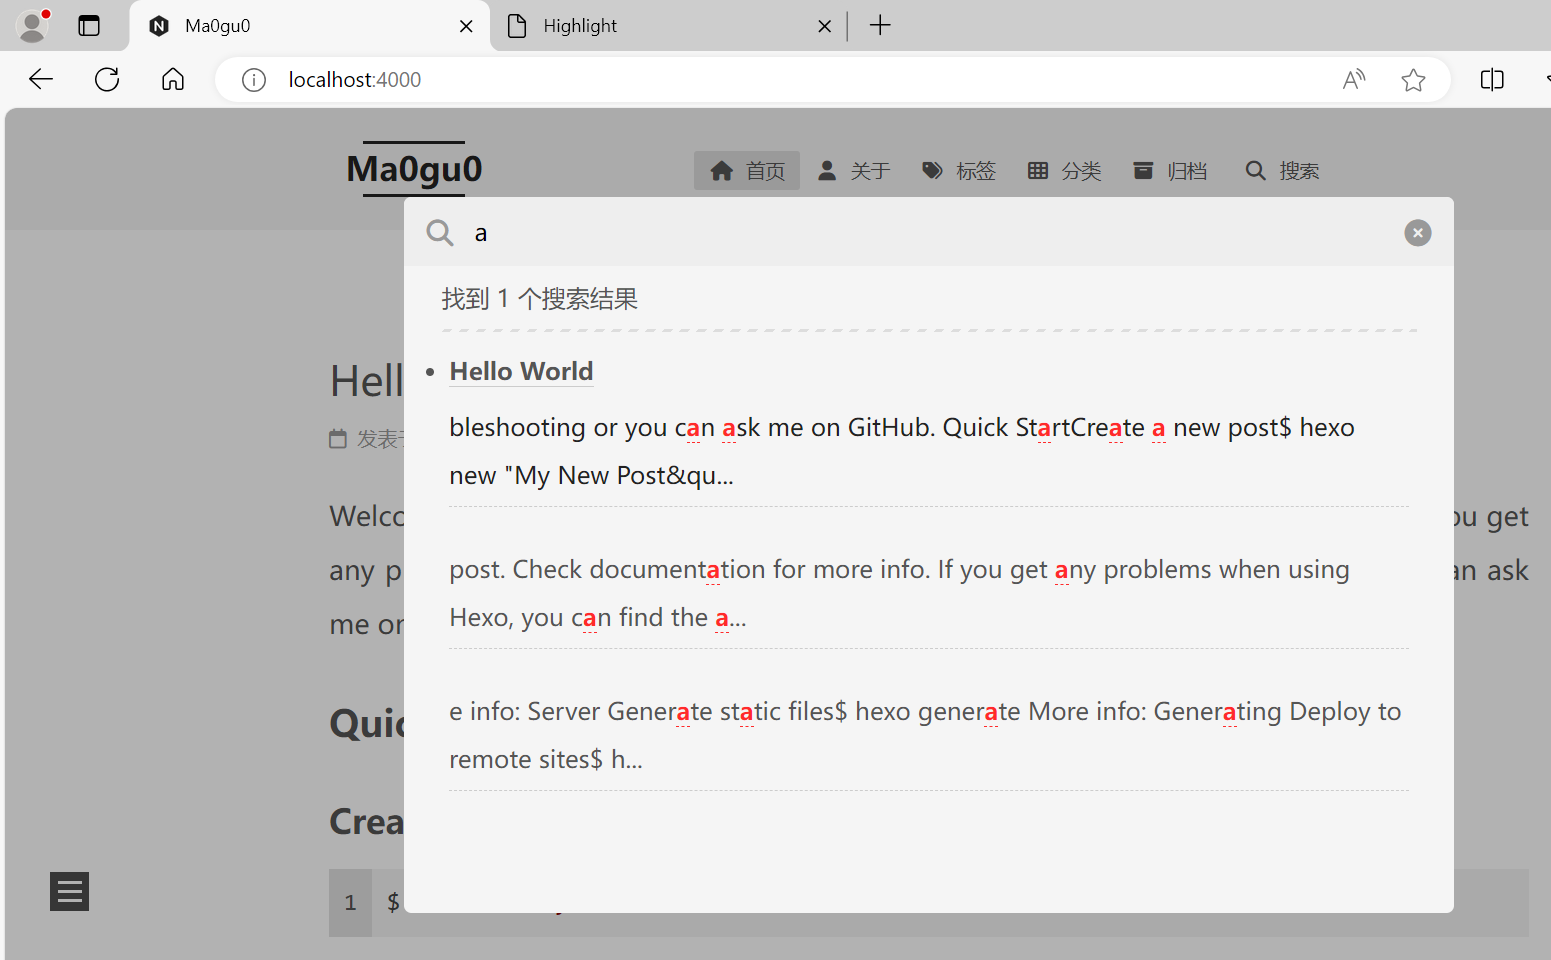
添加搜索功能
LocalSearch搜索
安装 hexo-generator-searchdb,在站点的根目录下执行以下命令:
1 | $ npm install hexo-generator-searchdb --save |
编辑 主题配置文件:
1 | # Local Search |
文章置顶
在Hexo博客中,有时候我们想要将一些特别的文章一直置顶在首页。Hexo博客中,默认的情况是按照时间倒序来排列的,即新发布的文章排在前面。虽然有一种很简单的方法,就是更改文章的发布时间到一个“未来”的时间点,这样虽然能让文章一直置顶,但是给人的体验和感觉是非常不好的。
今天介绍一种非常简单而且体验上也非常好的方法。
安装node插件
1 | $ npm uninstall hexo-generator-index --save |
添加标记
在需要置顶的文章的 Front-matter 中加上 top: true 即可。
比如:
1 | --- |
ok,现在发布文章,就能看到我们设置的文章已经置顶显示了,即使是之前发布的文章,同时日期也不会被更改。
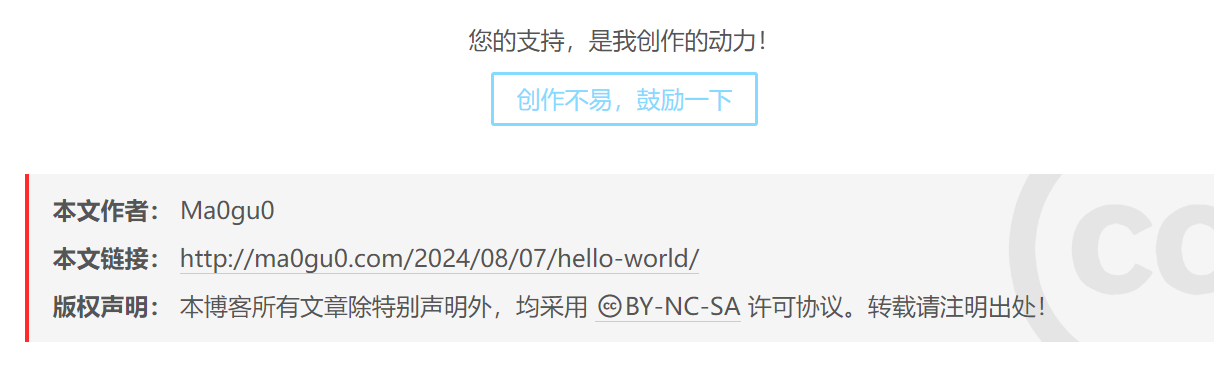
显示版权信息
一般在网络上发表文章时,都要时刻提防着网络爬虫的抓取。特别是有些网站在抓取到你的文章后进行一些词语、段落的修改,公然改为自己发表的文章。完全无视原作者的辛苦。
为了更好的标明文章的版权,一般我们都会在文章中添加上文章的链接、版权声明等信息,虽然不能完全彻底的抵制文章抄袭的情况,也算是“防君子不防小人”吧。
启用版权
我使用的是 Hexo 的 Next 主题。找到主题配置文件,更改以下部分:
1 | # Creative Commons 4.0 International License. |
将其中的 post: false 改为 post: true 即可。
但是改完后,使用 hexo s -g 预览,发现 “本文链接” 部分有问题。
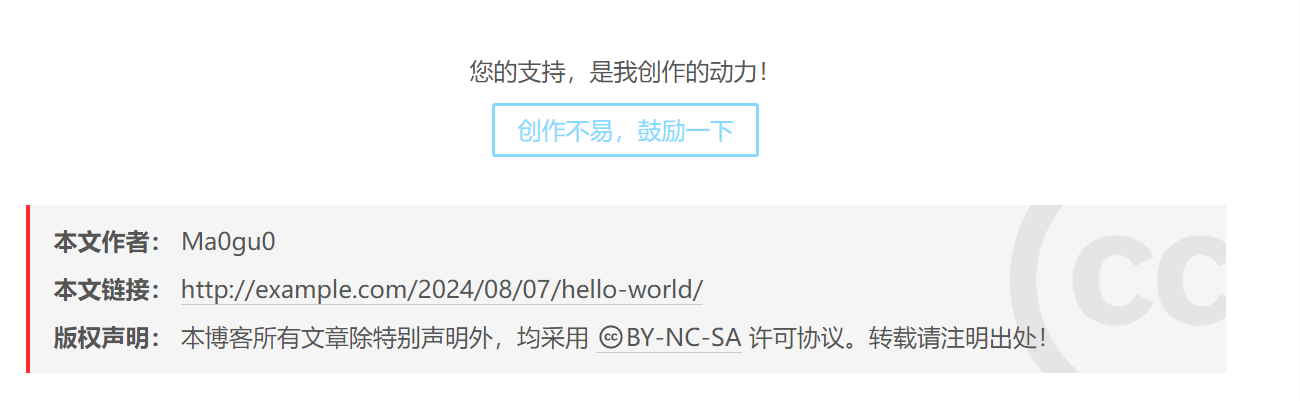
这就需要我们修改主站点的配置文件了。打开文站点配置文件,修改:
1 | # URL |
将 url 部分改成自己站点的域名地址即可。
访问统计功能
在博客中我们一般都比较在意自己博客的访问量,或者哪篇文章比较受欢迎之类的。
在Hexo的 Next 主题下带有多种统计和分析的功能。这里我选择 不蒜子统计来显示文章的访客数、浏览量等信息。
启用统计
找到 Next 主题下的配置文件 _config.yml ,找到 busuanzi_count 部分:
1 | # Show PV/UV of the website/page with busuanzi. |
当 enable: true 时,代表开启全局开关。
当 site_uv: true 时,代表在页面底部显示站点的UV值。
当 site_pv: true 时,代表在页面底部显示站点的PV值。
当 page_pv: true 时,代表在文章页面的标题下显示该页面的PV值(阅读数)。
修改后的结果:
1 | # Show PV/UV of the website/page with busuanzi. |
显示文章更新时间
在文章列表中我们一般都能看的文章的发布时间。对于一些文章来说,比如涉及到文章中的内容过期,或者软件的升级等等,我们都会进行一些修改。这种情况下,我们就像把文章的更新日期也显示处理,也能让读者看的我们写的之前的文章也是有更新的,不会过时的。
显示更新日期
在 Next 主题下添加显示更新时间非常简单,找到主题下的配置文件 _config.yml 的 post_meta 部分:
1 | # Post meta display settings |
默认开启。
自定义显示更新日期
对于某些特殊的文章,我们也想能够自定义这个更新的日期。当然,更改起来也非常的简单,Hexo默认就支持更新日期的配置。
在每一篇文章的 Front-matter 部分,只要添加 updated 参数即可。
1 | --- |
这样我们就自定义了这篇文章的更新时间。
添加文章字数统计
一般为了让读者大概估计阅读文章的时间,有的文章在头部会显示总的字数统计。
启用字数统计
首先安装一个依赖插件:
1 | npm i --save hexo-wordcount |
然后修改主题配置文件 _config.yml 中的 post_wordcount 部分:
1 | # Post wordcount display settings |
将 wordcount: false 改为 wordcount: true 即可显示单篇文章的总字数了。
另外,totalcount 是用来统计整站总的字数的。
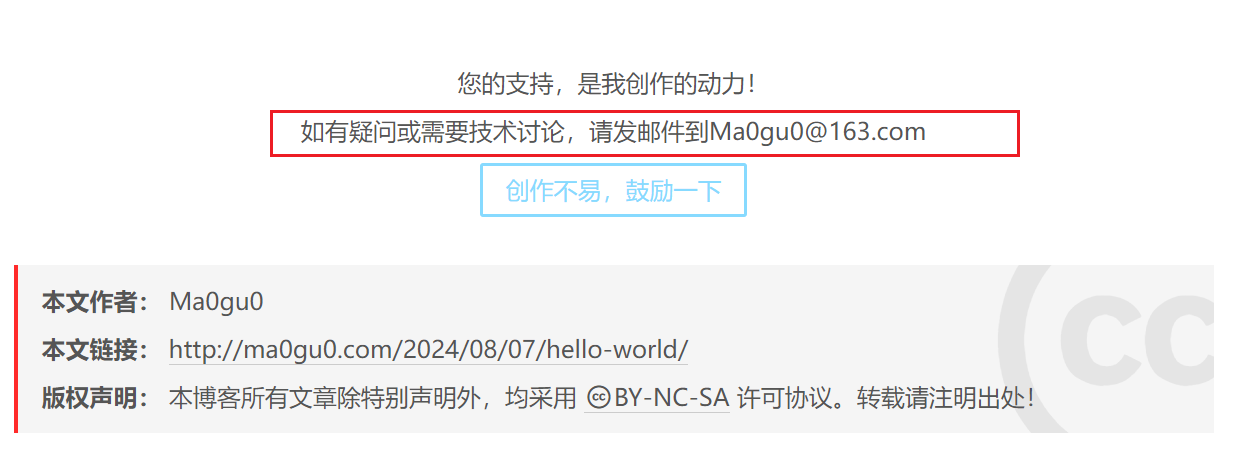
将“打赏”两字更改为“鼓励”
相应的修改方法是:
找到项目目录下 /themes/next/languages/zh-Hans.yml 文件,因为我的博客采用的是中文。这里可以按照自己的博客设置选择相应的语言文件。
1 | reward: |

找到 reward 部分,将 donate 的值修改为自己想要的内容即可。这里我测试了一下,最长是4个汉字,否则就要修改按钮的样式了。
关于评论
原来的打赏功能提示文字 reward_comment 参数,如果添加的字符太多的话,就会导致自动换行。所以这里我修改了一下页面文件。
找到目录下 E:\GTMC\blog\themes\next\layout\_partials\post 文件,找到第二行的
1 | <div>{{ __('reward.comment') }}</div> |
部分再复制一行,如下:
1 | <div class="reward-container"> |
我这里就直接改成了 <div>{{ __('reward.comment2') }}</div>2 。然后在E:\GTMC\blog\themes\next\languagesc\zh-CN.yml文件中也添加一个 reward_comment2 部分即可。
1 | reward: |
页面载入进度
这个效果也是刚刚查看配置文件的时候偶然看到的。
之前就曾看别人的博客做的特别炫。页面头部可以显示一个加载进度条,非常的羡慕。
在 next 主题的配置文件 _config.yml 中 找到 pace: false 将其改为 pace: true 即可。
在下面可以选择不同的加载主题样式,通过 pace_theme 参数设置。
评论系统
调研了一下可用的评论系统,简单总结:
- Disqus: 好用好配置,但国内访问不了(弃用原因)
- Valine: 好用好配置,但存在 # 安全性问题
- Github issue: 应该可用,没有亲自尝试
- Remark42: 自行部署,但对于https网站需要一个可用域名
对评论系统的需求:
- 用户评论方便:支持匿名评论,不强制登录,降低用户评论门槛
- 数据可迁移:将来如果切换到其他评论系统比较方便
- 不要求独立域名
- 无安全问题
这几条限制加上之后,可选项也就不多了,最终选择了Waline。
为 Next 主题添加 Waline 评论系统
技术设计中,存储评论,用的是MongoDB。
Waline的后端存储改用MongoDB,或者直接使用 MongoDB Atlas的免费版 。
使用MongoDB存储数据的好处:
- 速度更快,LeanCloud访问速度一言难尽
- 数据自己存储,非常灵活,方便导入导出
- 去除LeanCloud API存储依赖(引入MongoDB依赖 :-) )
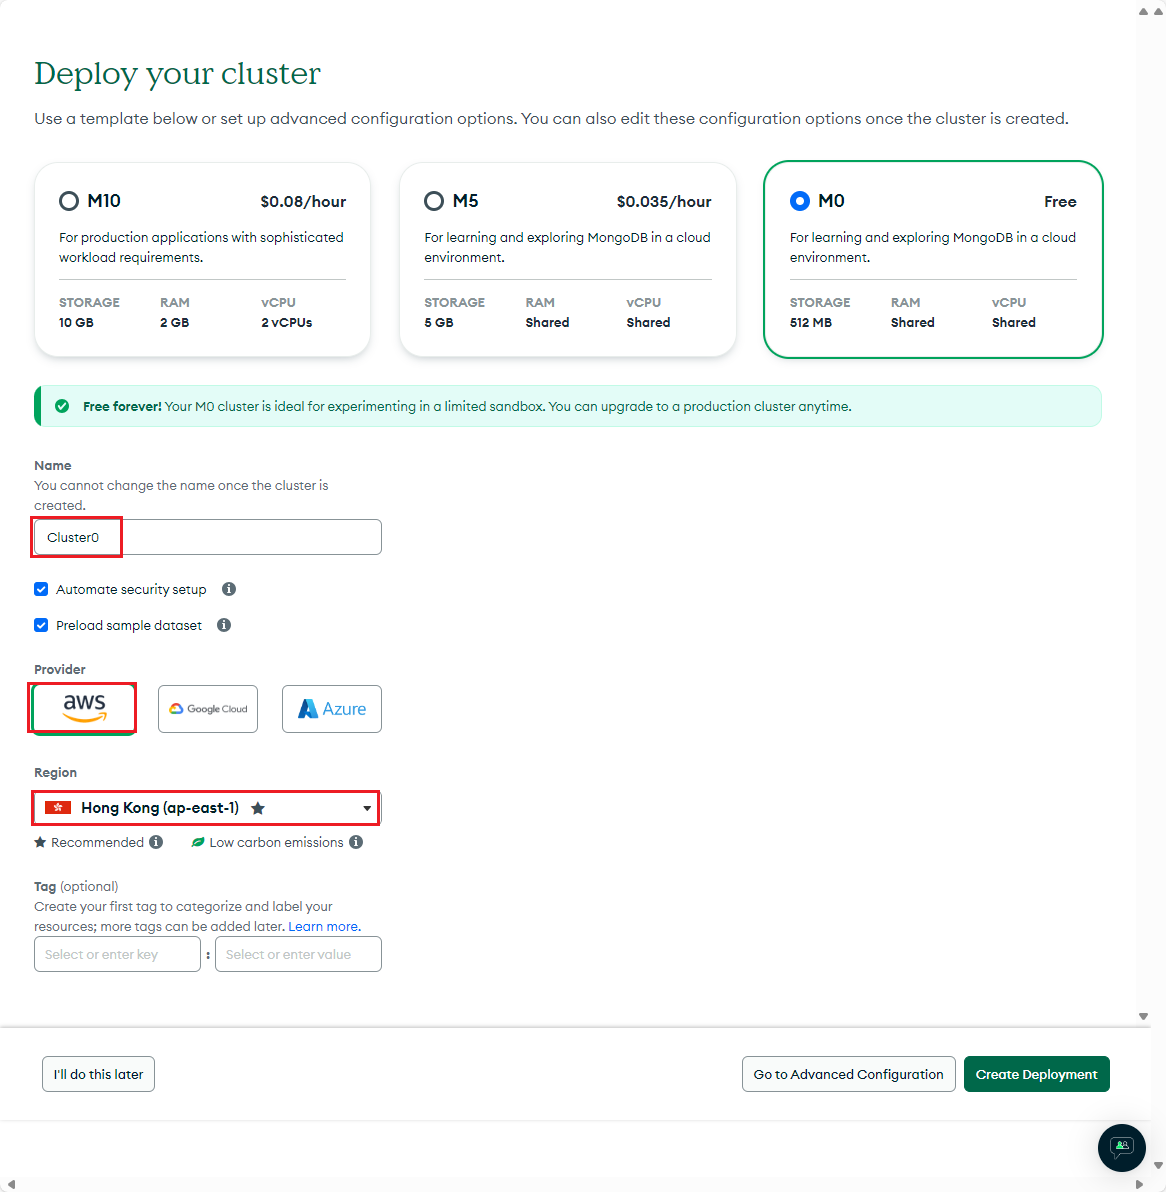
创建免费MongoDB数据库
直接使用 MongoDB Atlas的免费版 。
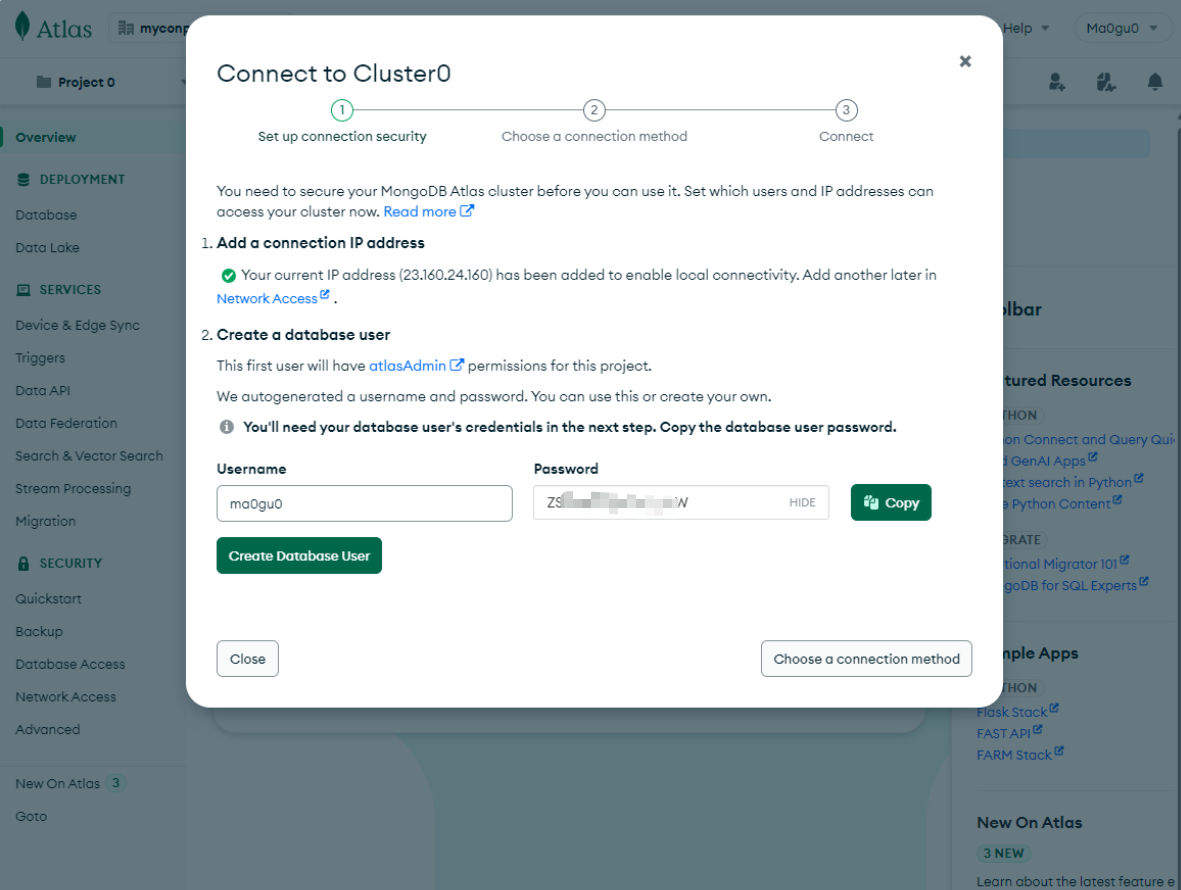
生成的账号密码:
1 | ma0gu0 |
安装Waline服务端
Waline 支持多种服务端,为了最简便上手,我们使用第一种方式,即在 Vercel 上安装服务端。首先,点击下面的链接:
https://vercel.com/import/project?template=https://github.com/walinejs/waline/tree/main/example
应该需要注册一个账号,支持使用 Github 账号直接登录:

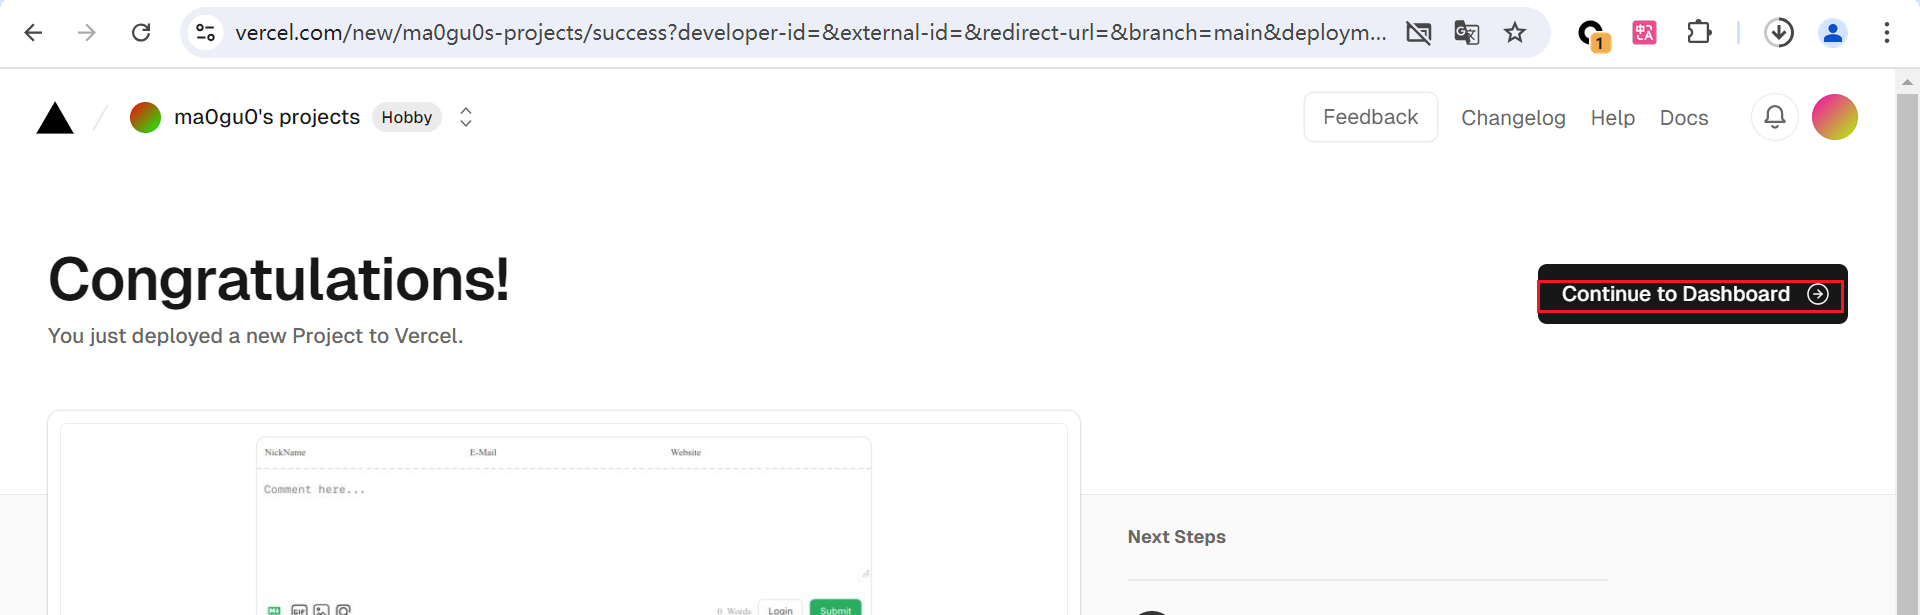
登录后重新点进来,点击 Create,Name为blog-waline-server:

然后等待下面 Deploy 构建完成,点击Continue to Dashboard:
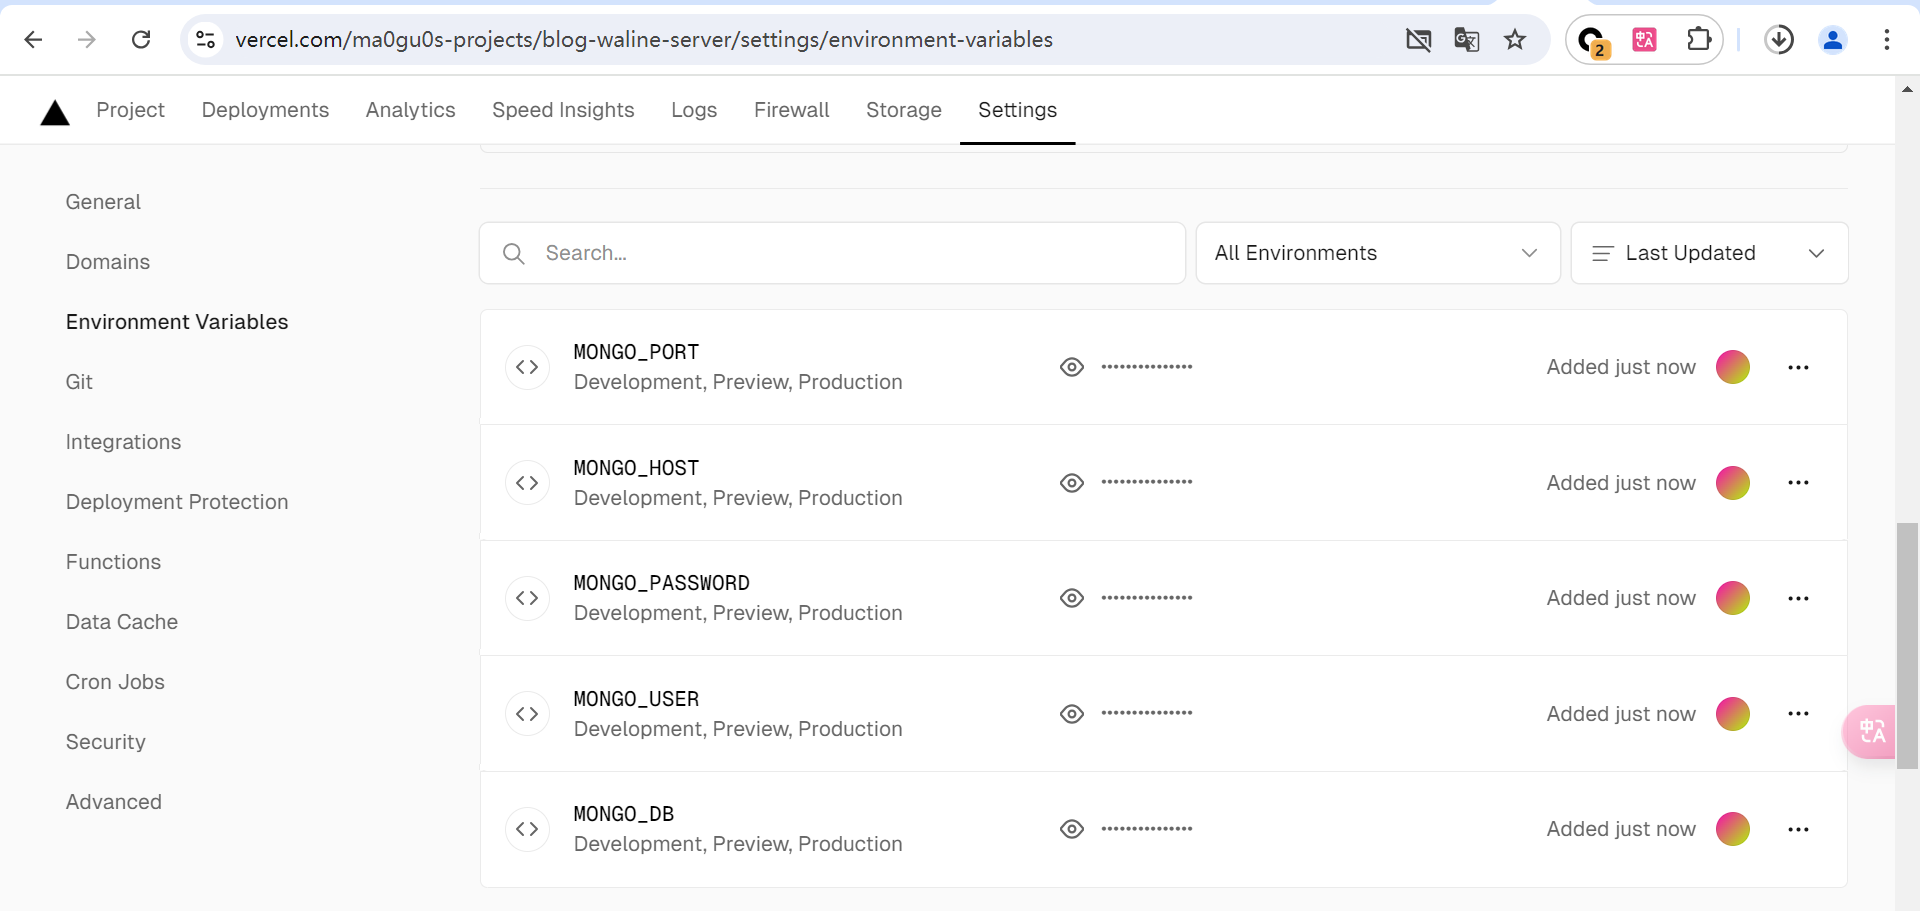
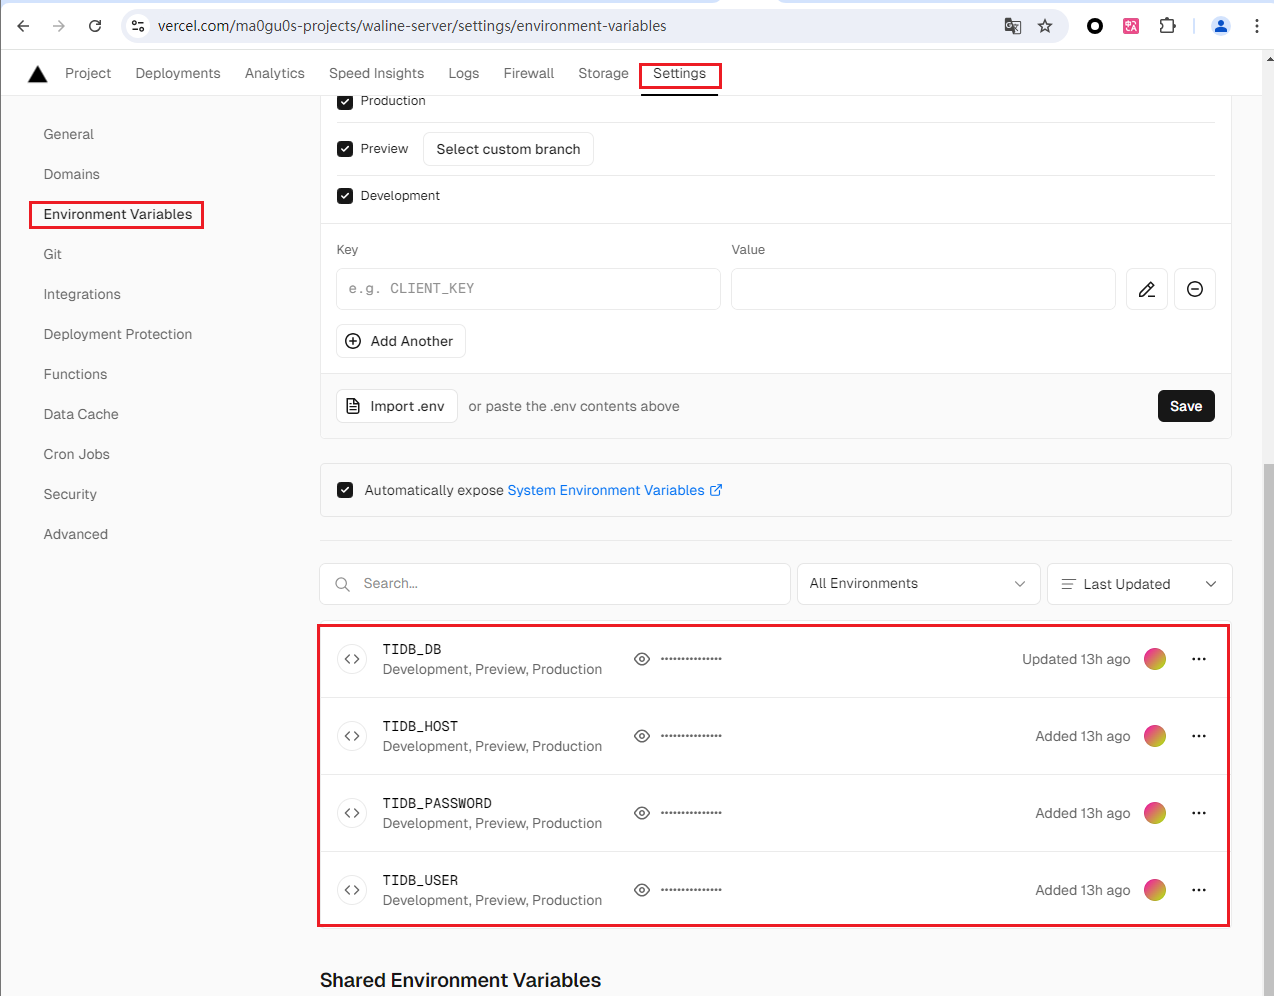
找到 Settings => Environment Variables,配置环境变量。
我们需要配置五个环境变量,对应如下表:
| MongoDB | Vercel Environment |
|---|---|
| Cluster0 | MONGO_DB |
| ma0gu0 | MONGO_USER |
| ZS3xxxxxpCW | MONGO_PASSWORD |
| xxxxx.nbijg.mongodb.net | MONGO_HOST |
| 27017 | MONGO_PORT |
https://mongodb.com 官网免费提供了 512M 的 MongoDB 数据库支持。以下是使用 MongoDB 存储需要配置的环境变量。
| 环境变量名称 | 必填 | 默认值 | 备注 |
|---|---|---|---|
MONGO_DB |
✅ | MongoDB 数据库名称 | |
MONGO_USER |
✅ | MongoDB 服务的用户名 | |
MONGO_PASSWORD |
✅ | MongoDB 服务的密码 | |
MONGO_HOST |
127.0.0.1 | MongoDB 服务的地址,支持数组格式 | |
MONGO_PORT |
27017 | MongoDB 服务的端口,支持数组格式 | |
MONGO_REPLICASET |
MongoDB 集群 | ||
MONGO_AUTHSOURCE |
MongoDB 认证源 | ||
MONGO_OPT_SSL |
false |
是否使用 SSL 进行连接 |

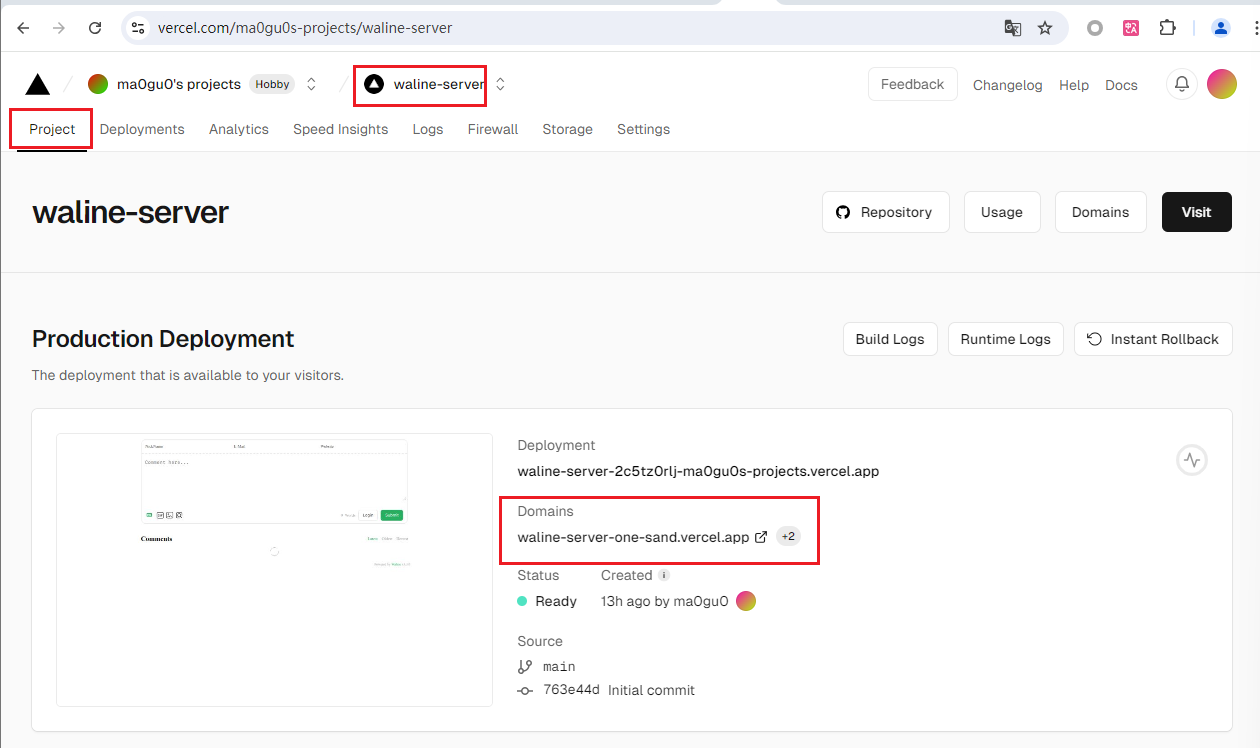
为了使环境变量生效,我们需要重新构建一次。在上方找到 Deployments ,点击 Redeploy。
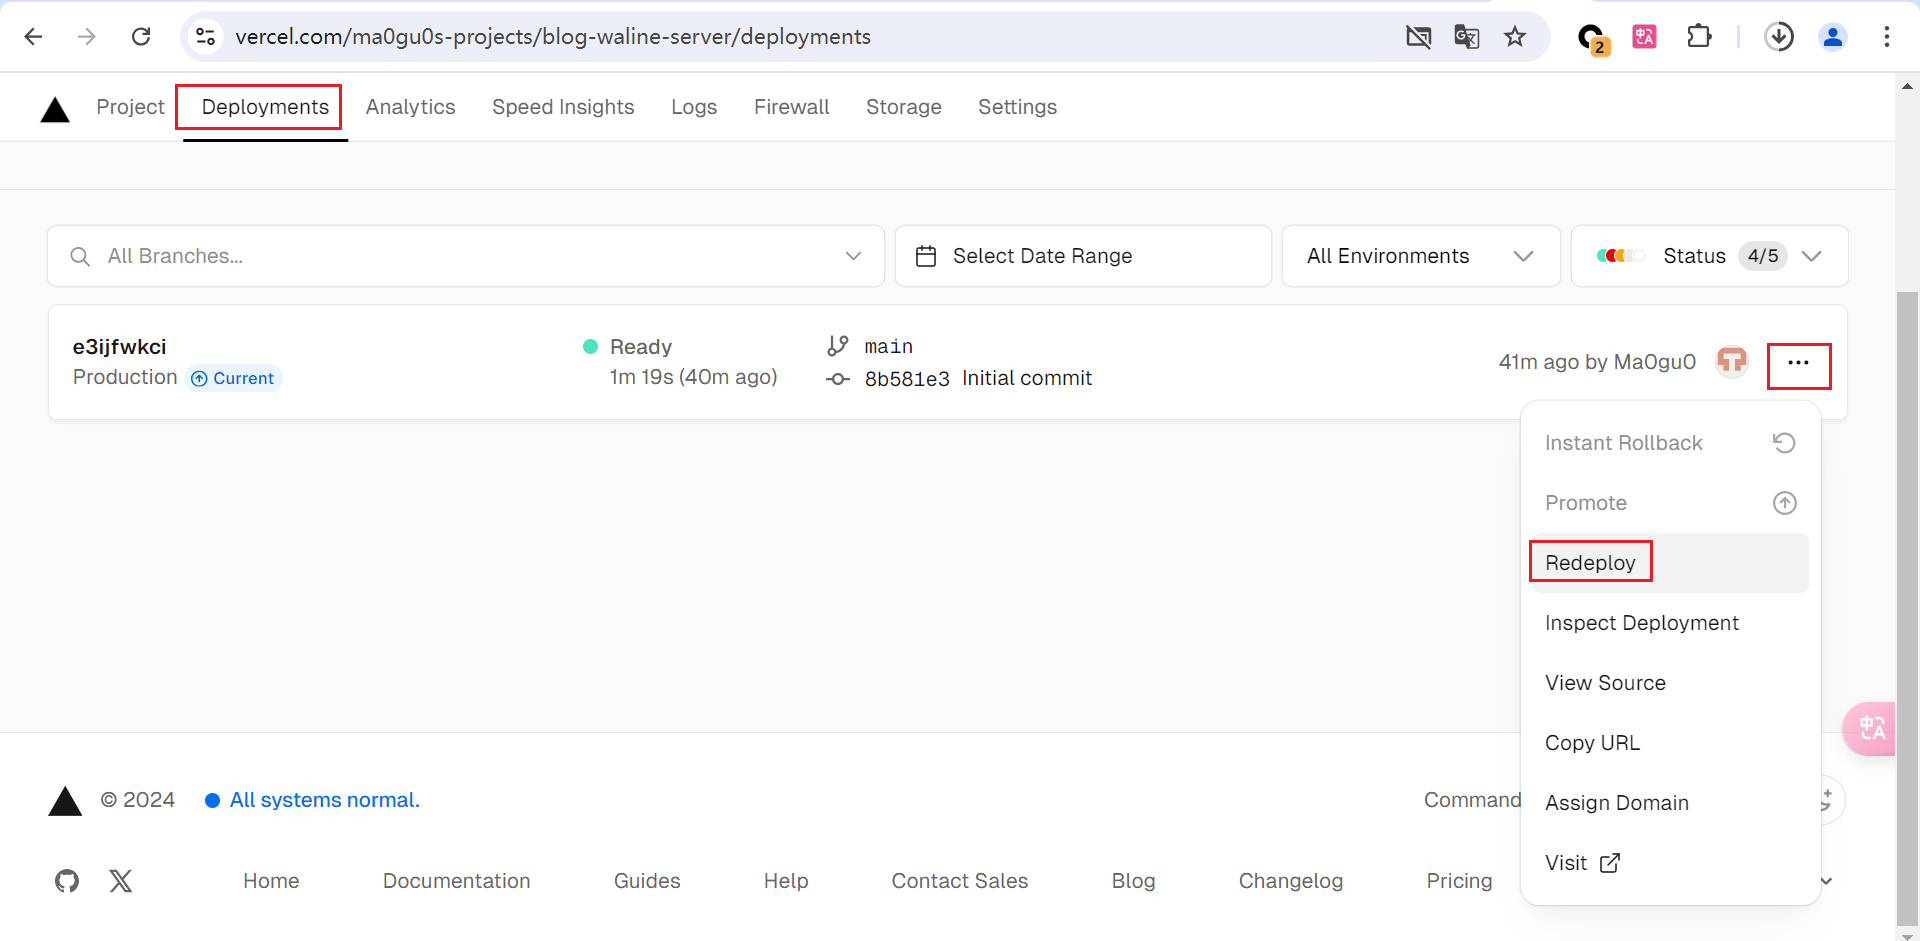
等待其构建结束,然后记住 DOMAINS 中的域名地址:
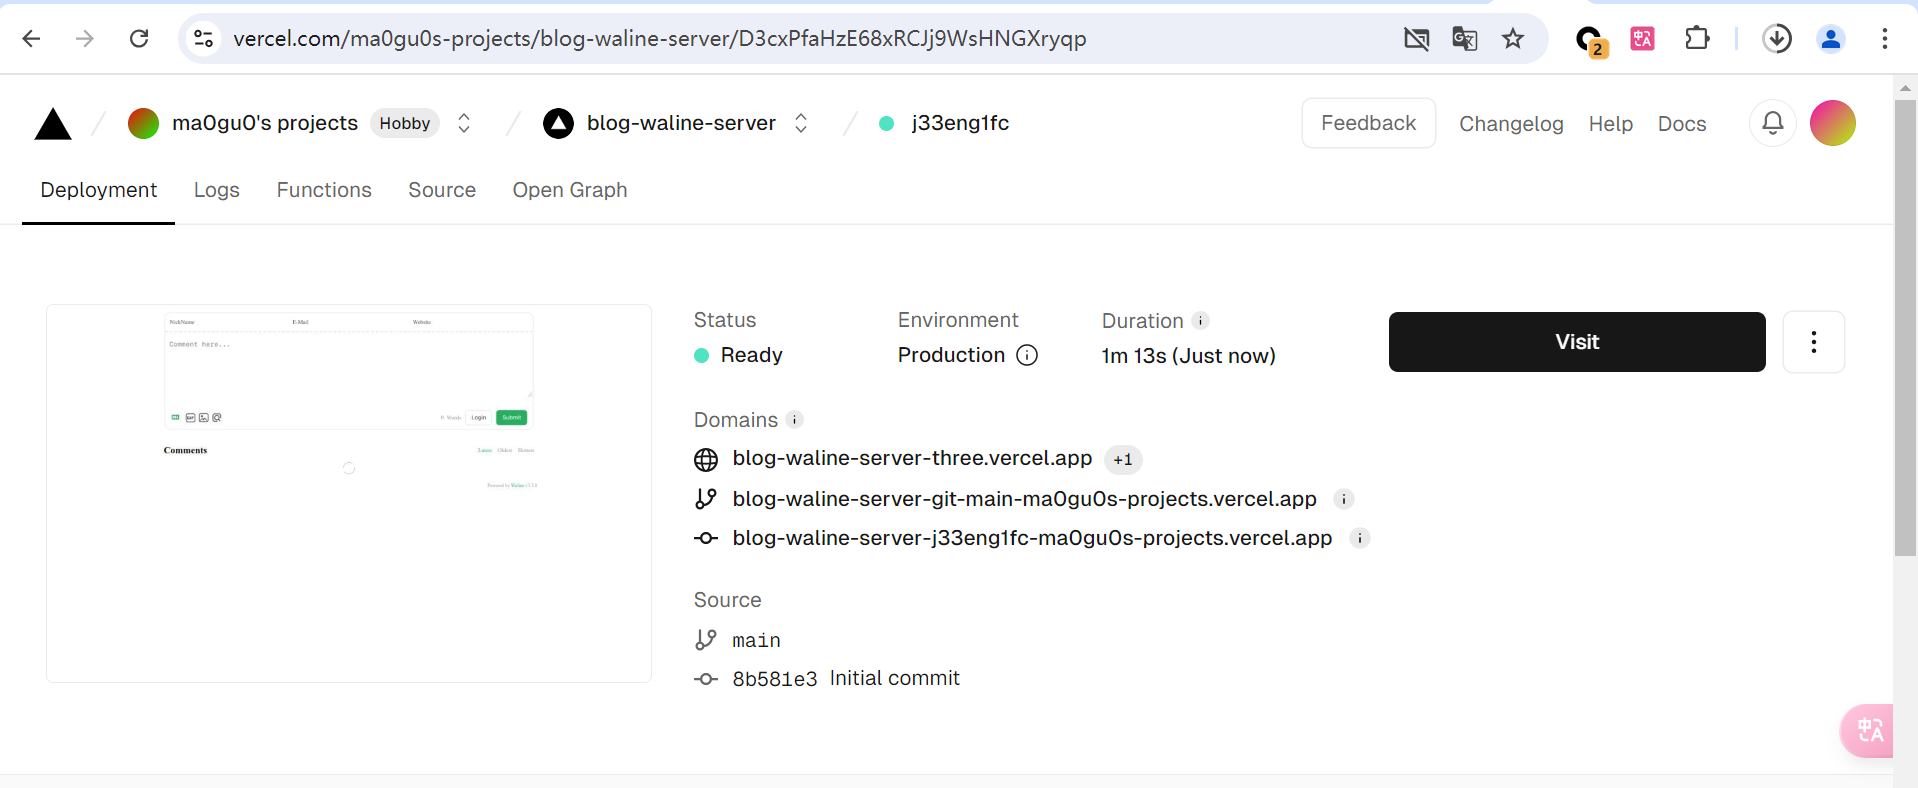
1 | blog-waline-server-three.vercel.app |
好了,服务端部署到此结束,下面我们开始在 Hexo Next 主题中配置客户端。
重点:
在实际测试中,该MongoDB无法使用,在使用注册时,前端的提示:
1 | {"errno":500,"errmsg":"ResourceRequest timed out"} |
后端logs信息:vercel上的日志
1 | TimeoutError: ResourceRequest timed out |
通过浏览器开发者模式,查看登录过程,会发现最后是这个接口的响应码微500:
1 | 最后是这个接口: |
经过排查后发现,在确定vercel服务端的MongoDB配置正确情况下,并且MongoDB上的network access设置为0.0.0.0/0即为放通所有IP地址访问,依然存在上述报错,判定的原因是vercel服务端连不上MongoDB数据库。
创建免费TiDB数据库
TiDB 是一款开源的 NewSQL 数据库。TiDB Cloud 则是官方提供的在线版本,它提供了 5GB 的免费额度。
使用时请查阅创建 TiDB 数据库了解初始化流程。
| 环境变量名称 | 必填 | 默认值 | 备注 |
|---|---|---|---|
TIDB_DB |
✅ | TiDB 数据库库名 | |
TIDB_USER |
✅ | TiDB 数据库的用户名 | |
TIDB_PASSWORD |
✅ | TiDB 数据库的密码 | |
TIDB_HOST |
127.0.0.1 | TiDB 服务的地址 | |
TIDB_PORT |
4000 | TiDB 服务的端口 | |
TIDB_PREFIX |
wl_ |
TiDB 数据表的表前缀 | |
TIDB_CHARSET |
utf8mb4 |
TiDB 数据表的字符集 |
创建数据库
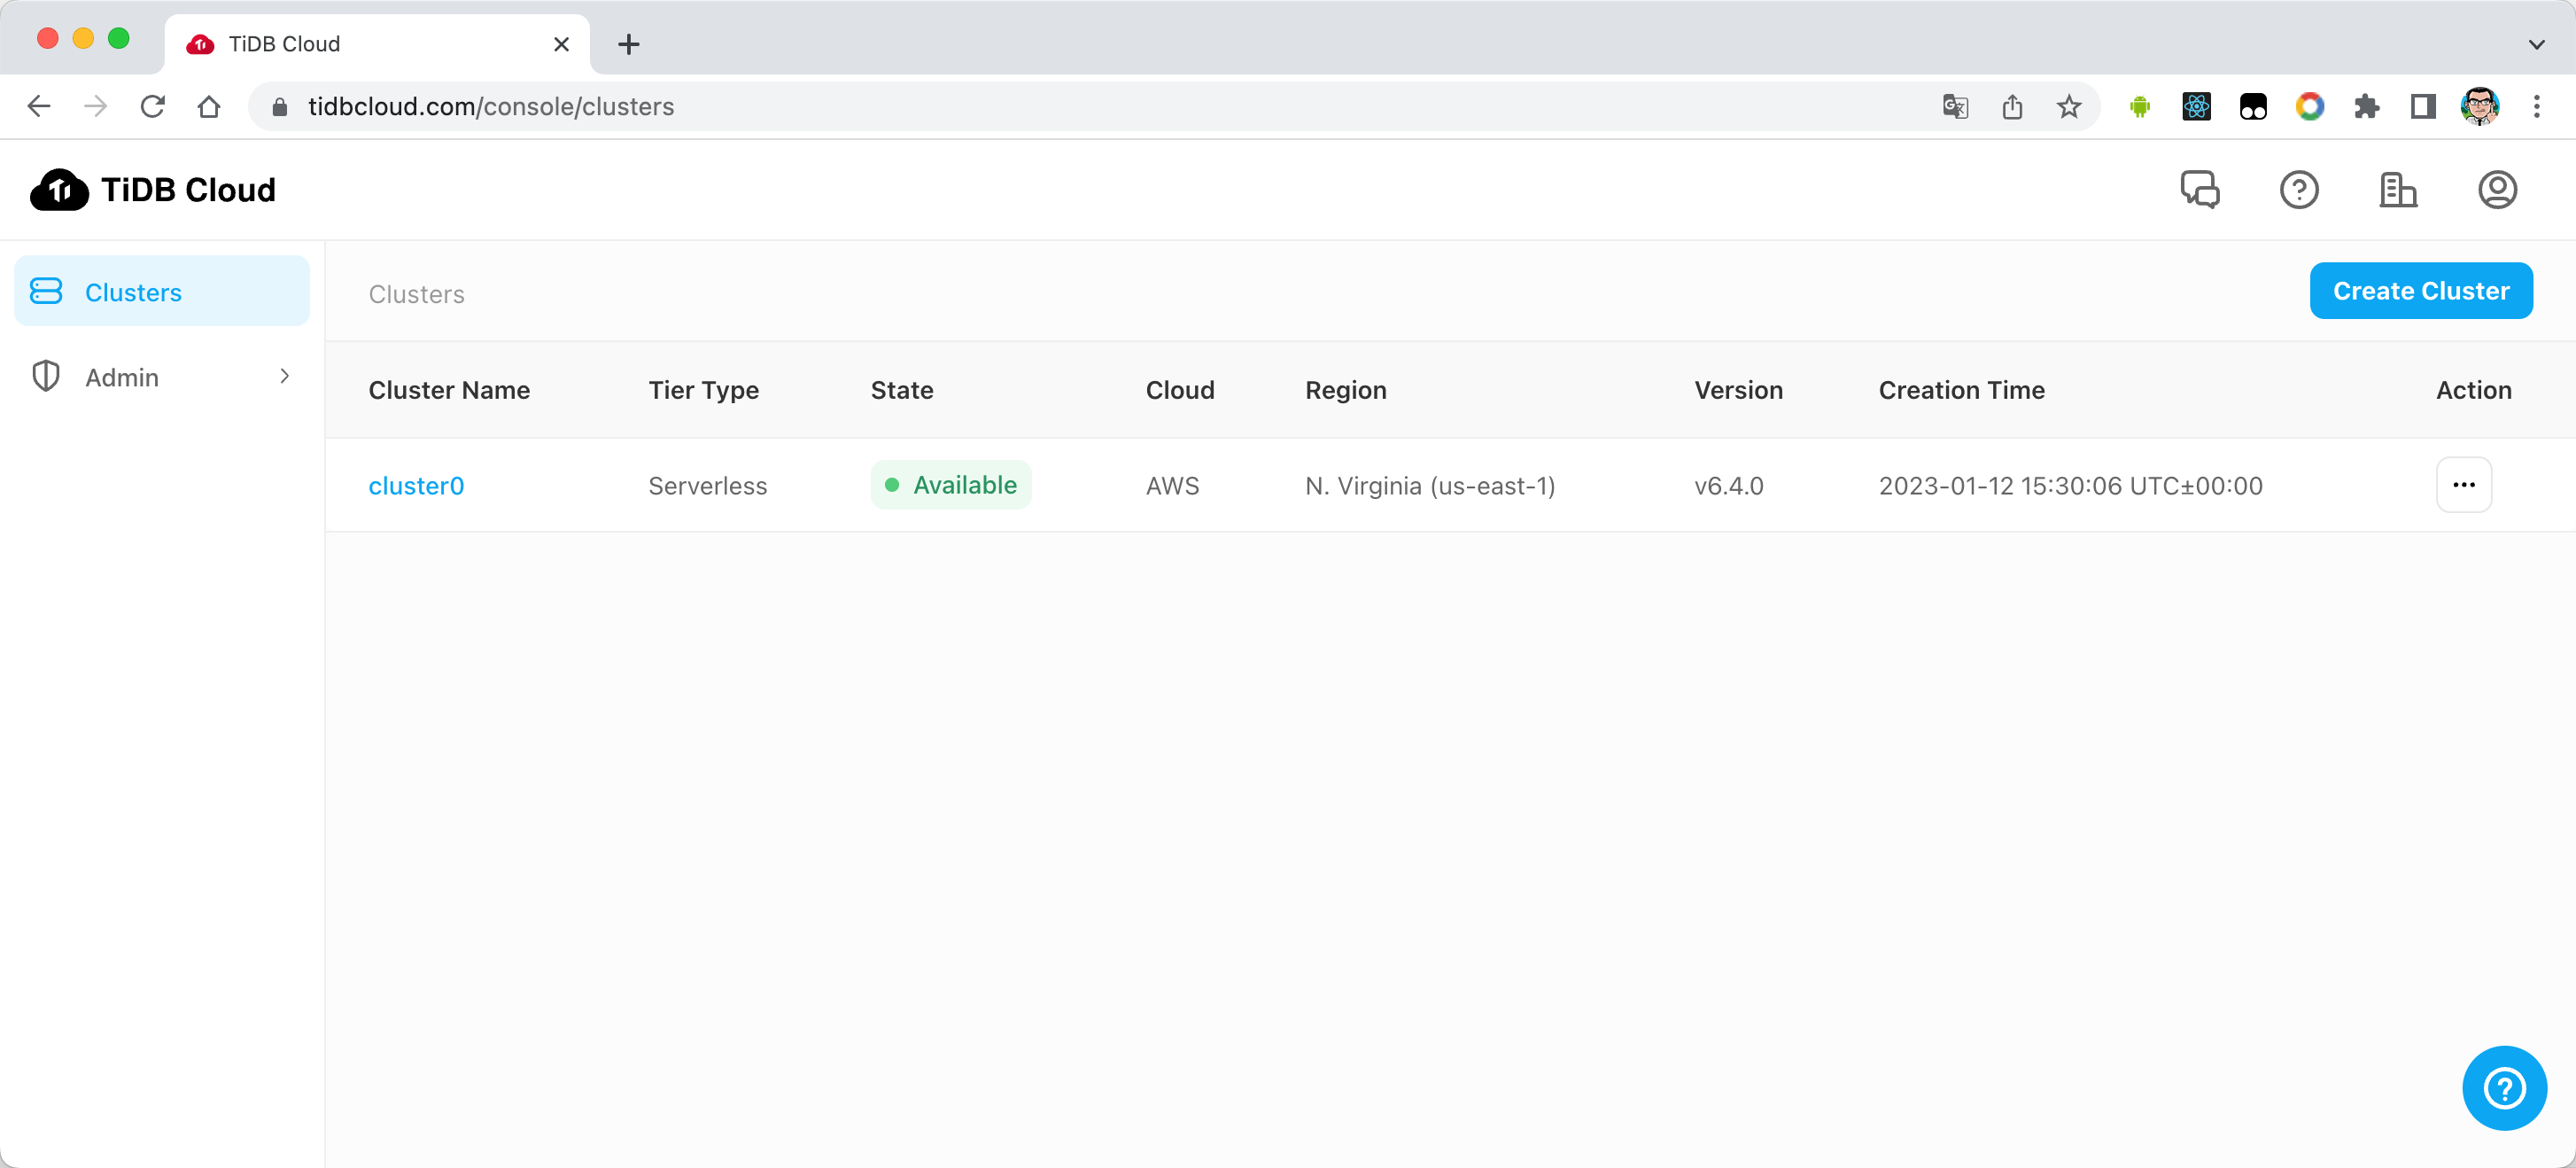
登录 TiDB Cloud 后会自动创建实 TiDB 实例,直接点击 cluster0 进入实例
左侧列表选择SQL Editor,并将并将 waline.tidb 内容按照 ; 为语句分布贴近界面执行:

waline.tidb内容为:
1 | CREATE DATABASE `waline`; |
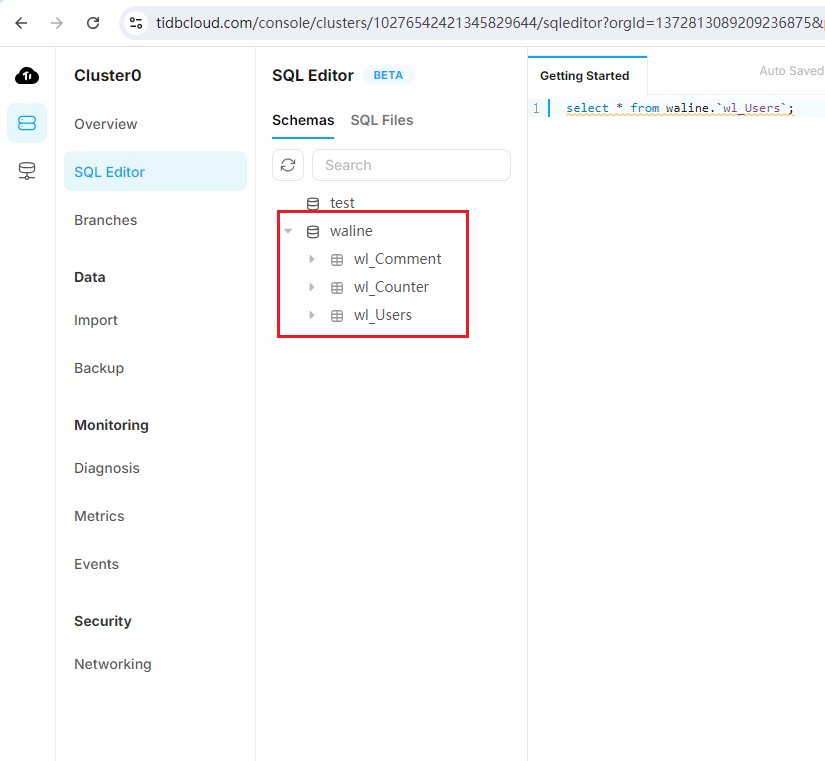
至此 Waline 数据库就已经创建完成!
在vercel上配置TiDB参数
在TiDB上获取参数:
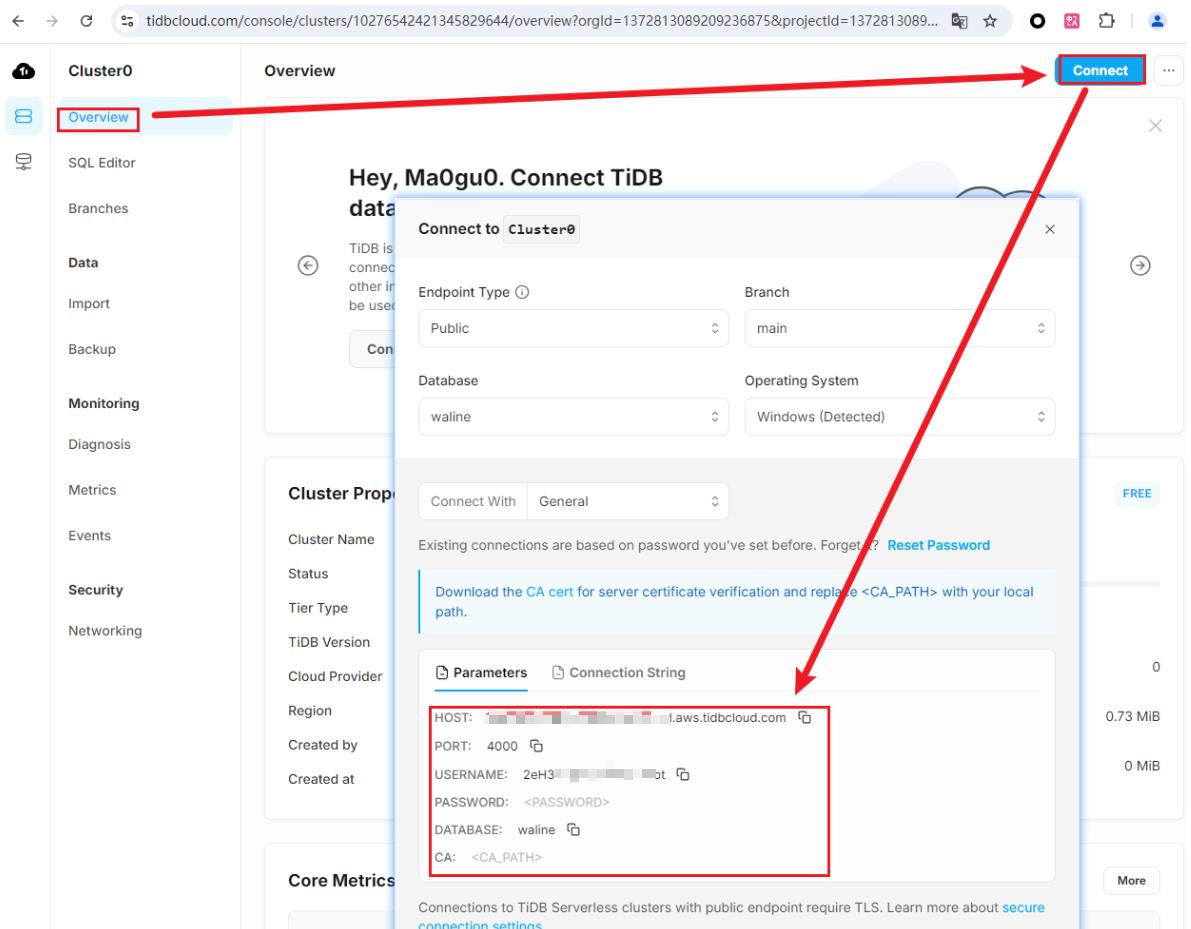
第一次设置的时候,是可以设置密码并且密码是可以看到的。
在vercel上配置参数:
| TiDB | Vercel Environment |
|---|---|
| waline | TIDB_DB |
| xxxxxxx.aws.tidbcloud.com | TIDB_HOST |
| KCxxxxxx8uIcup | TIDB_PASSWORD |
| 2eH3xxxxt | TIDB_USER |
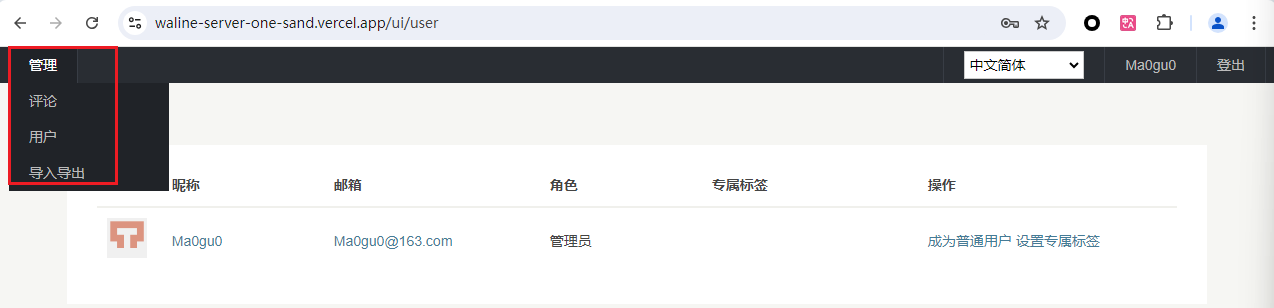
注册第一个用户
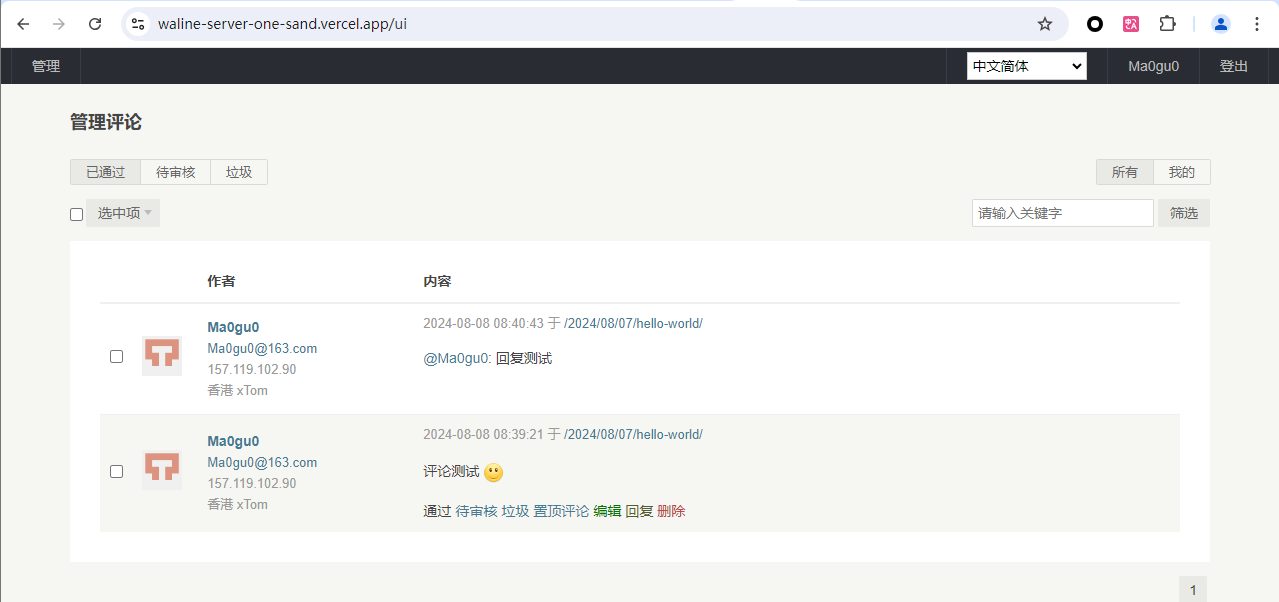
由于 Waline 有服务端,支持评论管理。我们需要注册一个账号作为管理员。
找到评论框,点击 登录 按钮,会弹出一个窗口,找到用户注册,默认第一个注册的用户为管理员,所以部署好一定要记得及时注册。
注册好,登录之后即可进入评论管理的后台,可以对评论进行管理。
注册url的获取办法:先拿到domain,再拼接/ui/register
当时注册时的样例:

进入管理后台:https://xxxx/ui/login
我这里是使用github授权登录的。
在Hexo Next主题中配置
由于 Next 主题中并不自带 Waline 的评论配置,我们需要安装官方提供的插件。在 Hexo 根目录执行:
1 | npm install @waline/hexo-next |
1 | E:\GTMC\blog>npm install @waline/hexo-next |
找到 Next 的主题配置文件,在最后加上
1 | # Waline |
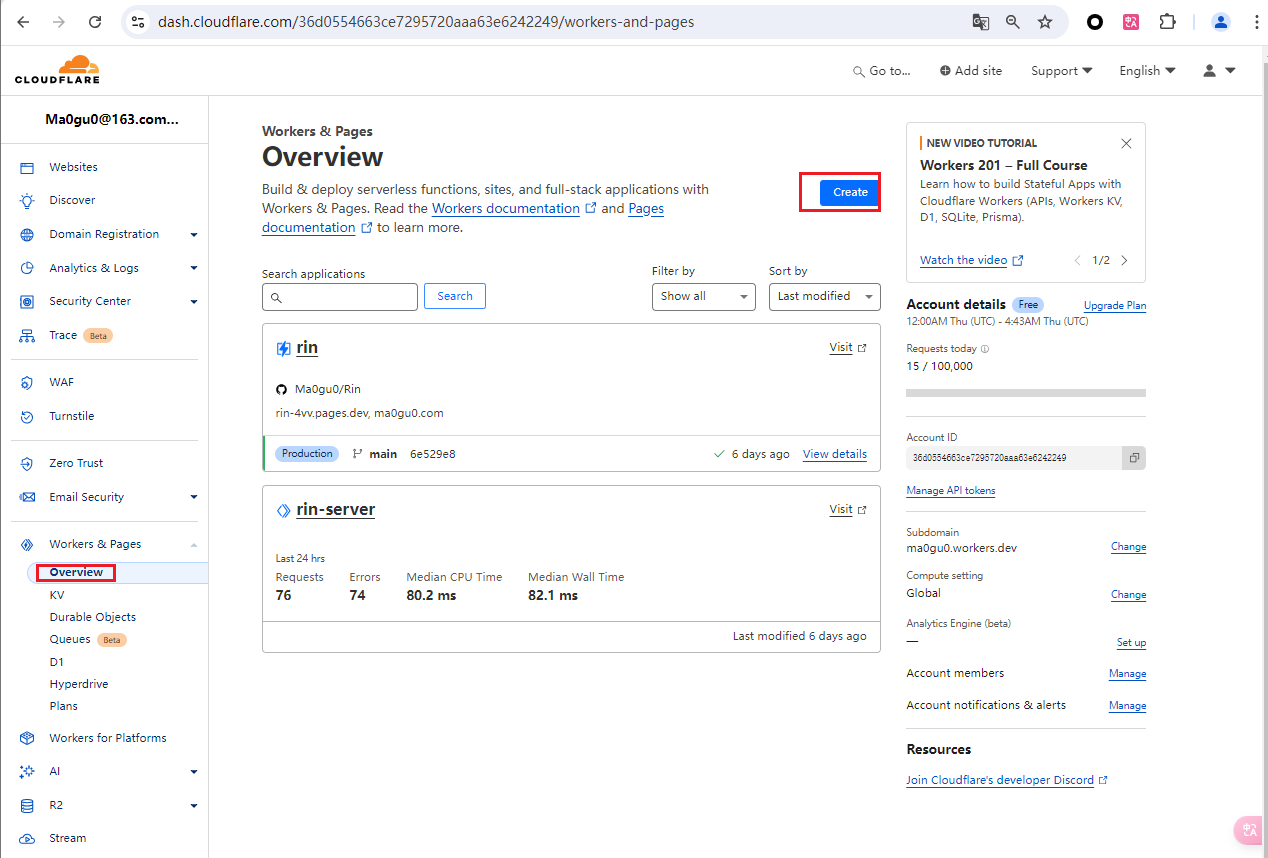
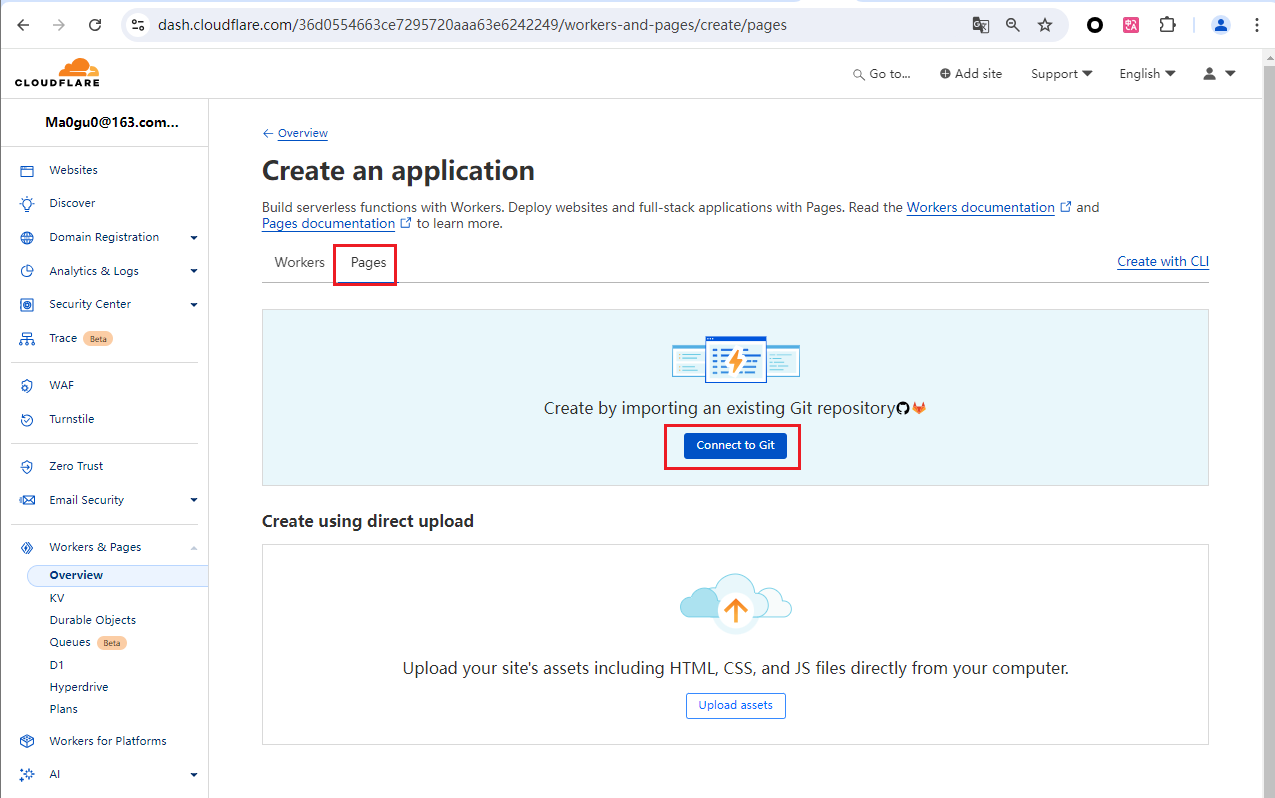
博客发布到Cloudflare Pages
为什么不发布到github pages上:
因为发布到github上的博客,仓库必须是public,加密的文章对应的图片,也会因为仓库是public 的导致图片泄露。
为什么发布到Cloudflare pages上:
Cloudflare Pages 是一个由 Cloudflare 提供的静态网站部署服务。它允许用户轻松地将静态网站部署到 Cloudflare 的全球内容分发网络(CDN)上。
相对于 GitHub Pages,Cloudflare Pages 的优势主要体现在以下几个方面:
- CDN 覆盖范围:Cloudflare 在中国大陆拥有合规的 CDN 服务,这意味着您的网站可以通过 Cloudflare 在中国获得更好的访问性能,因为 Cloudflare 在全国各地都拥有较广泛的 CDN 点。
- 性能与稳定性:Cloudflare 的 CDN 架构致力于提供更快的加载速度和更好的可用性,并通过优化网络效率来提高页面交付速度。
- 安全性:Cloudflare 不仅仅提供 CDN,还提供安全防护、SSL 加密等服务,这些服务可以帮助保护您的网站免受 DDoS 攻击等安全威胁。
- 全球网络优势:Cloudflare 在全球拥有大量的数据中心,能够更好地为全球用户提供稳定的访问体验。
另外,Cloudflare 还提供了一定量的免费存储服务 R2,如果你愿意的话还可以把你的图床部署在这里。
在github上创建仓库
在 Github 中创建一个新项目用于存储 Hexo 博客:
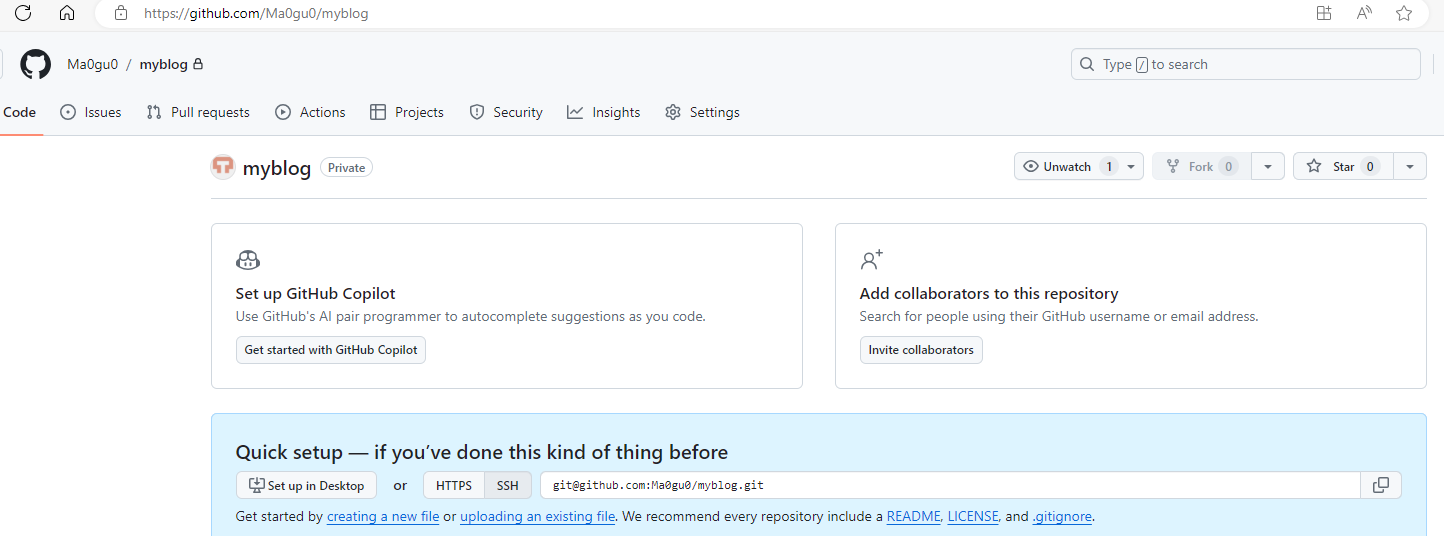
注意:博客一定要设置为private,不能是public。
在站点配置文件中设置:
1 | # Deployment |
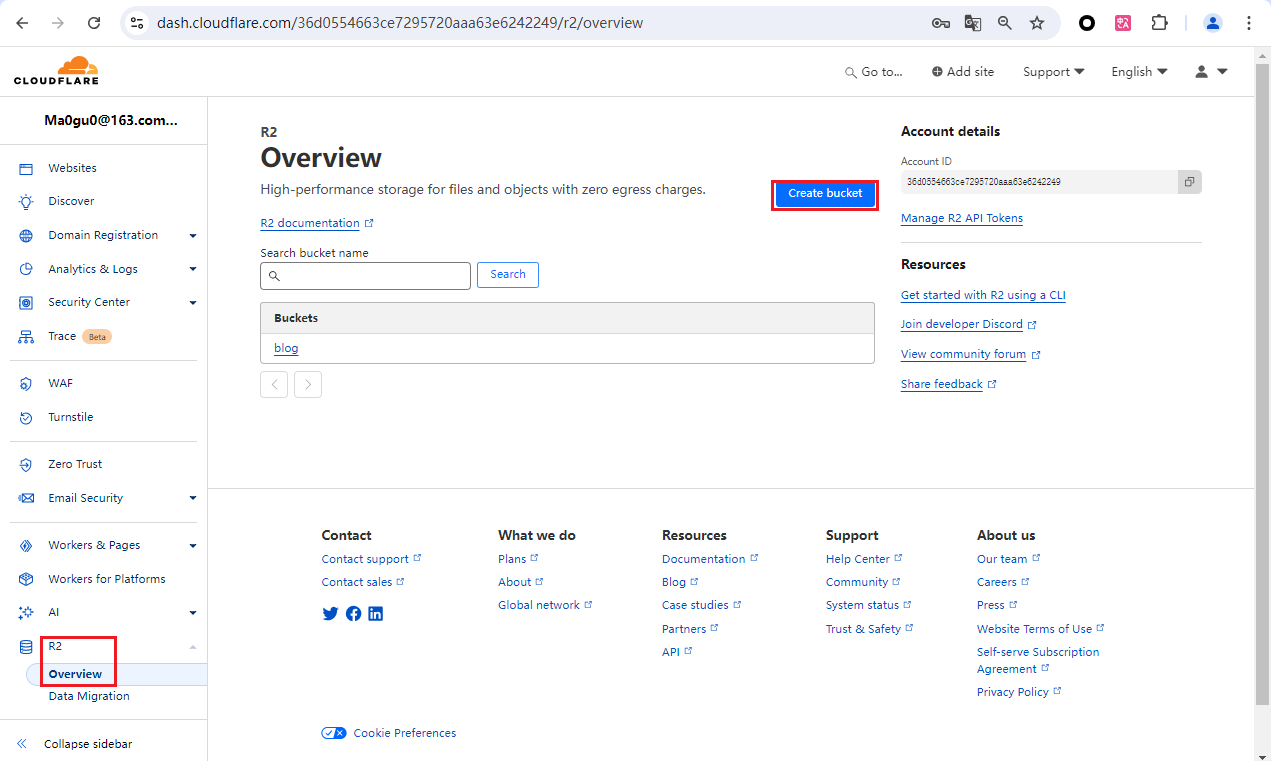
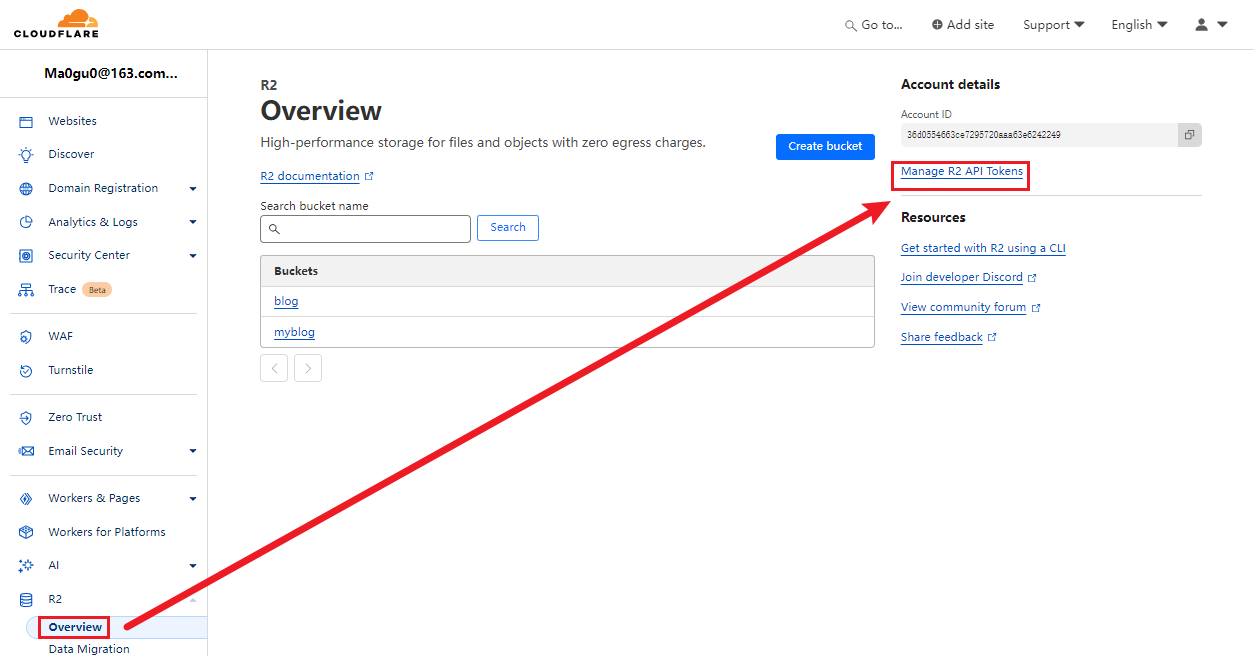
如何将图片上传到Cloudflare R2上
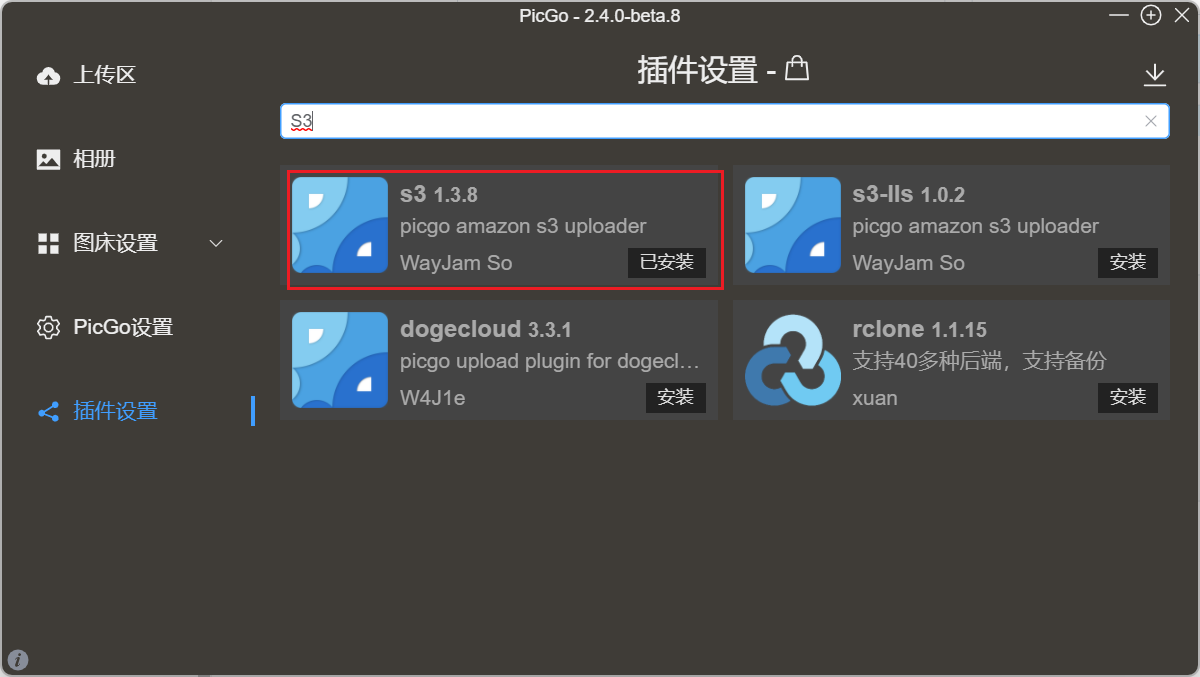
下载并设置PicGo
下载PicGo,并下载插件:
需要设置这几项:

这几项的内容从哪里来呢:
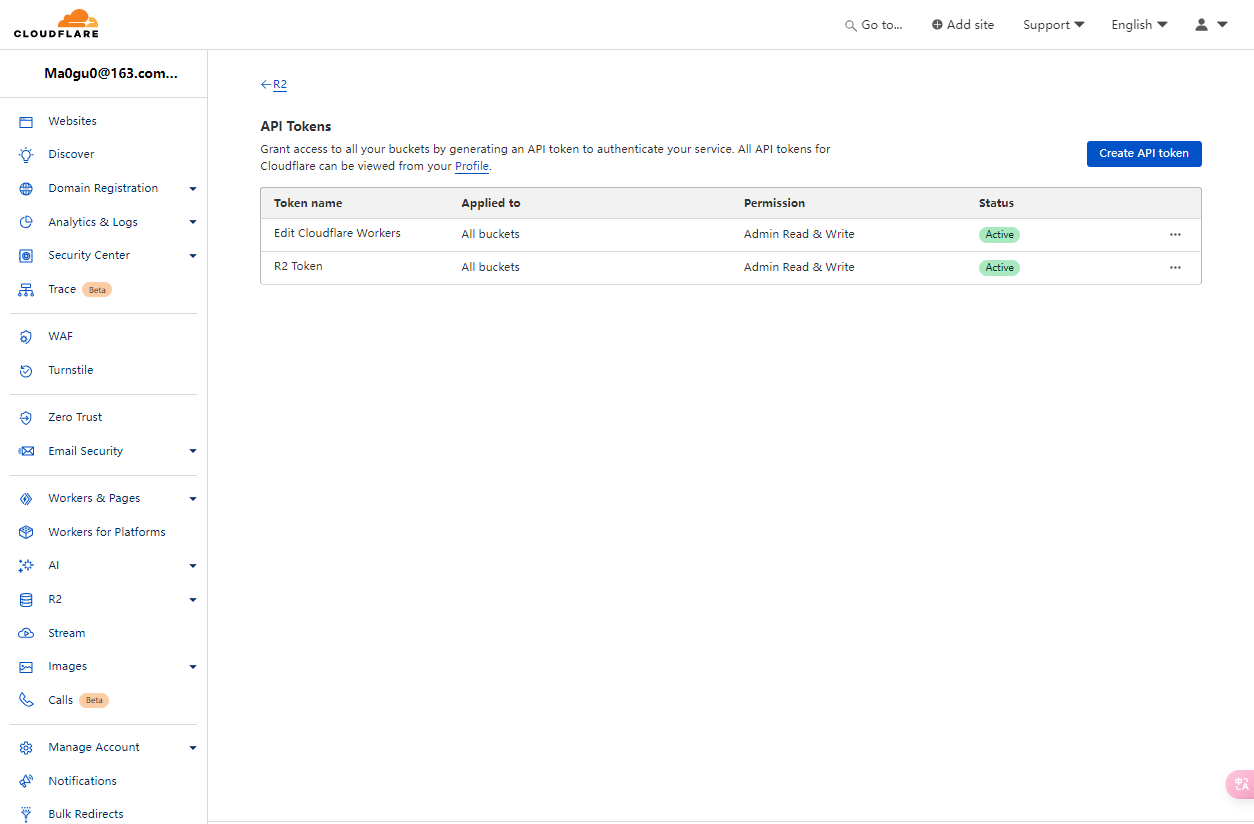
去Cloudflare的R2上获取。
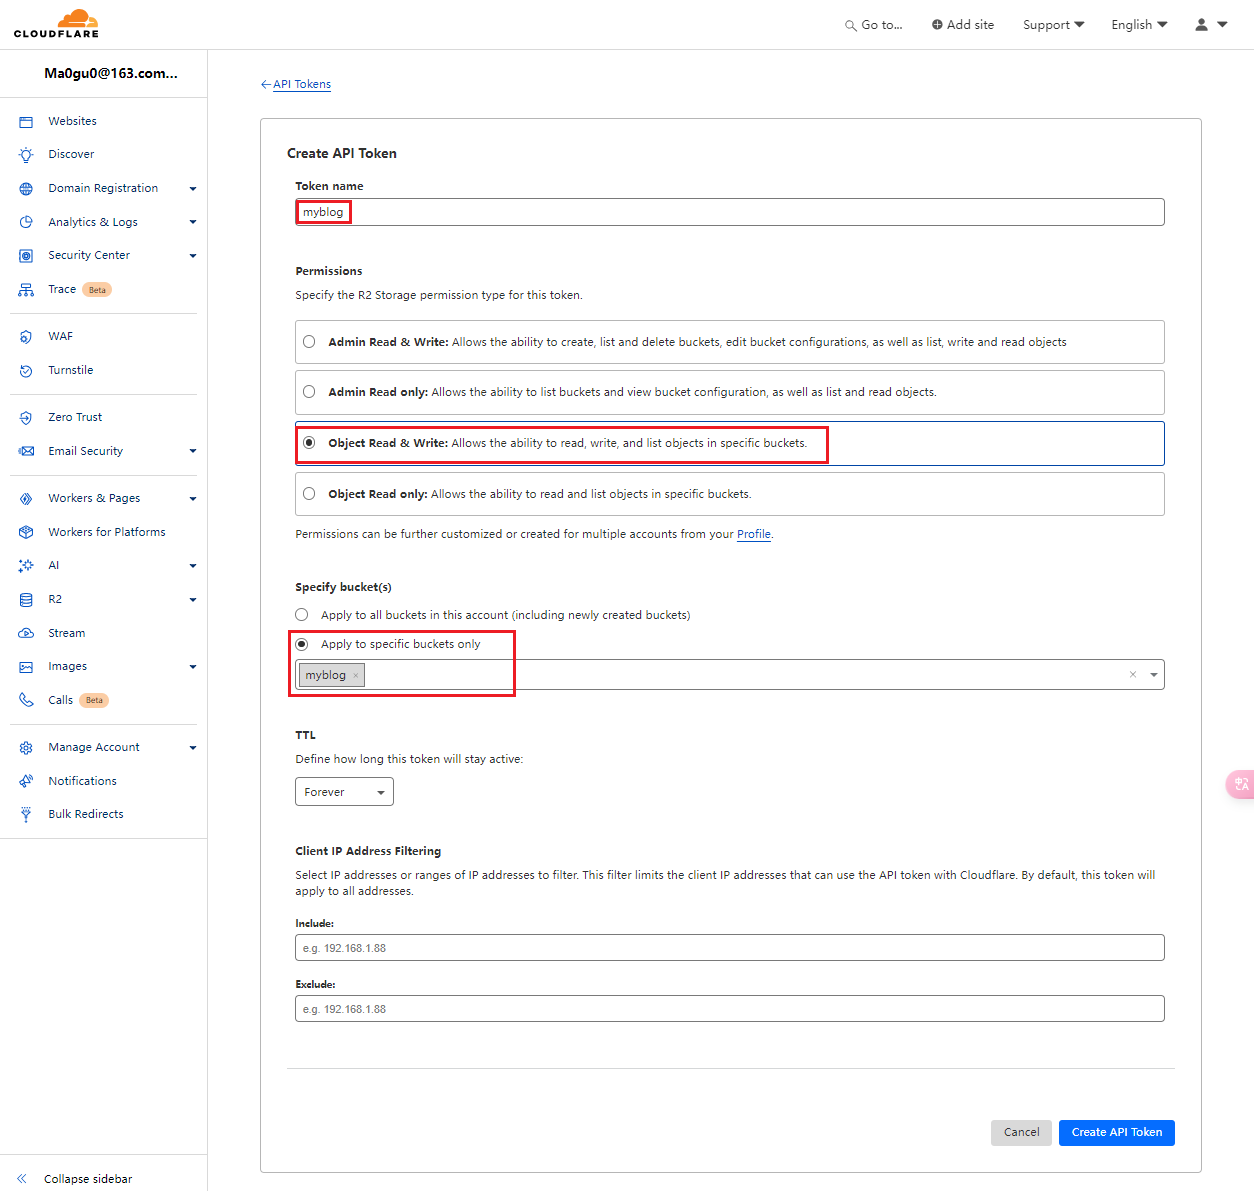
设置 Cloudflare R2
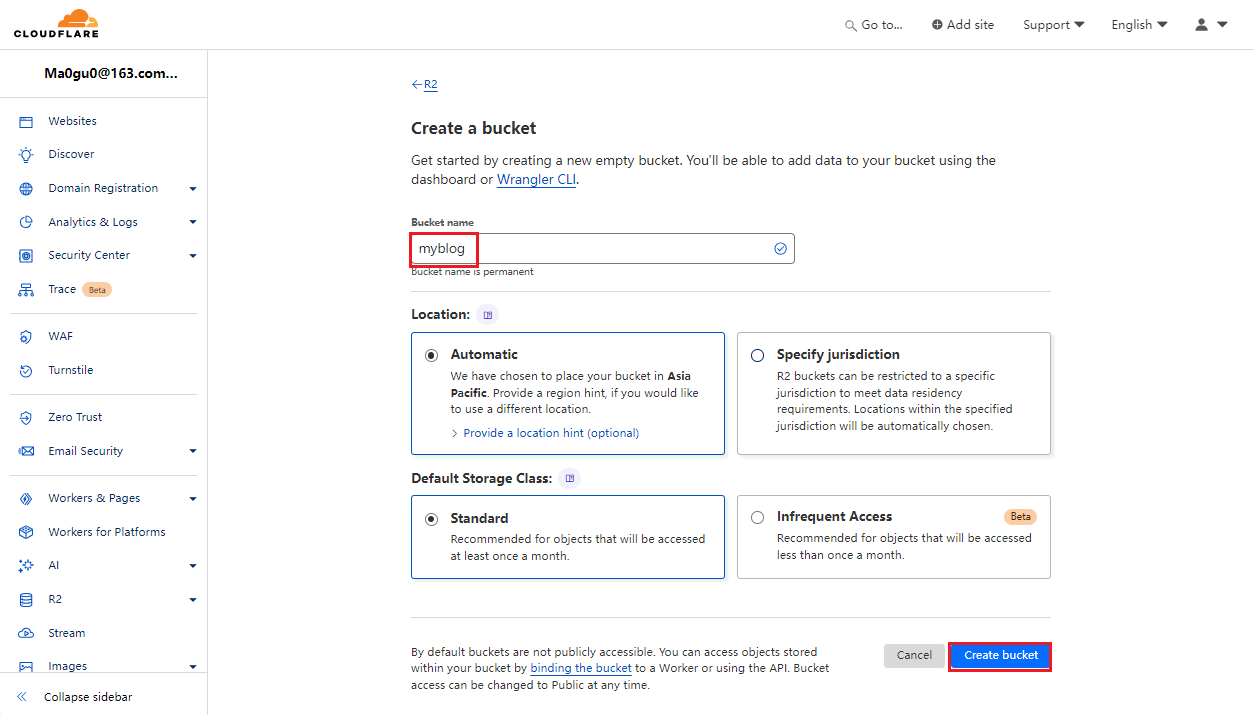
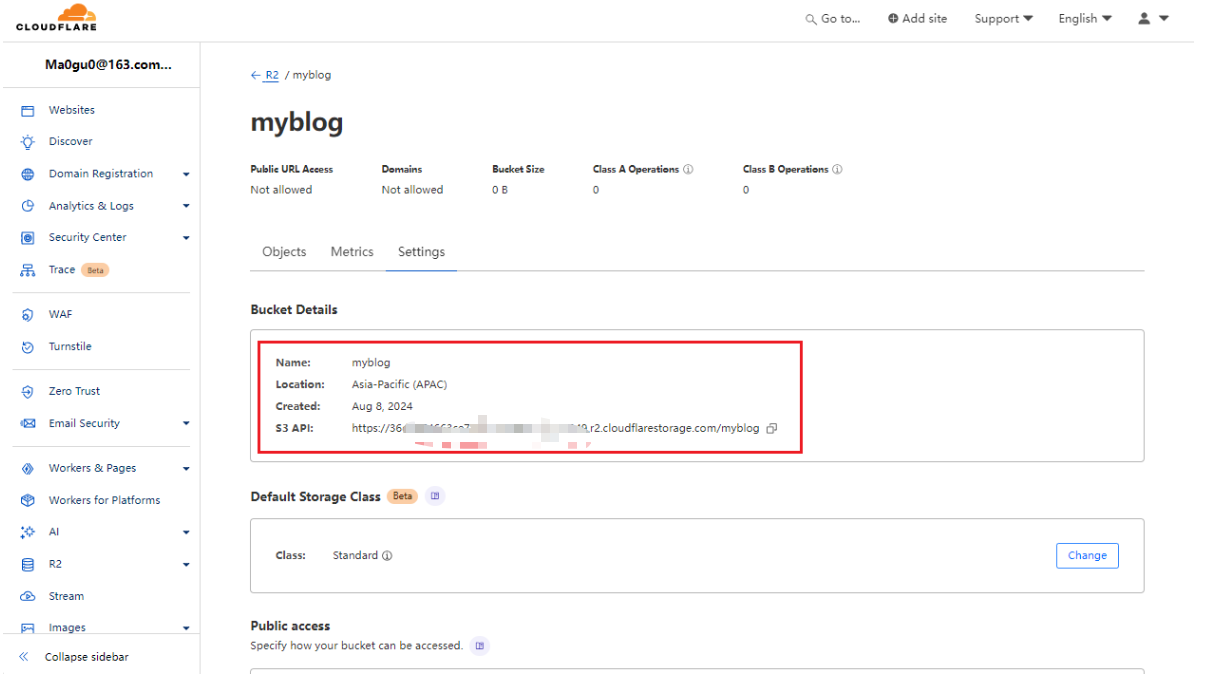
1 | Name:myblog |
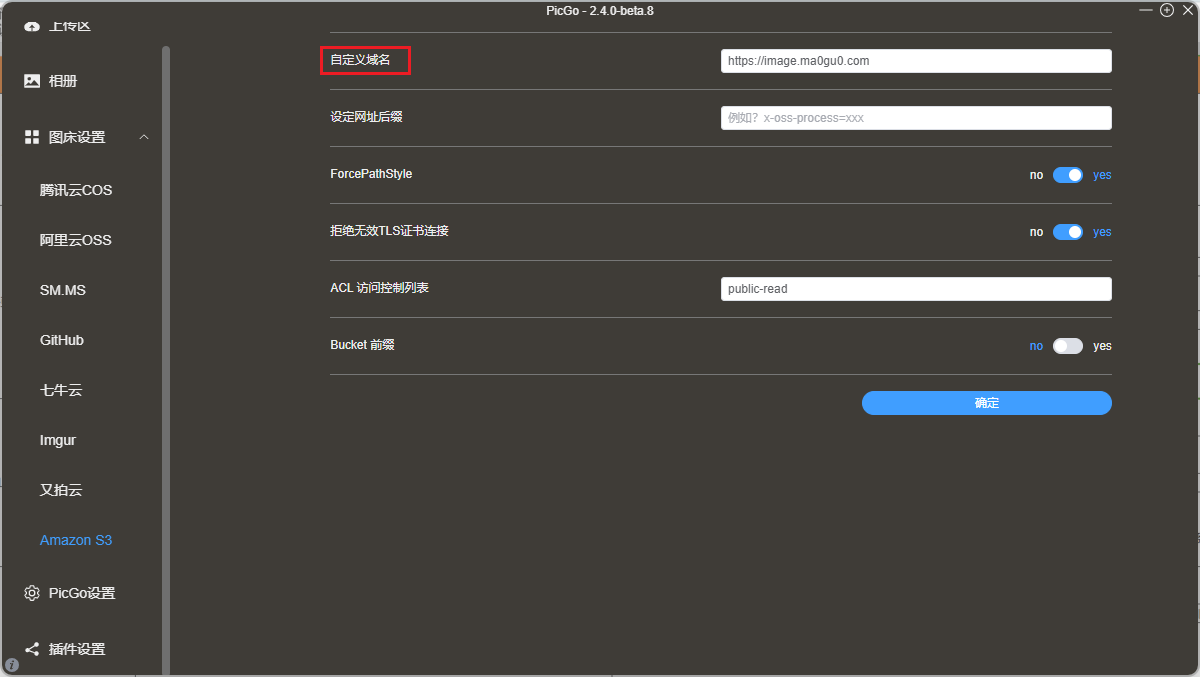
设置custom domain:
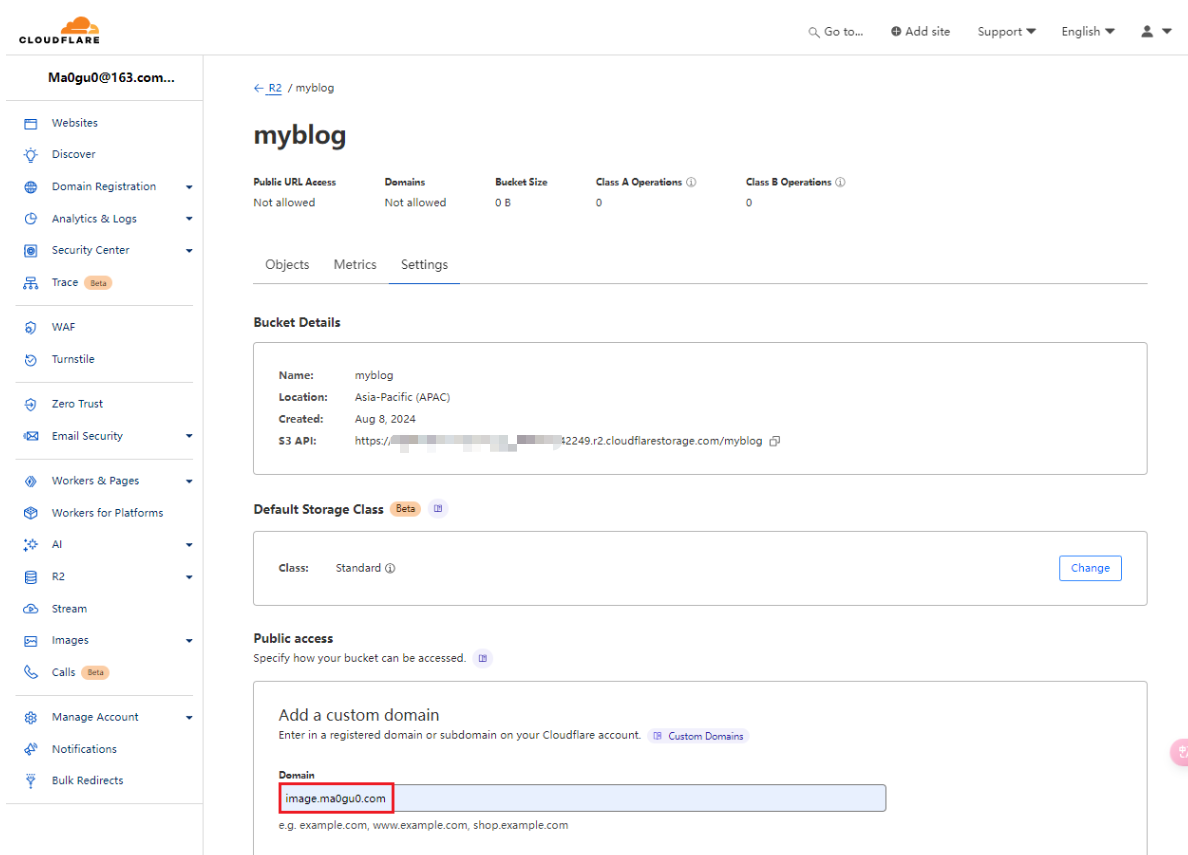
这个域名image.ma0gu0.com 就是图床设置中的自定义域名https://image.ma0gu0.com
获得R2对应的token:
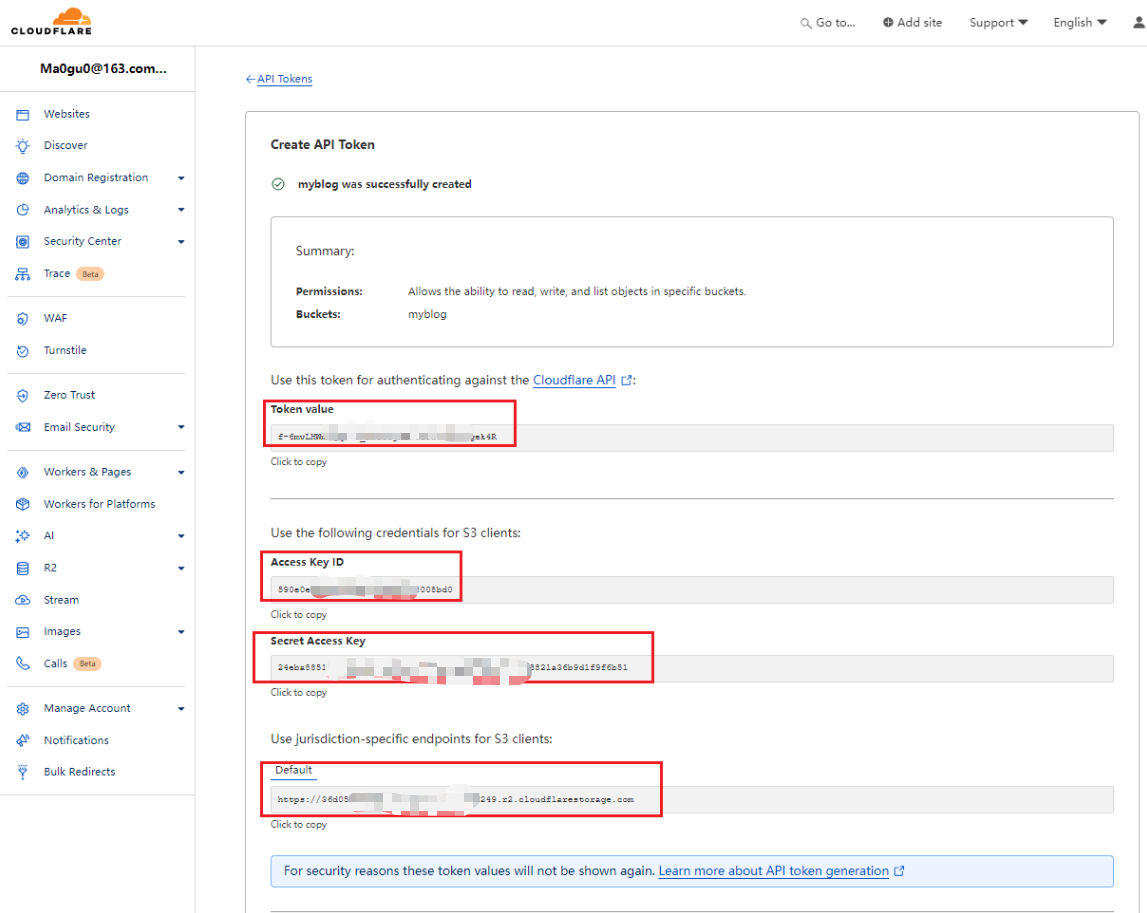
1 | Token value:f-6mvLxxxxxxqJwF_wxxxxxxgek4R |
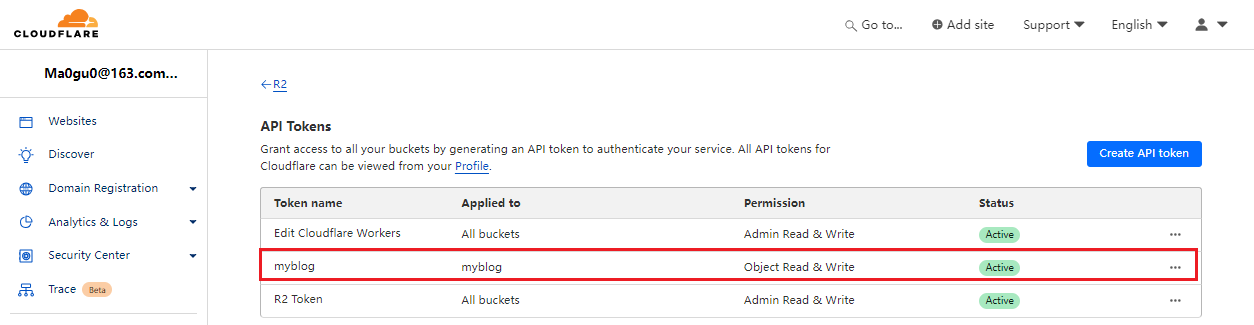
最后在PicGo上图床设置内容 :
| 参数名 | 内容 | 来源 |
|---|---|---|
| 应用密钥ID | 590e0eeccaxxxxxxxxxxx8fe287e8008bd0 | |
| 应用密钥 | 24eba88511d743a6f04xxxxxxxxx7d8821a36b9d1f9f6b51 | |
| 桶名 | myblog | |
| 文件路径 | {filename} | |
| 自定义节点 | https://36d0554663cxxxxxxxxxe6242249.r2.cloudflarestorage.com | |
| 自定义域名 | https://image.ma0gu0.com |
对应Typora设置: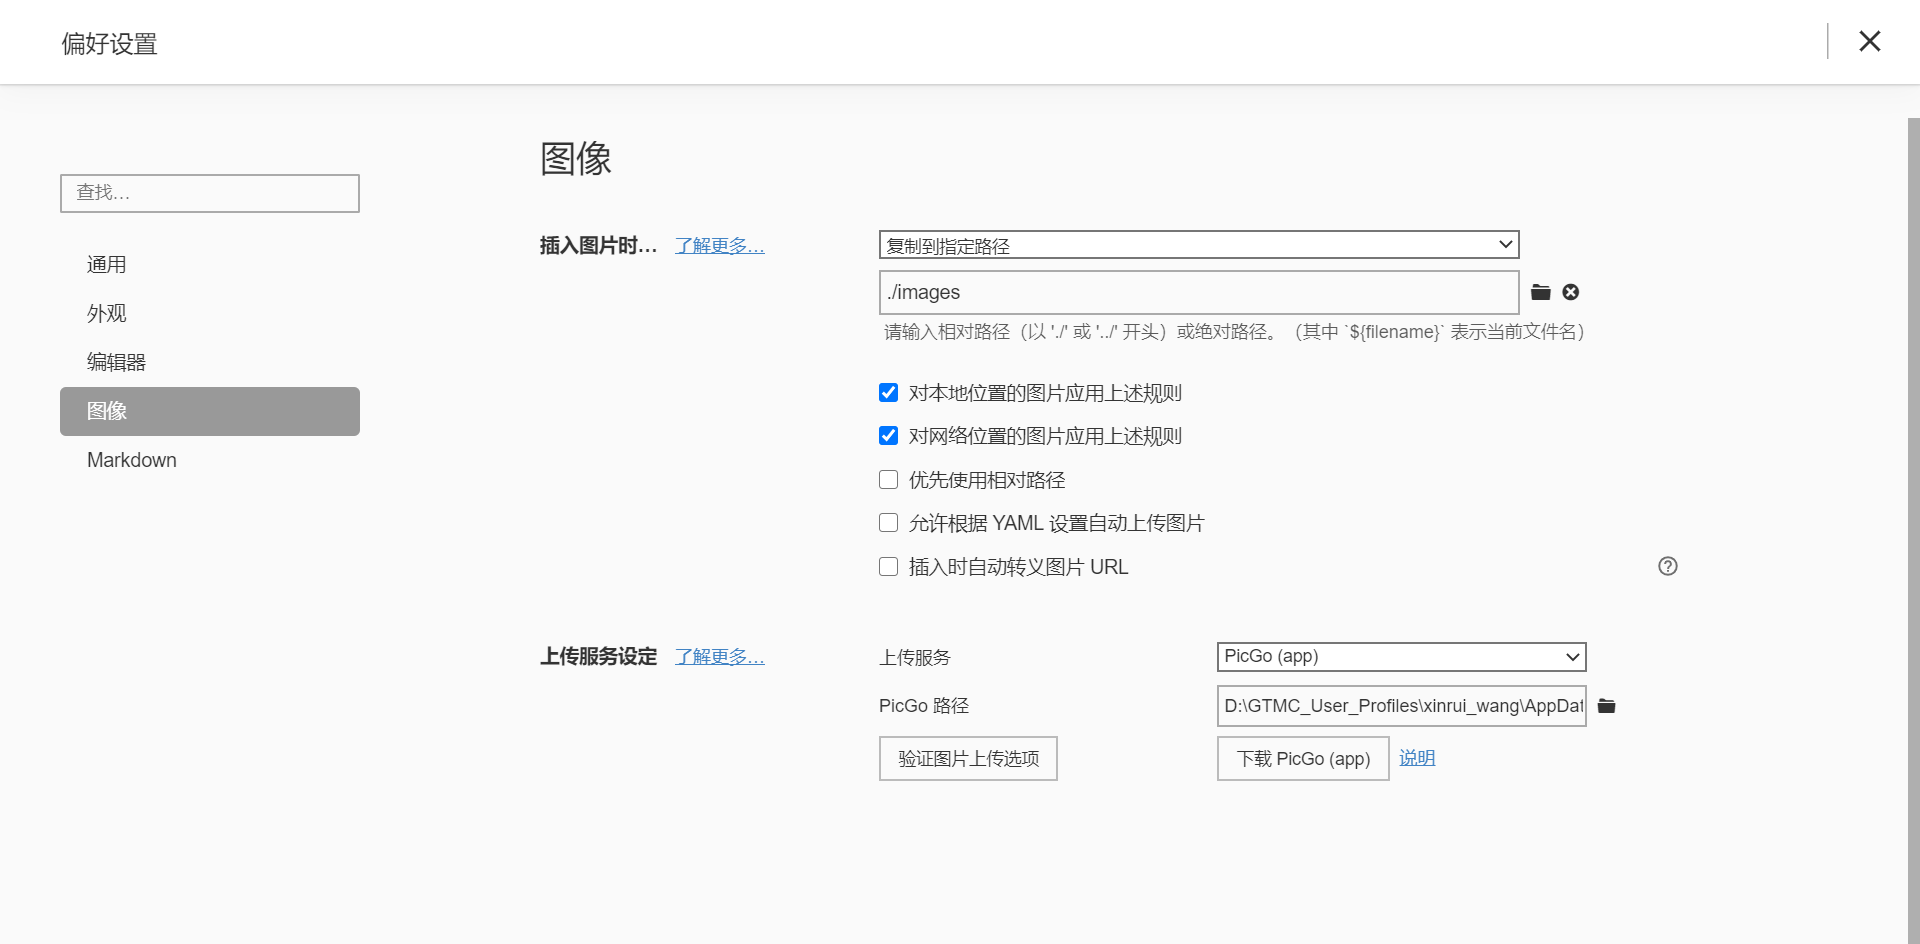
本地图片与存储桶文件名一致
待完善。
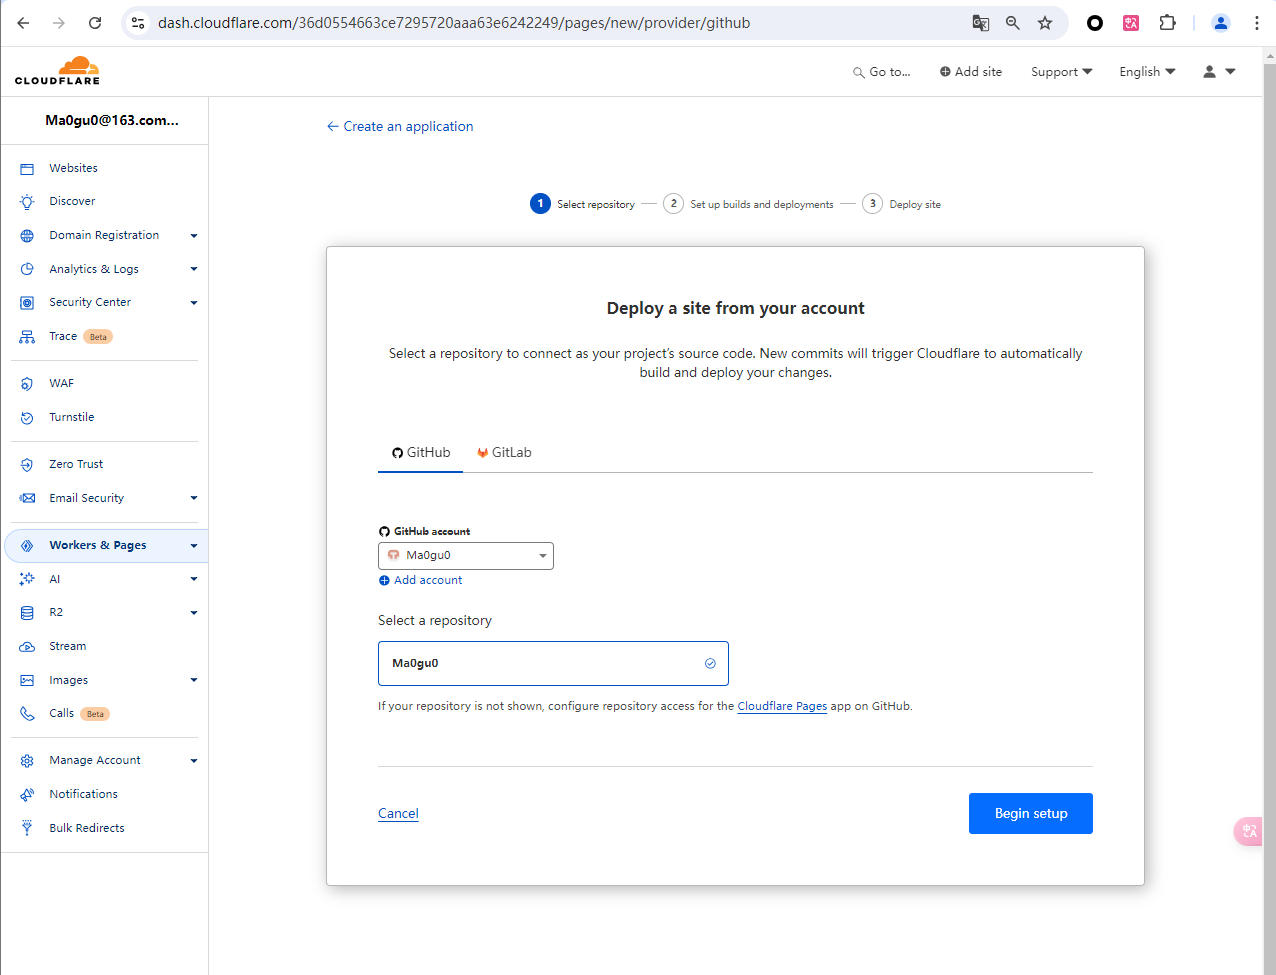
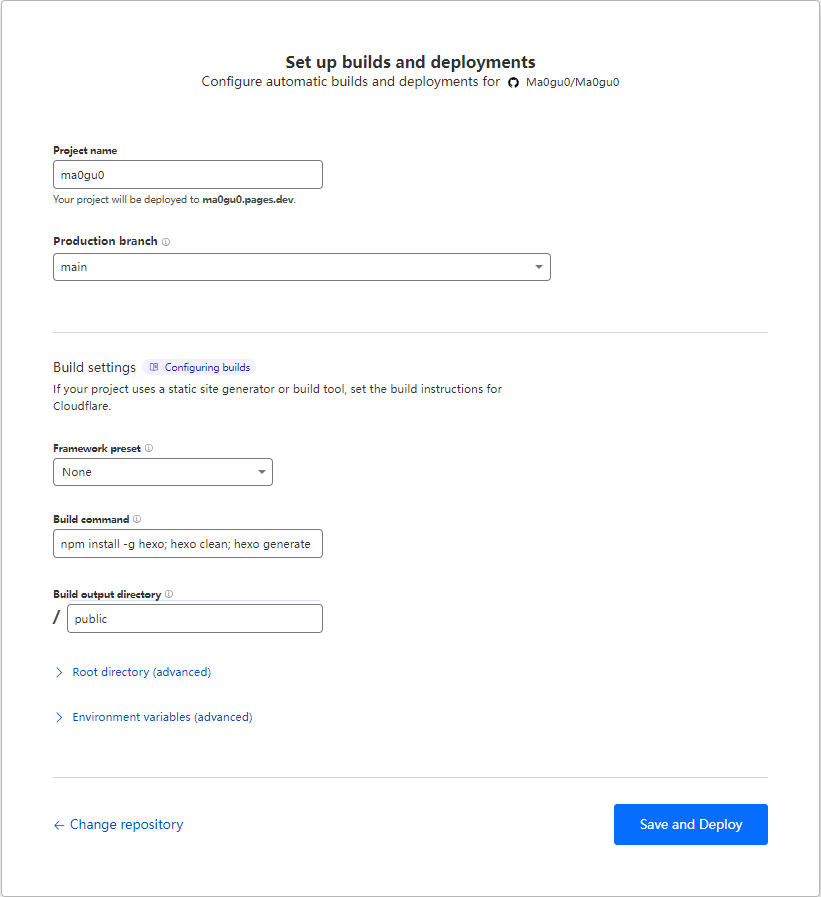
部署到Cloudflare Pages
Hexo文章加密
今天给大家推荐一款适用于 Hexo 的静态博客加密插件:hexo-blog-encrypt,搭配此插件你可以写一些私密博客,通过密码验证的方式让人不能随意浏览。
1 | npm install hexo-blog-encrypt |

用法:
1 | --- |
abstract:用于设置加密文章显示的摘要。message:输入密码提示。wrong_pass_message: 输入错误提示。
vercel.app被墙的解决办法
现在遇到的问题是:当把博客发布出去后,如果访客不能科学上网的情况下,是看不到评论的。
解决思路:在主域名下创建二级域名,给vercel.app用
第一步:在阿里云的域名配置上,增加一个cname
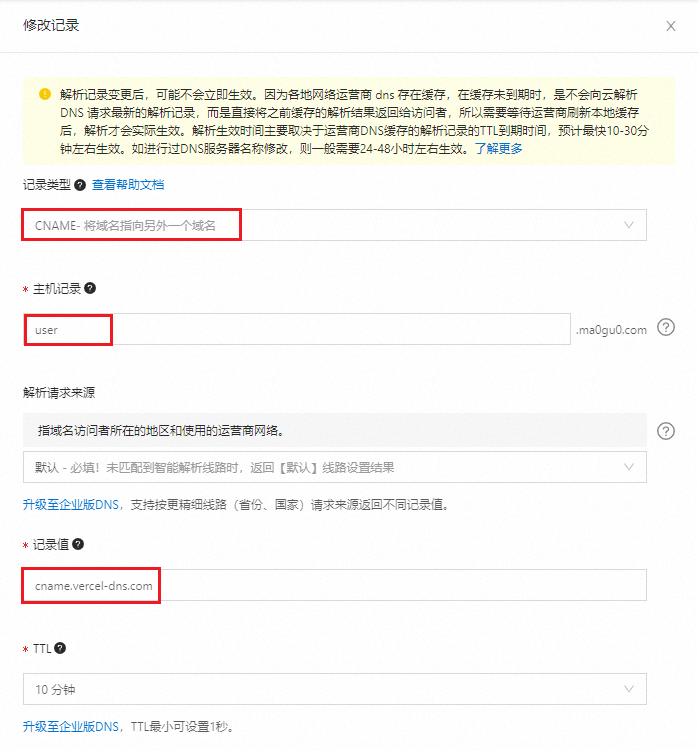
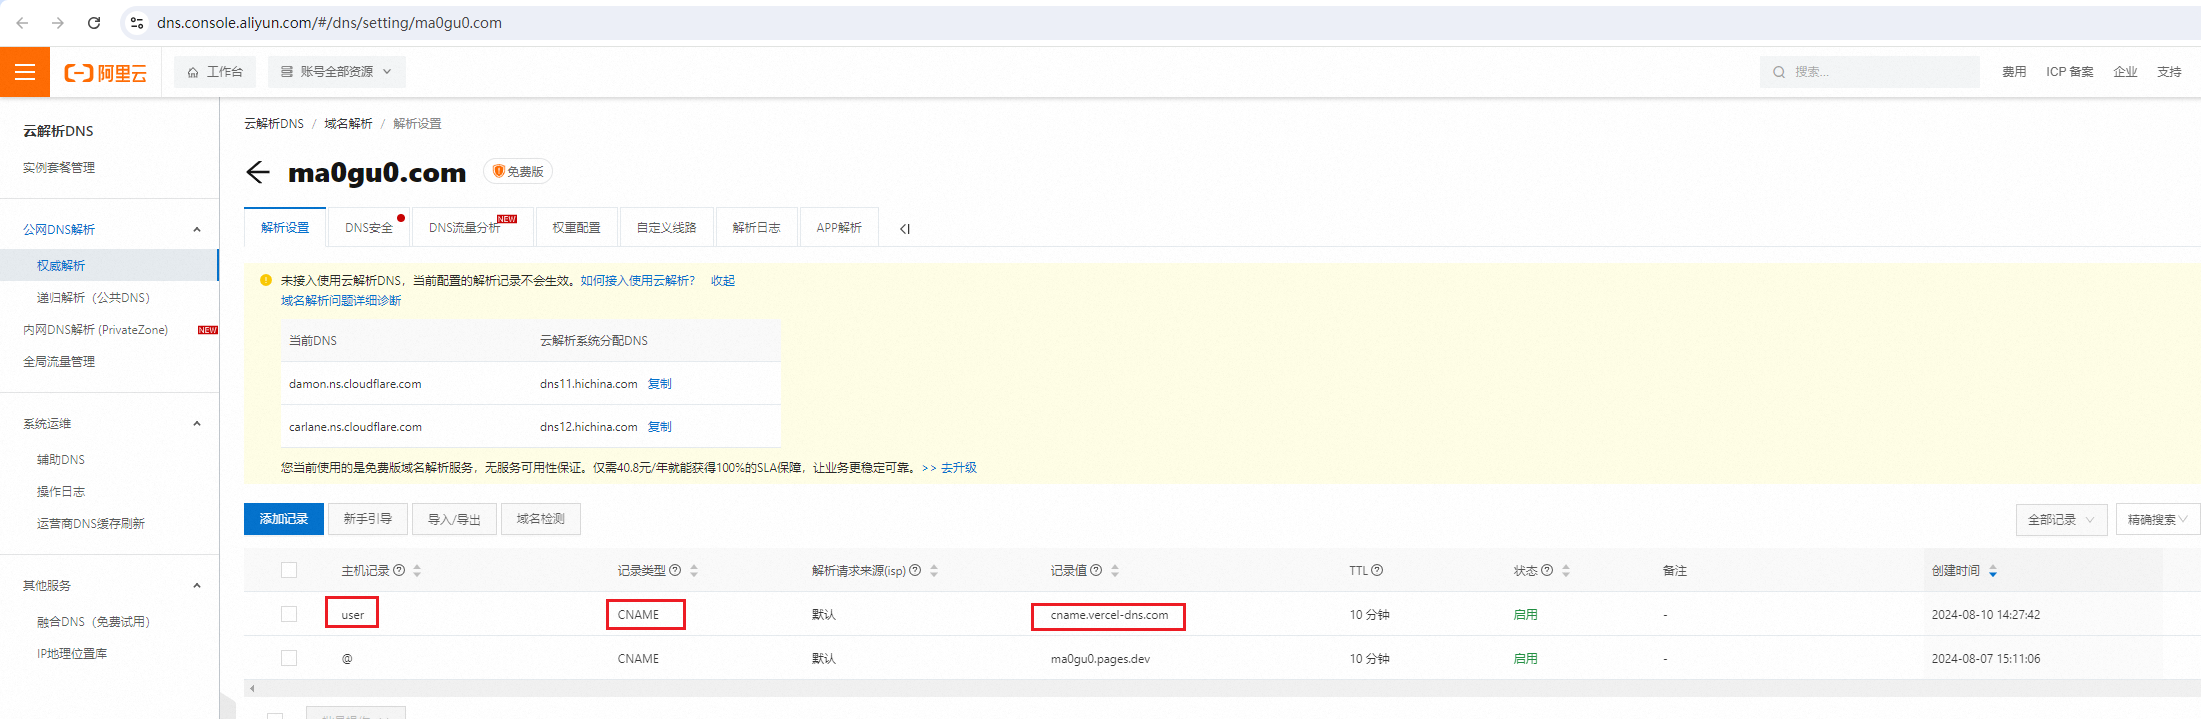
第二步:在Cloudflare的DNS上增加一条cname记录
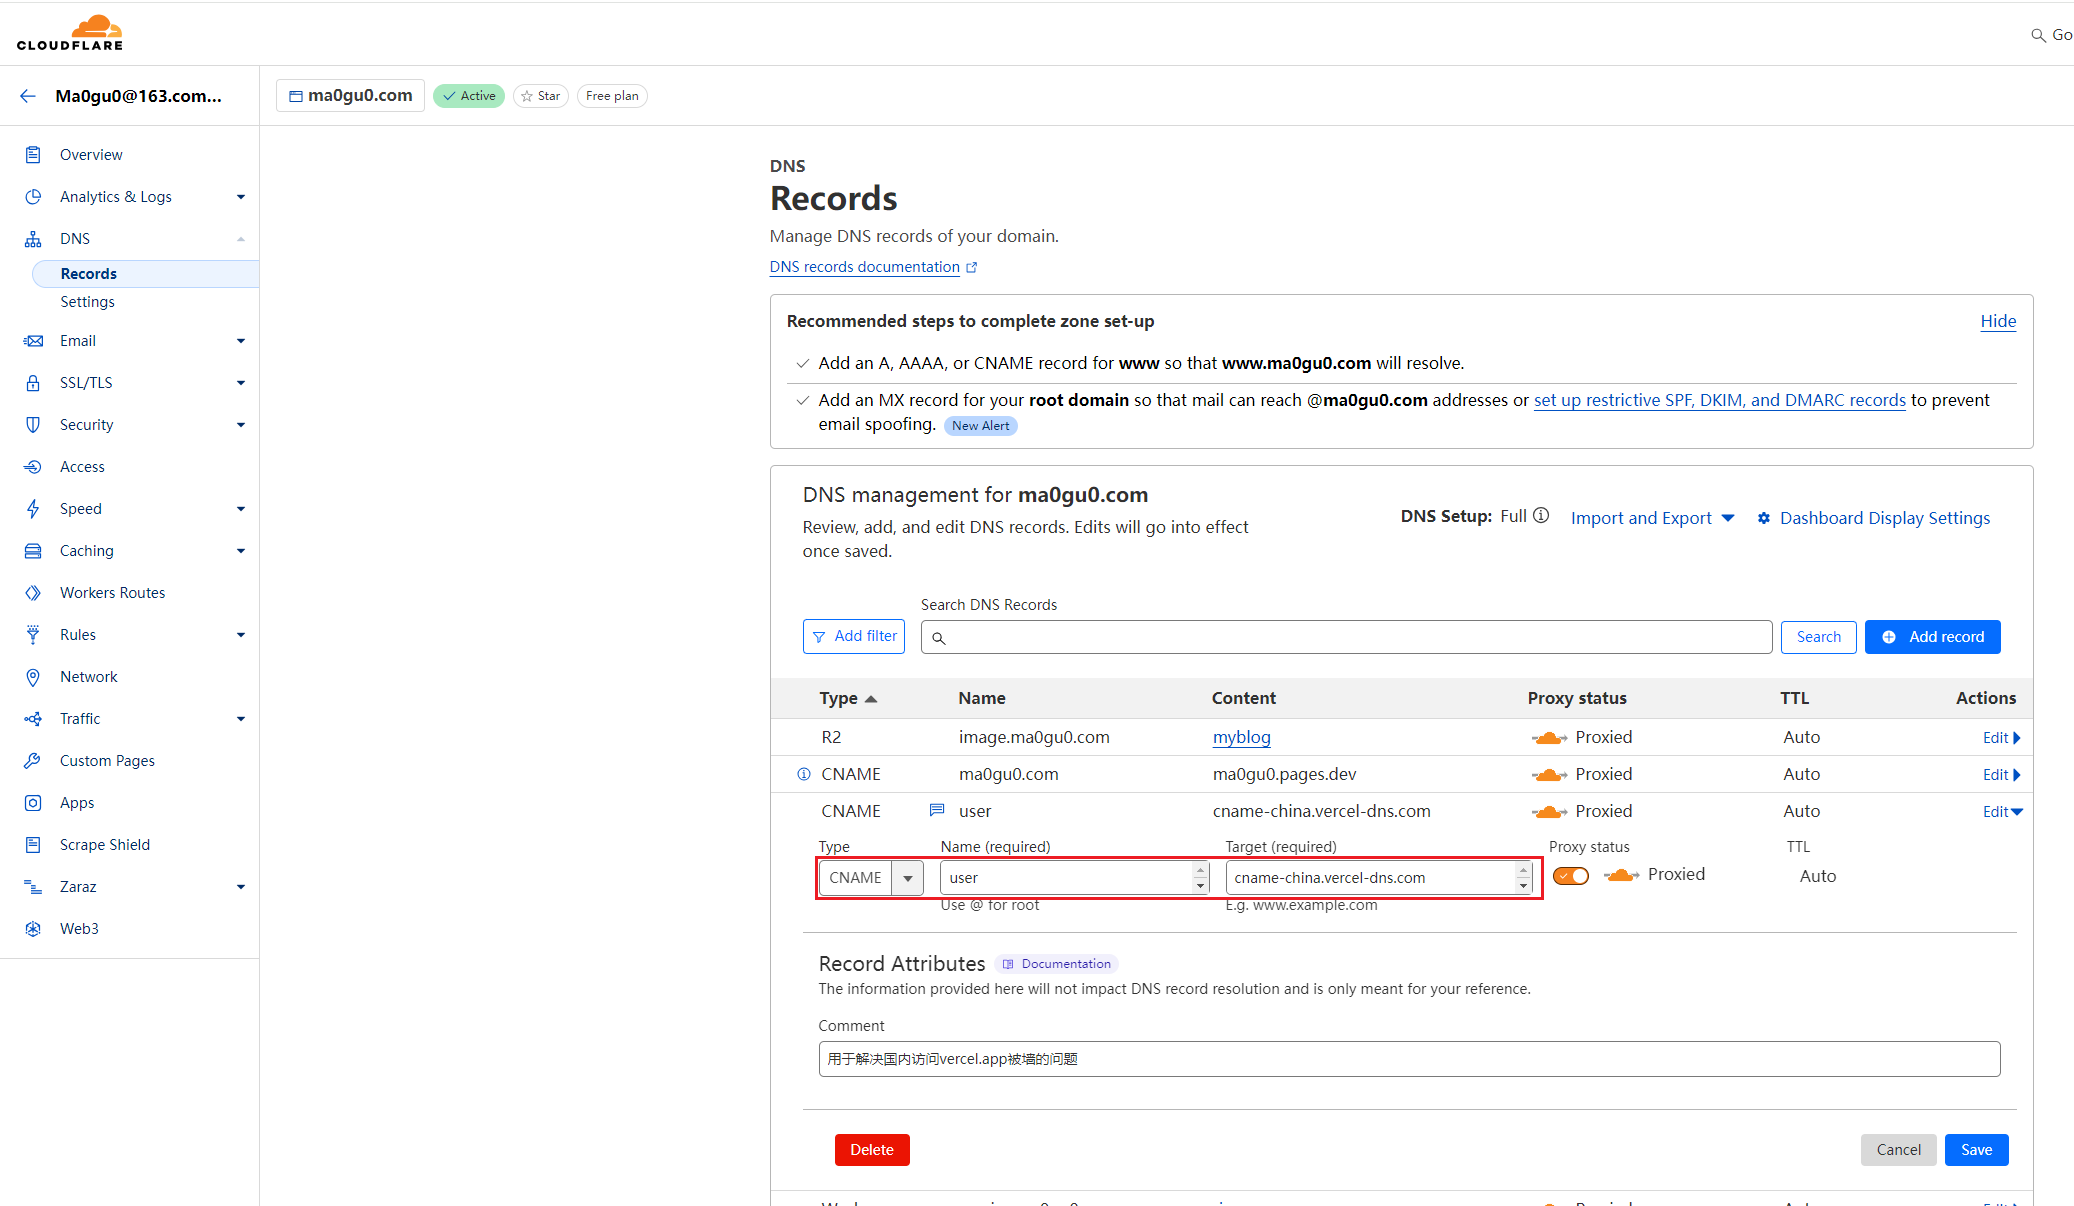
这个cname指向:cname-china.vercel-dns.com
第三步:在vercel.com生成的应用上,增加一个domain

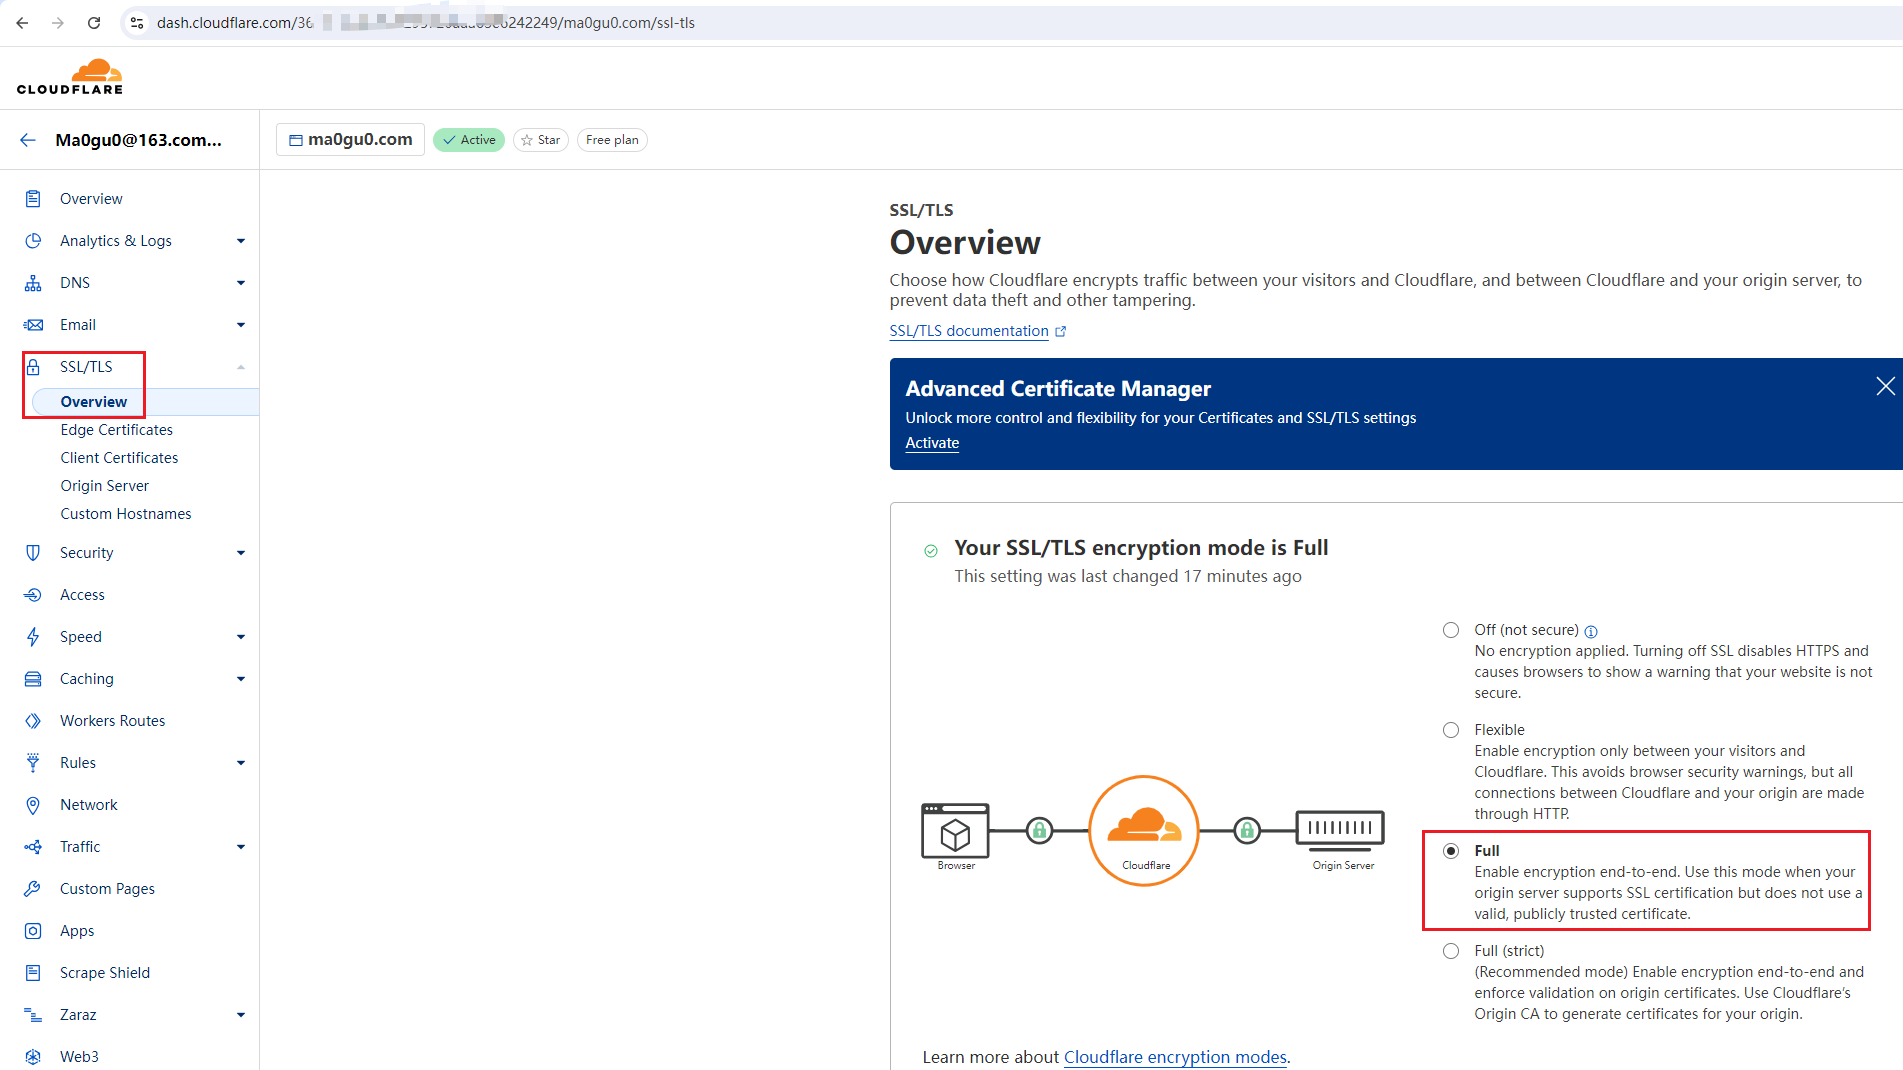
第四步:设置加密模式为完全
会遇到重定向次数过多的问题。
这其实是Cloudflare为添加的站点加密模式设置错误导致的。
进入 Cloudflare Dashboard,点击有问题的域名,打开左侧的 SSL/TLS 设置,在 Overview 中设置加密模式为完全或完全(严格)即可:
第五步:测试验证,通过访问user.ma0gu0.com
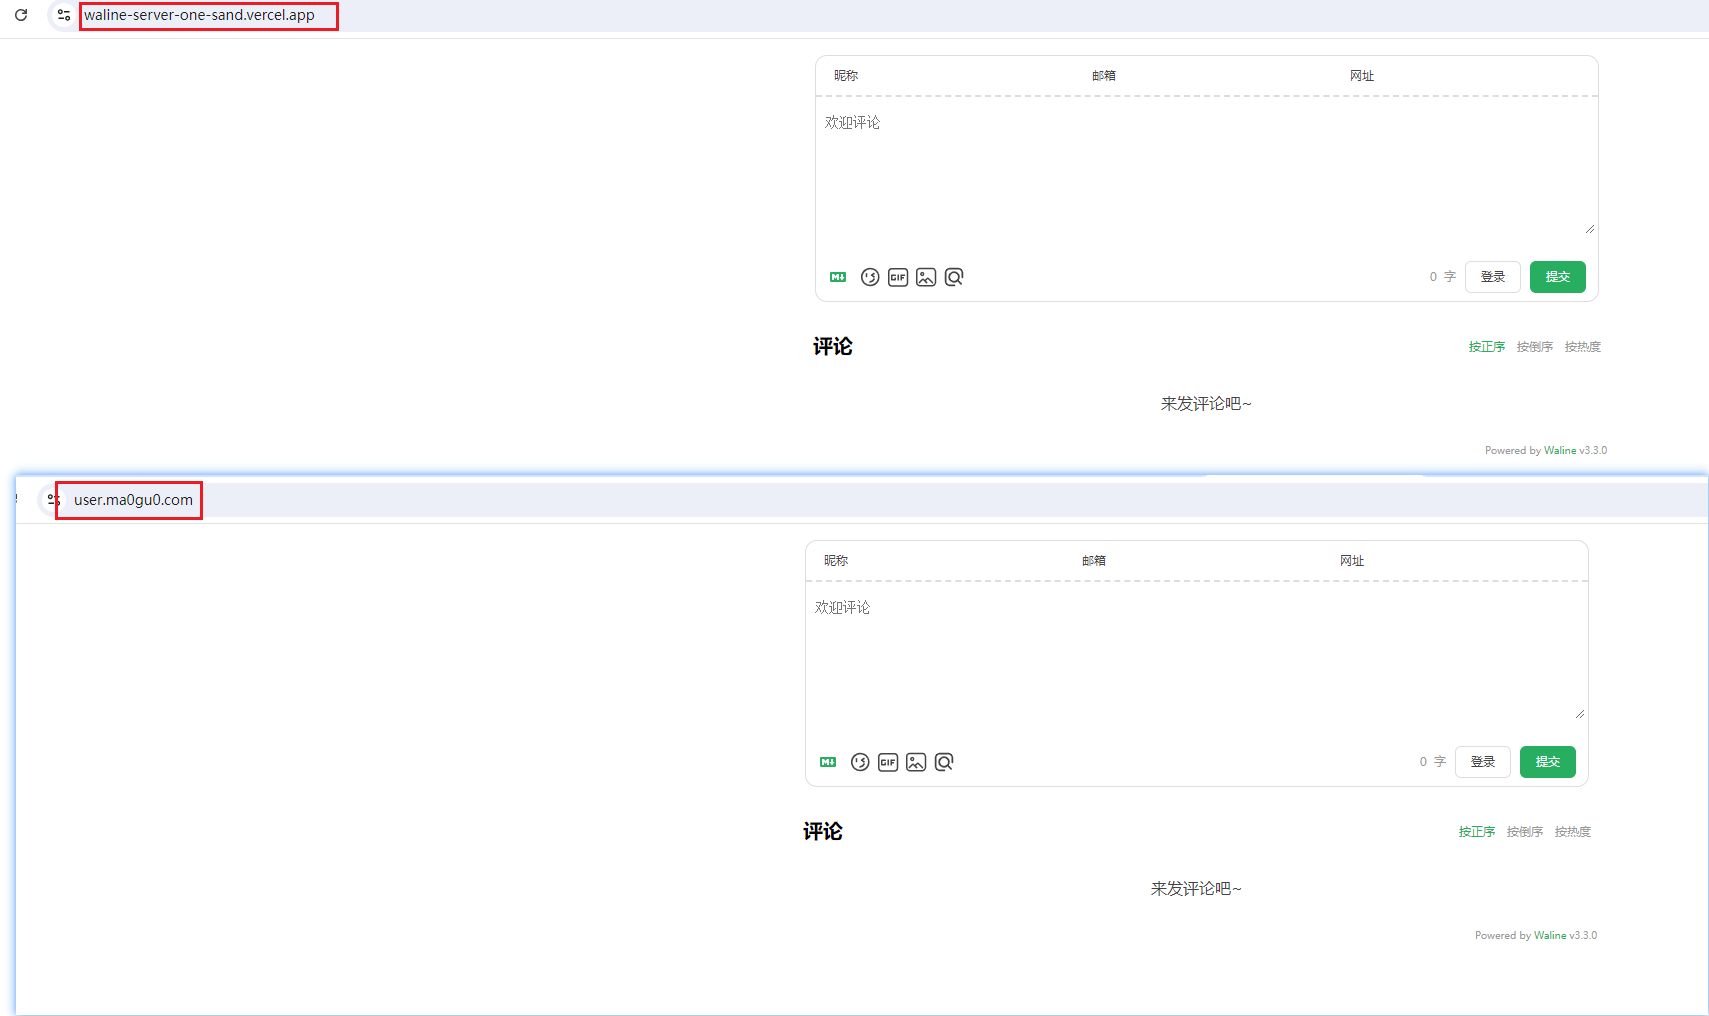
如上图,说明成功。
第六步:修改主题配置文件
1 | # Waline |
将serverURL从 waline-server-one-sand.vercel.app 改为 user.ma0gu0.com 即可。
第七步:发布
1 | hexo g |
第八步:通过未翻墙的软件,也可以看到评论,说明成功了。
总结:
user.ma0gu0.com —-cname—>cname.vercel-dns.com——cname—->user.ma0gu0.com
博客发布到Github Pages
备注:这个实际并没有做。
生成 SSH 添加到 Github
生成 SSH 添加到 Github ,连接 Github 与本地
右键桌面打开 Git Bash ,然后输入下面的命令:
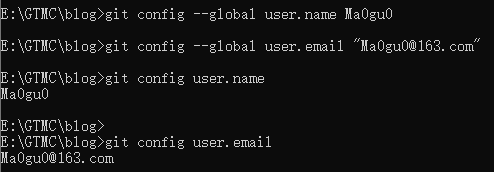
1 | git config --global user.name "yourname" |
注意:第一次使用 git 后需要将用户名和邮箱进行初始化
这里的 name 和 email 分别是 Github 的用户名和邮箱,根据自己的注册信息填写就可以了
1 | git config user.name |
可以用上面两条命令确认自己是否输入正确:
然后创建 SSH,一路回车即可
1 | ssh-keygen -t rsa -C "youremail" |
ssh,简单来讲,就是一个秘钥,其中,id_rsa是你这台电脑的私人秘钥,不能给别人看的,id_rsa.pub是公共秘钥,可以随便给别人看。把这个公钥放在GitHub上,这样当你链接GitHub自己的账户时,它就会根据公钥匹配你的私钥,当能够相互匹配时,才能够顺利的通过git上传你的文件到GitHub上。
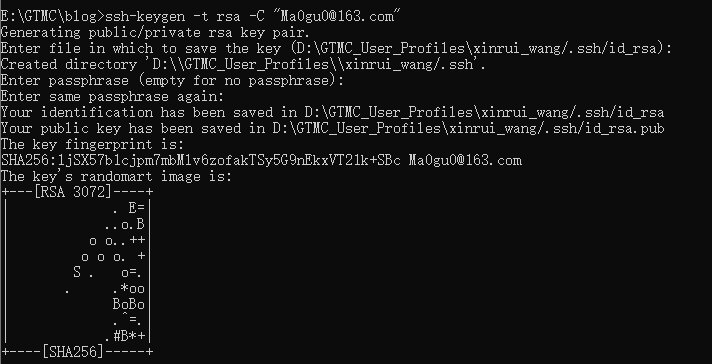
这个时候它会告诉你已经生成了.ssh的文件夹。在你的电脑中找到这个文件夹。
注意:这里我设置了passphrase for key。
将 id_rsa.pub 的内容复制好,挨个点击 Settings –> Deploy keys –> Add deploy key
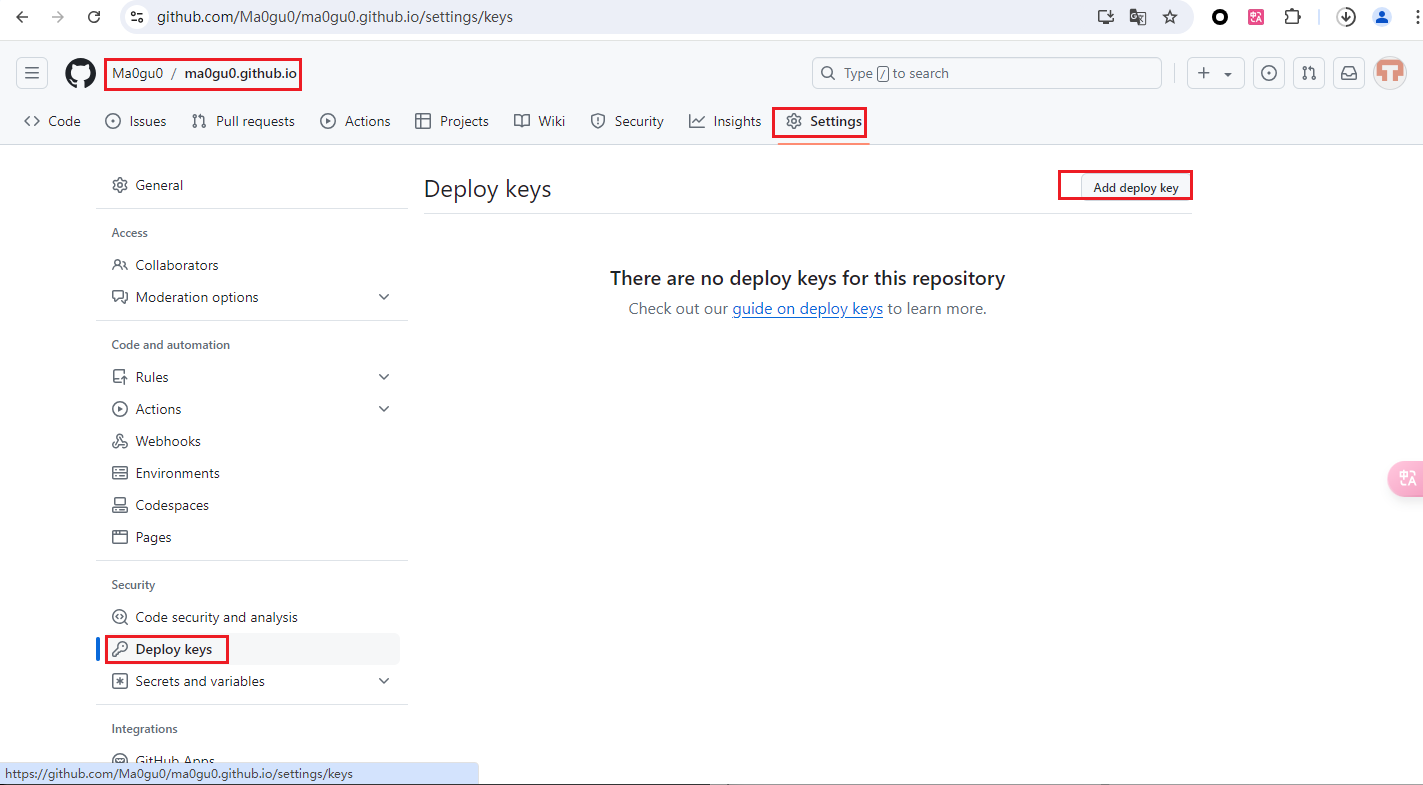
然后名字随便取一个就行,把 id_rsa.pub 的内容粘贴到 Key 中。
在 git bash 中输入 ssh -T [email protected] ,如果出现 Hi xxx/xxx.github.io! You've successfully authenticated,but Github does not provide shell access.即为设置成功
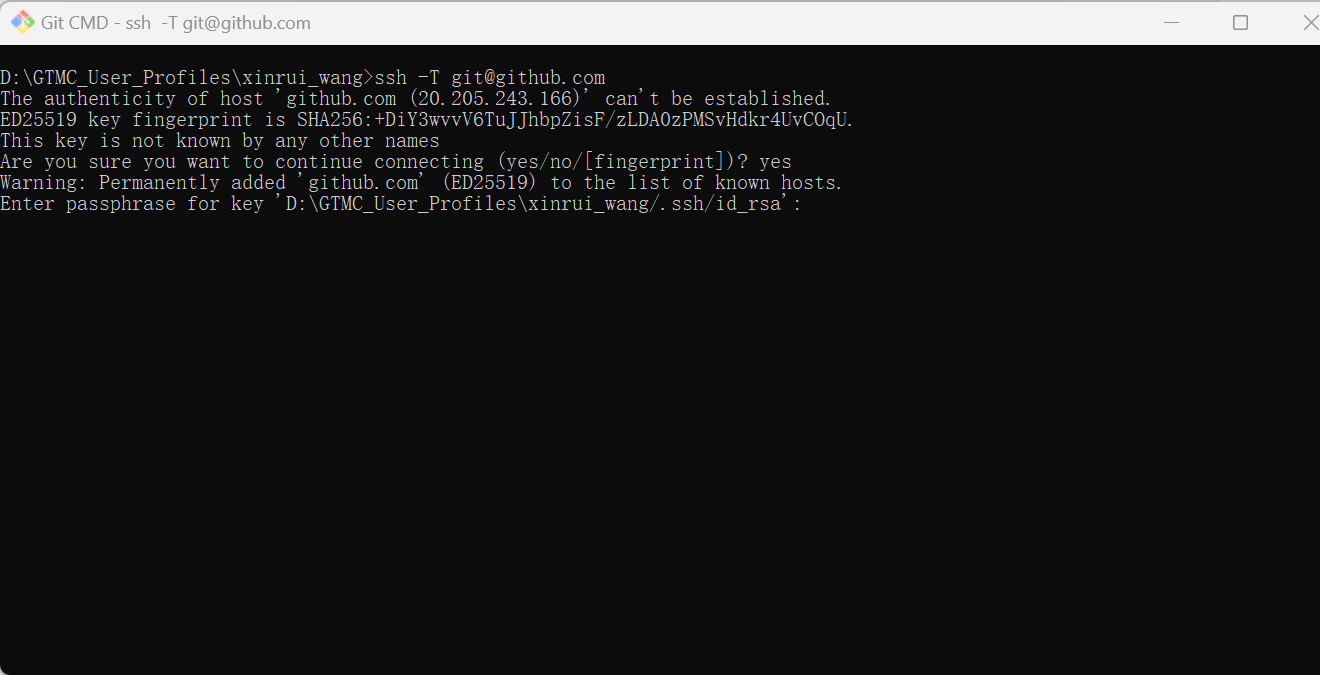

到这一步,本地的 Git 已经通过 SSH 和我的 GitHub 连接起来了。
将 Hexo 部署到 Github
到 GitHub 新建一个项目,项目名为:你的用户名.github.io 必须为这个名字
Hexo 目前没有自带 Git 部署模块,需手动安装(也就是部署到 Github 的命令,这样才可以使用命令行部署到 Github):
1 | > npm install hexo-deployer-git --save |
然后,在 站点配置文件 _config.yml 中设置 deploy 字段:
1 | # Deployment |
注意:这个respository的地址你在GitHub创建同名仓库后,会在页面中给出,直接复制即可。另外,
branch要设置为master分支。
将它修改为:
1 | # Deployment |
其中的 repository 修改为自己的 Github 仓库地址即可
1 | hexo clean |
即可发布到 Github
然后等待几分钟即可更新成功
接着去 http://yourname.github.io 这个网站即可看到你的博客